Affichage des articles dont le libellé est PinkFresh Studio. Afficher tous les articles

mardi 2 juin 2026

Floral Day Dream


Buongiorno creative, 
come state? 
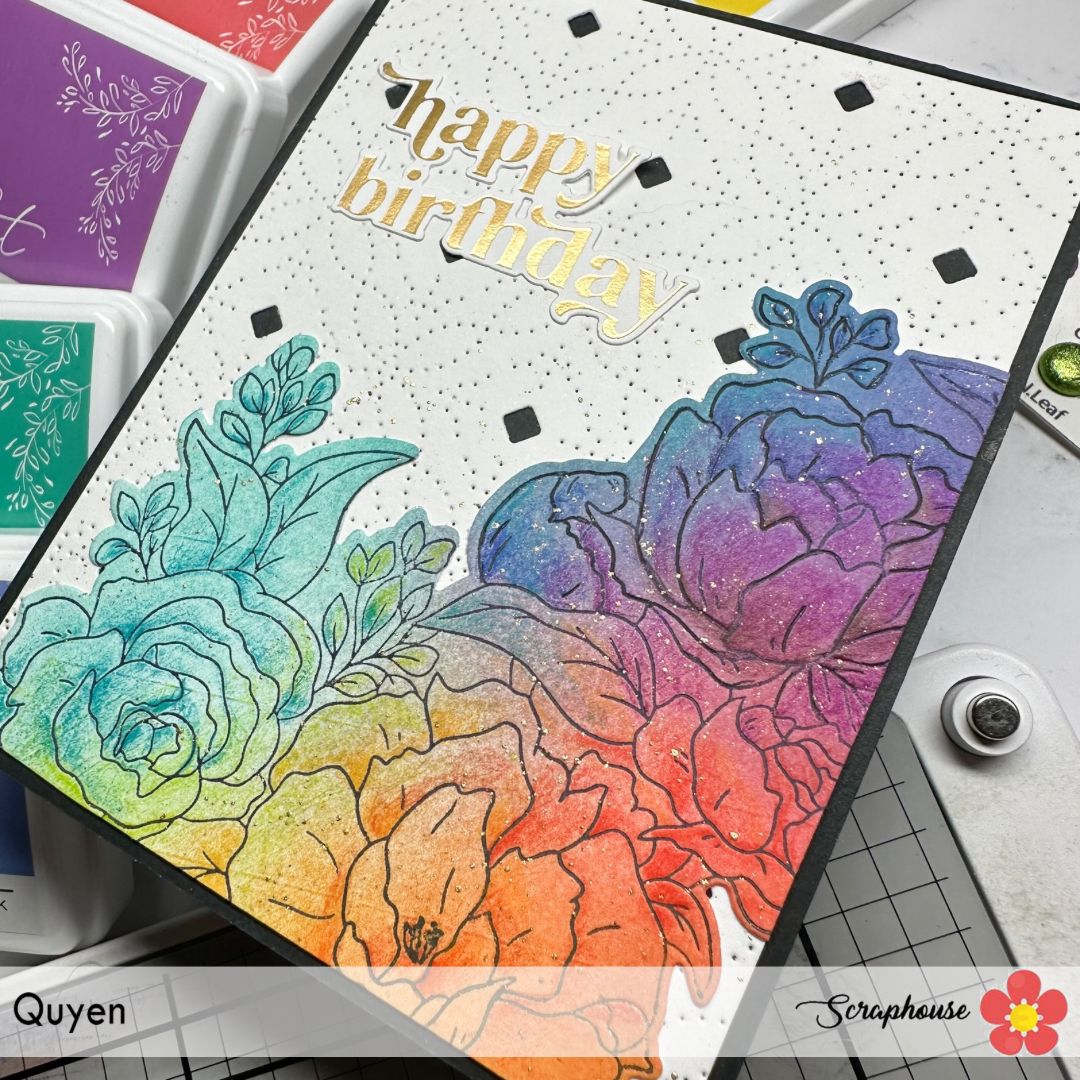
Questo caldo improvviso vi ha travolto? Devo dire che mi ha colto alla sprovvista, e di solito mi viene molta stanchezza quando é così caldo, ma nonostante tutto mi sono sentita super ispirata da questo set di Pinkfresh Studio Floral Day Dream che ho creato in diverse varianti , che vi mostrerò prossimamente su instagram. :D
Per adesso ecco qui la versione Green! Mi son divertita a giocare con diverse tonalità di verde ed ho colpo ispirazione dalle cards fatte dal design team di Pinkfresh.
Ho usato il timbro, stencil e fustella del set Floral day dream.
Ho colorato i fiori con 2 inchiostri verdi di Pinkfresh Studioevergreen e fresh pear, ed usando pressioni differenti con il blending tool, ho ottenuto sfumature differenti.
Per entrambi gli sfondi delle due cards ho usato i ritagli ottenuti dalla fustella di Spellbinders Infinity Punch&Pierce Plate. La card che vedete a destra invece ho aggiunto in più un cartoncino bianco embossato con un 3d embossing folder di Lisa Horton ed abbellito con il sentiment di Spellbinders Layered Happy Birthday etches dies.
Spero vi piacciano,
vi auguro una splendida giornata


Good morning, crafters, 
how are you? 
Has this sudden heatwave caught you off guard? I have to say it took me by surprise, and I usually get really tired when it’s this hot, but despite everything, I felt super inspired by this Pinkfresh Studio Floral Day Dream set, which I’ve created in several variations—I’ll be showing them to you soon on Instagram. :D
For now, here’s the Green version! I had fun playing with different shades of green and drew inspiration from the cards made by the Pinkfresh design team.
I used the stamp, stencil, and die from the Floral Day Dream set.
I colored the flowers with two green inks from Pinkfresh Studio, Evergreen and Fresh Pear, and by applying different pressures with the blending tool, I achieved various shades.
For the backgrounds of both cards, I used the cutouts from the Spellbinders Infinity Punch & Pierce Plate die. On the card you see on the right, I also added a white cardstock piece embossed with a 3D embossing folder by Lisa Horton and embellished with the sentiment from the Spellbinders Layered Happy Birthday Etches Dies.
I hope you like them,
have a wonderful day


Quyen


lundi 25 mai 2026

Garden Grace Pinkfresh Studio


Buongiorno creative,
come state? eccomi oggi qui sul blog di Scraphouse a mostrarvi questa card usando sempre quei meravigliosi Washi tape di Pinkfresh Studio.
Qui ho usato il set Garden Grace che comprende washi, fustella, timbro e stencil. Trovo che la resa del washi sia magnifica, mi piace davvero tanto, sicuramente proverò a realizzare con anche il timbro e lo stencil per cambiare colori.
Ma ora vi parlerò di come ho strutturato questa card. Ho cominciato fustellando la Cover plate die Stitched diamonds, che poi ho ritagliato a metà.  basandomi sulle misure di questi due rettangoli ho costruito cosi la base del cartoncino a "finestra".

Good morning, crafters,
How are you? I’m here today on the Scraphouse blog to show you this card, once again using those wonderful Washi tapes from Pinkfresh Studio.
Here I used the Garden Grace set, which includes washi tape, a die, a stamp, and a stencil. I think the washi tape looks absolutely stunning—I really love it. I’ll definitely try using the stamp and stencil too to experiment with different colors.
But now I’ll tell you how I put this card together. I started by die-cutting the Stitched Diamonds cover plate, which I then cut in half.  Using the measurements of these two rectangles, I built the base of the “window” card.


Visto che volevo assicurarmi che le due "ante" della mia card rimanessero chiuse, ho fissato una coppia di calamite la cerchio centrale della card (Fancy Circles) che ho fustellato 2 volte per poter poi coprire una delle due calamite, mentre la seconda calamita verra nascosta da uno dei pannelli rettangolari.

Since I wanted to make sure the two “flaps” of my card stayed closed, I attached a pair of magnets to the center circle of the card (Fancy Circles), which I die-cut twice so that I could cover one of the magnets, while the second magnet will be hidden by one of the rectangular panels.


Infine ho decorato con i fiori del Garden grade washi sia all'esterno della card e sia all'interno. Ho aggiunto dei sentiment foilizzati con la hot foil plate perfect sentiment. Cosa ne pensate, vi piace?
Vi auguro un buon inizio settimana
un abbraccio


Finally, I decorated both the outside and inside of the card with flowers made from Garden Grade washi tape. I added some foil-stamped sentiments using the Perfect Sentiment hot foil plate. What do you think? Do you like it?
Have a great start to the week!
Hugs

Quyen


dimanche 10 mai 2026

Whispering Daffodils Washi


Buongiorno anime creative!
come state? Innanzi tutto auguri a tutte le mamme! Dedico a tutte voi questa card floreale in onore di questa festività.
Ho usato la nuova collezione di Pinkfresh Studio Whispering Daffodils
Ho usato il Washi tape della collezione e fustellato i fiori con la loro fustella coordinata.
Per la composizione ho pensato che ci poteva stare con una cornice esagonale dorata che ho ricavato usando due fustelle di dimensioni diverse (una grande ed una più piccola ) del set Nested Hexagons. Ho usato ancora la fustella grande per ritagliare un esagono bianco che ho sfumato con il Distress Oxide Tattered rose, per usare come base dove incollare la cornicetta dorata.
Per rendere la card dinamica, ho deciso di usare la fustella Sparkling Diamonds, che gli da qual dettaglio in più alla card ma senza rubare la scena ai fiori. 
Infine ho aggiunto il sentiment che si trovava nel set di timbri coordinato ed ho aggiunto la scritta "mom" usando un timbro alfabeto della Lawnfawn.

Spero vi sia piaciuta, una splendida domenica.


Good morning, creative souls!
How are you all? First of all, happy Mother’s Day to all the moms out there! I’m dedicating this floral card to all of you in honor of this special day.
I used the new Whispering Daffodils collection from Pinkfresh Studio
I used the washi tape from the collection and die-cut the flowers with their matching die.
For the layout, I thought a gold hexagonal frame would work well, which I created using two dies of different sizes (one large and one smaller) from the Nested Hexagons set. I used the large die again to cut out a white hexagon that I distressed with Distress Oxide Tattered Rose, to use as a base for gluing the little gold frame onto.
To add some movement to the card, I decided to use the Sparkling Diamonds die, which adds that extra detail to the card without stealing the spotlight from the flowers.
Finally, I added the sentiment from the coordinating stamp set and added the word “mom” using a Lawnfawn alphabet stamp.
I hope you liked it—have a wonderful Sunday!


Go to the collection of Whispering Daffodils:

washi

dies

stamp

stencil


vendredi 20 mars 2026

Pinkfresh studio Fragrance notes

 Buongiorno card makers,
come state?
Oggi sono qui per mostrarvi queste due card usando i nuovi prodotti di Pinkfresh Studio.

 Good morning, card makers,
How are you?
Today I’m here to show you these two cards made with the new products from Pinkfresh Studio.


 Dal loro sito ufficiale potete ammirare la varietà di card che hanno creato con questo prodotti. Le cards del loro design team sono una più bella dell'altra. Ammetto che quando poi vedo così tante belle card poi un po' mi blocco perchè non vorrei creare qualcosa di "mio" senza farmi influenzare. Quindi ho deciso di fare svariati test su cartoncini di base di colori differenti, ed alla fine quello che mi é piaciuto di più era la combinazione con carta d'acquarello grigia della Canson.

I materiali che usato sono i seguenti:

- Pinkfresh Studio Fragrance notes press plate , Fragrance notes die  e Fragrance notes stencil.

- Distress Oxide Tattered rose, Saltwater taffy, Bundled sage, Speckled egg.


 On their official website, you can see the variety of cards they’ve created with these products. The cards designed by their design team are each more beautiful than the last. I admit that when I see so many beautiful cards, I get a little stuck because I don’t want to create something “of my own” without being influenced. So I decided to do several tests on different colored cardstock, and in the end, what I liked best was the combination with Canson gray watercolor paper.

The materials I used are as follows:

- Pinkfresh Studio Fragrance Notes press plate, Fragrance Notes die, and Fragrance Notes stencil.

- Distress Oxide Tattered Rose, Saltwater Taffy, Bundled Sage, Speckled Egg.


In questa prima card ho usato tutti i 4 Oxide con gli stencil sia per creare lo sfondo sia per colorare i fiori. Ho ritagliato un cerchio ed inserito delle pailettes per creare una shaker card e sullo sfondo dietro alla "finestran"ho sfumato su un cartoncino bianco l'oxide Tattered rose e Saltwater taffy.


For this first card, I used all four Oxide inks with stencils to create both the background and to color the flowers. I cut out a circle and added sequins to create a shaker card, and on the background behind the “window,” I blended Tattered Rose and Saltwater Taffy Oxide inks onto white cardstock.


Invece con la seconda card i fiori li ho colorati come la card precedente, ma lo sfondo invece ho usato solo Tattered rose e Saltwater taffy e poi creato degli schizzi di nero con l'inchiostro Raven di Spellbinders.
Spero vi siano piaciute queste card, vi auguro buona giornata e buon weekend!

For the second card, I colored the flowers the same way as on the previous card, but for the background I used only Tattered Rose and Saltwater Taffy, and then added some black splatters using Spellbinders Raven ink.
I hope you enjoyed these cards. Have a great day and a wonderful weekend!

Quyen


vendredi 23 janvier 2026

A Special Toast


Buona sera creative, come state? La mia prima card i quest'anno é a tema matrimonio! Lo scorso anno é uscita questa magnifica fustella di Spellbinders A special toast , ma essendo alle prese con le cards di natale, l'ho lasciata in disparte. Finalmente ho trovato l'occasione di usarla. Ho sempre un po'di difficoltà quando una fustella ha tanti piccoli dettagli perché non so mai che colori combinare insieme. In questo caso ho usato le carte base di Spellbinders per esser sicura che si abbinassero bene insieme. 
Ho scelto 3 verdi differenti per le foglie e in colori sul rosa-rosso per i fiori.
Invece per lo sfondo ho usato la hot foil plate di Pinkfresh studio LushVines con del foil dorato per dargli un tocco elegante alla card.
Spero vi piaccia,


Good evening, crafters, how are you? 
My first card this year is wedding-themed! Last year, Spellbinders released this magnificent die cut, A Special Toast, but since I was busy with Christmas cards, I left it aside. Finally, I found the opportunity to use it. I always have a little trouble when a die cut has lots of small details because I never know which colors to combine. In this case, I used Spellbinders base cards to make sure they would match well together. 
I chose three different greens for the leaves and pink-red colors for the flowers.
For the background, I used Pinkfresh Studio's LushVines hot foil plate with gold foil to give the card an elegant touch.
I hope you like it,

Quyen


mercredi 23 avril 2025

Beautiful soul - Pinkfresh Studio


Buongiorno creative!

come state? spero bene! Sono così felice di mostrarti questa card oggi perché ho usato il nuovo timbro di Pinkfresh studio Beautiful Soul, disegnato da Isha Gupta! Trovo i suoi design molto delicati e fini e sono cosi fiera di far parte del design team di Scraphouse insieme ad Isha!

Ho posizionato il timbro dei fiori su Sizzix stamp & spin tool per poter creare una ghirlanda. Il timbro dei fiori é composto da due rami, ed ho inchiostrato solo quello più corto e l'ho fatto roteare ottenendo il motivo come da foto. Poi ho timbrato al centro il sentiment ed il timbro Cercle eclatant di Florileges design con l'inchiostro per embossare a caldo per poter embossare la polvere Metallic gold rich di WOW embossing powders.


Good morning crafters!


how are you? hope well! I am so happy to show you this card today because I used the new Pinkfresh studio Beautiful Soul stamp, designed by Isha Gupta! I find her designs very delicate and fine and I am so proud to be part of the Scraphouse design team along with Isha!


I placed the flower stamp on Sizzix stamp & spin tool in order to create a garland. The flower stamp consists of two branches, and I inked only the shorter one and twirled it getting the pattern as pictured. Then I stamped in the center the sentiment and the Cercle eclatant stamp from Florileges Design with hot embossing ink in order to emboss the Metallic gold rich powder from WOW embossing powders.


A parte ho timbrato altri fiori con il Memento London fog e colorato con lo stencil abbinato , Beautiful soul stencil. Per i fiori ho usato gli inchiostri di Pinkfresh Studio Candy violet e Regal kiss, mentre le foglie e lo stelo con gli inchiostri di Altenew Lime e Reindeer Moss. Una volta colorato tutto ho proceduto a ritagliarmi con la fustella coordinata.

Un volta posizionato i rametti mi sembrava che mancasse qualcosa, quindi nei due angoli ho ritimbrato i rami e sfumato con i colori che ho usato per la composizione dei fiori.

Cosa ne pensate? vi piace il risultato? spero che anche voi amerete questo set come lo adorato io!

Vi auguro una splendida giornata


Separately I stamped more flowers with the memento London fog and colored with the matching stencil , Beautiful soul stencil. For the flowers I used Pinkfresh Studio Candy violet and Regal kiss inks, and the leaves and stem with Altenew Lime and Reindeer Moss inks. Once everything was colored, I proceeded to cut out with the coordinating die cut.

Once the sprigs were placed I felt like something was missing, so in the two corners I re-trimmed the branches and shaded with the colors I used for the flower arrangement.

What do you think? do you like the result? I hope you will love this set as much as I did!

Have a wonderful day


Quyen

vendredi 26 avril 2024

Breezy blossom


Buona sera creative!

spero che stiate bene! Oggi con molta gioia vi mostro questa card che ho creato con il set di Pinkfresh studio Breezy blossom che é stato disegnato dalla nostra cara Isha Gupta!!!!! è stata davvero bravissima! se siete curiosi nello shop ci son anche altri set disegnati da lei!:D
Ho da sempre avuto un debole per i fiori di cilegio, per cui son letteralmente impazzita quando ho visto questo design!

Good evening creative!

I hope you are well! Today with much joy I show you this card I created with the Pinkfresh studio Breezy blossom set that was designed by our dear Isha Gupta!!!!! she was really great! if you are curious in the shop there are also other sets designed by her!:D
I have always had a soft spot for cherry blossoms, so I literally went crazy when I saw this design!


Ho usato la press plate Breezy Blossom sia con la Betterpress sia con la Glimmer machine
Avevo fatto un sondaggio su IG ed la maggioranza ha votato il risultato con il foiling. Per cui come potete vedere da foto ho usato il foil oro e colorato i fiori con i Copic markers.


I have used the Breezy Blossom press plate with both the Betterpress and the Glimmer machine. I had done a poll on IG and the majority voted the result with foiling. So as you can see from photos I used the gold foil and colored the flowers with Copic markers.


In seguito ho voluto creare una cornice di fiori e mi son aiutata con la fustella Mini slimline di Pinkfresh come guida. Per richiamare l'oro presente nei fiori, ho colorato il bordo interiore della cornice con l'acquarello Pale gold di Spellbinders.

Next, I wanted to create a frame of flowers and helped myself with Pinkfresh's Mini slimline die cut as a guide. To echo the gold present in the flowers, I colored the inner edge of the frame with Spellbinders' Pale gold watercolor.


Ho incollato fiori e cornice su uno sfondo bianco ricavato dall' Ornate medallions coverplate die di Pinkfresh ed a sua volta su un rettangolo rosa dal Paper pad shades of pink di Studio Light.
Infine ho abbellito con un sentiment dal set You are everything sentiments press plate di Spellbinders.

Grazie per esser state qui in mia compagnia, 

buon weekend creativo a tutte


I glued flowers and frame onto a white background from the Ornate medallions coverplate die by Pinkfresh and in turn onto a pink rectangle from the Paper pad shades of pink by Studio Light. Finally I embellished with a sentiment from the You are everything sentiments press plate set by Spellbinders.

Thank you for being here in my company, 

have a great creative weekend everyone

Quyen


jeudi 11 avril 2024

Rainbow Camelias


 Ciao care creative, 
a chi non piacciono gli arcobaleni?
Oggi ho voluto creare una bella card colorata usando i prodotti di Pinkfresh Studio.
Ho cominciato a sfumare su un cartoncino d'acquarello i seguenti colori: sunshine, clementine, passion fruit, candy violet, slumber ed aquamarine.

Poi ho posizionato la Camellias press plate sulla mia Betterpress ed anche il mio cartoncino colorato. Purtroppo mi son accorta solo in quel momento di aver calcolato male la zona dove sarebbe impresso il fiore e la sfumatura l'avevo fatta dal lato opposto. Per fortuna la stampa é uscita bene lo stesso. Una volta impresso la mia Camelia, ho usato la fustella coordinata per ritagliarla dal cartoncino.

Ho incollato tutto su una basa bianca che ho ricavato con la Ornate Medallions cover plate die ed abbellito con un sentiment foilizzato d'oro.

Buon pomeriggio 


 Hello dear crafters, 
who doesn't like rainbows?

Today I wanted to create a beautiful colorful card using Pinkfresh Studio products.
I started by blending the following colors on a watercolor card: sunshine, clementine, passion fruit, candy violet, slumber and aquamarine.

Then I placed the Camellias press plate on my Betterpress and also my colored cardstock. Unfortunately, I only realized at that moment that I had miscalculated the area where the flower would be imprinted and the gradient I had done on the opposite side. Fortunately, the print came out fine anyway. Once my Camellia was imprinted, I used the coordinating die cut to cut it out of the cardstock.

I glued everything onto a white base that I cut out with the Ornate Medallions cover plate die and embellished with a gold foil stamped sentiment.
Good afternoon 

Quyen


dimanche 17 mars 2024

2 different ways to use Pinkfresh Studio Press plate


Buona sera care creative,

son cosi felice che son arrivate le novità di Pinkfresh Studio sullo shop di Scraphouse! che emozione!!! Per intanto stasera vi mostro questa card, dove ho usato la Floral Octagon Frame press plate in due modi differenti.


Good evening dear creatives,

I am so happy that  Pinkfresh Studio's new items  have arrived on the Scraphouse shop!!! What a thrill!!! In the meantime tonight I'll show you this card, where I used the Floral Octagon Frame press plate in two different ways.


Dapprima ho posizionato la mia press plate sulla BetterPress ed ho "embossato" sul cartoncino di acquarello della Betterpress. Mi piace molto l'effetto delicato che riusciamo ad ottenere con questa tecnica.

In seguito ho usato la press plate per foilizzarla in argento con la Hot foil machine. I fiori e le foglie le ho colorate con i seguenti copic markers: B0000, BG10, BG72, BG75, BG90. 

Ho aggiunto un sentiment sempre foilizzato d'argento dalla press plate Always and forever sentiment strips di Spellbinders su un cartoncino del paper pad di Studio Light Winter Sky che ho usato anche per lo sfondo della card.

Spero vi piaccia questa card, 

buona notte


First, I placed my press plate on the BetterPress and "embossed" on the Betterpress watercolor board. I really like the delicate effect we can achieve with this technique.

Later I used the press plate to foil it in silver with the Hot foil machine. I colored the flowers and leaves with the following copic markers: B0000, BG10, BG72, BG75, BG90. 

I added a silver foil always sentiment from the press plate Always and forever sentiment strips from Spellbinders on a paper pad card from Studio Light Winter Sky that I also used for the background of the card.

I hope you enjoy this card, 

good night


Quyen


mercredi 23 août 2023

Christmas foiling

 Buongiorno creative!

Con queste giornate caldissime, il Natale sembra un pensiero lontano! Oggi mi son divertita a giocare con la nuova hot foil plate di Spellbinders Holly Background. Mi piace molto come un bello sfondo si possa creare differenti card in maniera veloce. Parto mostrandovi il risultato finale per poi spiegarvi come le ho realizzate.

Good morning creative!

With these hot days, Christmas seems like a distant thought! Today I had fun playing with the new hot foil plate from Spellbinders Holly Background. I really like how a beautiful background can be created different cards quickly. I'll start by showing you the end result and then explain how I made them.


Ho cominciato ad usare la Holly background hot foil plate con diversi colori di foil su cartoncini di colori differenti. Dove ho foilizzato su carta bianca, ho colorato l'agrifoglio con i Copic, mentre su cartoncino colorato, in questo caso nero, l'ho lasciato "nature".

I started using the Holly background hot foil plate with different colors of foil on different colored cardstock. Where I foiled on white paper, I colored the holly with Copics, while on colored cardstock, in this case black, I left it "nature."


In seguito ho voluto usare anche la solid plate per poter usare i foil avanzati dalle precedenti sfondi , ottenendo un risultato differente.

In seguito ho voluto usare anche la solid plate per poter usare i foil avanzati dalle precedenti sfondi , ottenendo un risultato differente.


Infine ho abbellito questi sfondi con delle mattature rosse e/o verdi e aggiungendo dei sentimenti delle plate di Lawn fawn e di Pinkfresh studio.

Finally, I embellished these backgrounds with red and/or green matting and adding sentiments from Lawn fawn plates and Pinkfresh studio.


Cosa ne pensate? Spero vi siano piaciute queste cards!
Ci sentiamo al prossimo post!
Gioiosa giornata a tutte

What do you think? I hope you enjoyed these cards!
Talk to you in the next post!
Joyful day to all

Quyen


mercredi 2 août 2023

3D Embossing folder

 Salve carissime,

oggi vi mostro una card semplice semplice ma di grande effetto!
materiale necessario:
- embossing folder 3d ( io ho usato Beautiful butterflies 3d embossing folder di Spellbinders)
-carta acquarello ( ho usato quella della Florence)
- distress ink reinkers ( ho usato scattered straw, picked raspberry, mermaid lagoon)
- embossing powders + ink for embossing powders ( ho usato wow Metallic gold sparkle)
- gold ink pad ( ho usato versa color gold)
- pennarello nero

Hello darlings,

today I show you a simple simple but impressive card!
materials needed:
- 3d embossing folder ( I used Beautiful butterflies 3d embossing folder from Spellbinders)
-watercolor paper ( i used the one from Florence)
- distress ink reinkers ( I used scattered straw, picked raspberry, mermaid lagoon)
- embossing powders + ink for embossing powders ( I used wow Metallic gold sparkle)
- gold ink pads ( I used versa color gold)
- black pen


Ho cominciato colorando la carta con i miei 3 inchiostri, mettendo il colore a casaccio e sfumandoli tra di loro. Una volta che lo sfondo era asciutto, l'ho embossato con la placca della Spellbinders. 
Ho passato sulla parte in rilievo il tampone dorato, aspettato che l'inchiostro fosse asciutto e poi ho passato il tampone versamark per le polveri da embossing e poi buttato la polvere della WOW. Ho rimosso con un pennellino d'acquarello pulito ogni eccesso di povere nei punti dove non volevo che ci fosse. 
Per creare lo sfondo nero invece ho colorato con un semplice pennarellino nero tutte le parti che non erano in rilievo.
Spero che vi piaccia, buona serata

I started by coloring the paper with my 3 inks, putting color randomly and blending them together. Once the background was dry, I embossed it with the Spellbinders plate. 
I swabbed the embossed part with the gold pad, waited until the ink was dry, and then swabbed the versamark pad for the embossing powders and then tossed in the WOW powder. I removed with a clean watercolor brush any excess powder in places where I didn't want it to be. 
To create the black background instead, I colored with a simple black marker all the parts that were not embossed.
I hope you like it, have a good evening

Quyen


dimanche 11 juin 2023

Happy Birthday card

 Buona sera creative! 

Spero di trovarvi bene! Stasera voglio parlarvi delle card di compleanno! chi di voi si é ritrovata all'ultimo a dover preparare un biglietto di compleanno, alzi la mano! :D io sono una tra queste! Ho marcato sul calendario le date dei compleanni, ma poi capita sempre non contando le tempistiche di spedizione, di arrivare all'ultimo a preparare la card. Quindi oggi vi voglio proporre una soluzione veloce per fare al volo una card.

Good evening creative! 

I hope to find you well! Tonight I want to talk to you about birthday cards! those of you who have found yourselves at the last minute having to prepare a birthday card, raise your hands! :D I am one of them! I have marked on the calendar the dates of birthdays, but then it always happens not counting the timing of shipping, to arrive at the last to prepare the card. So today I want to propose a quick solution to make a card on the fly.


Per lo sfondo ho usato l'embossing folder di Spellbinders Orange peel quilt, un cartoncino sfumato lilla dal pad di Studio Light White fade ed una mattatura viola più scuro dal pad Spooky colors.
In seguito ho usato la plate Just for you e colorato fiori e foglie con i Copics.
Ho voluto incorniciare il fiore con l'esagono hot foil plate di Pinkfresh Studio Nested Hexagons ed infine un sentiment sempre di Pinkfresh Studio Perfect Sentiments hot foil plate.
Spero vi piaccia!
Buona serata 
un abbraccio

For the background I used the Spellbinders Orange peel quilt embossing folder, a lilac shaded cardstock from the Studio Light White fade pad and a darker purple matting from the Spooky colors pad.
Next I used the Just for You plate and colored flowers and leaves with Copics.
I wanted to frame the flower with the Pinkfresh Studio Nested Hexagons hot foil plate and finally a sentiment also from Pinkfresh Studio Perfect Sentiments hot foil plate.
I hope you enjoy it!
Have a great evening 
a hug

Quyen


samedi 28 janvier 2023

Yana's Bloom


 Buongiorno carissime,
come state? son felicissima di mostrarvi queste due card che ho fatto con i prodotti di Spellbinders!


 Good morning dears,
how are you? i am so happy to show you these two cards i made with Spellbinders products!


Di questa collezione Yana's Bloom il fiore della magnolia esiste sia nella versione foil sia fustella classica. Ero indecisa su che tipologia di card fare e alla fine ho deciso di usare entrambi i prodotti!
Ho cominciato con Magnolia Glimmer Hot Foil Plate & die set abbinando un foil oro dal Glimmer hor foil roll Metallics variety pack. Ho foilizzato due volte il fiore su un cartoncino rosa chiaro dal pad Pastels di StudioLight, ritagliato e poi colorato con il Distress ink Victorian Velvet. In seguito ho foilizzato più volto la Magnolia sul cartoncino che ho ritagliato come base per la mia cars. Ho aggiunto le magnolie colorate con del biadesivo spessorato per dare un po' di dimensione alla card. Infine ho aggiunto il sentiment Thanks dal set Yana's Layered script sentimen etched dies e delle mezze perle dorate di Pinkfresh studio.


From this Yana's Bloom collection, the magnolia flower exists in both foil and classic die cut versions. I was undecided on what type of card to make and finally decided to use both products!
I started with Magnolia Glimmer Hot Foil Plate & die set by matching a gold foil from the Glimmer hor foil roll Metallics variety pack. I foiled the flower twice on a light pink cardstock from StudioLight's Pastels pad, cut out and then colored with Distress ink Victorian Velvet. Next, I foil stamped more face Magnolia onto the cardstock that I cut out as a base for my cars. I added the colored magnolias with thick double-sided tape to give the card some dimension. Finally I added the sentiment Thanks from Yana's Layered script sentimen etched dies set and some gold half pearls from Pinkfresh studio.


Per questa seconda card ho usato la fustella Magnolia Blooms Etched Dies, ho fustellato il fiore con un cartoncino lilla  , colorato il centro con il Distress ink Seedless preserves, rifustellato il fiore per ottenere il bordo dorato e la base in vellum. Per la base della mia card ho usato la Spellbinders Hot Foil Plate Diagonal Stripes Background ed ho aggiunto il sentiment da Hello, Friend SentimentsGlimmer Hot Foil Plate. 

Spero vi piacciano e che vi invogliano a provare la Hot foil Glimmer Machine!
Buon weekend!

For this second card I used Magnolia Blooms Etched Dies, die-cut the flower with a lilac cardstock , colored the center with Distress ink Seedless preserves, re-cut the flower to get the gold border and the vellum base. For the base of my card I used Spellbinders Hot Foil Plate Diagonal Stripes Background and added the sentiment from Hello, Friend SentimentsGlimmer Hot Foil Plate. 
I hope you enjoy them and that they will entice you to try the Hot foil Glimmer Machine!
Have a great weekend!
Quyen


samedi 10 décembre 2022

Best Wishes


Buongiorno creative, 

non vado matta per le fustelle perché non mi piace incollare i piccoli ritagli, ma oggi ho voluto sperimentare qualcosa di nuovo. Ho usato la fustella di Les ateliers de Karine Enveloppe Fleurie, per creare la busta e i rametti che escono da essa, insieme alla bimba di All And Create Happy mail 819 sfondo di questa card l'ho realizzata usando lo stencil Les Flocons della SOKAI su carta kraft con il distress oxide vintage photo. Il sentiment Best Wishes invece di Pinkfresh Classic words die set.


Good morning creative, 

I'm not crazy about die-cuts because I don't like to glue little cutouts, but today I wanted to experiment with something new. I used the die cut from Les ateliers de Karine Enveloppe Fleurie, to create the envelope and the sprigs coming out of it, along with the little girl from All And Create Happy mail 819 background of this card I made it using the Les Flocons stencil from SOKAI on kraft paper with the distress oxide vintage photo. The Best Wishes sentiment is from Pinkfresh Classic words die set.


have a nice day

Quyen