Bonjour!
Hello!
Je vous ai parlé de la Silhouette Curio, mais une autre machine est apparue sur le marché il y a quelques temps: c'est la Silhouette Mint. Cette machine vous permet de créer vos propres tampons. Génial, non? Vous la trouverez en boutique. Suivez-moi pour ce nouveau tutoriel.
I have told you about the Silhouette Curio, but another machine has appeared on the market these last months: the Silhouette Mint. This machine enables you to create yourr own stamps. Great, isn't it? You can find it in the shop. Stay with me for this new tutorial.
Ich habe euch die Silhouette Curio gezeigt, aber eine neue Maschine ist den letzten Monaten auf dem Markt gekommen: die Silhouette Mint. Diese Maschine gibt euch die Möglichkeit, eure eigene Stempel zu erstellen. Genial, oder? Ihr findet sie im Shop. Ich beschreibe sie in diesem neuen Tutorial.
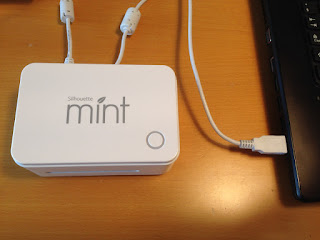
La Silhouette Mint est toute petite, elle ne prend donc pas beaucoup de place sur votre bureau. C'est un avantage.
The Silhouette Mint is very small, it takes up almost no desk space. A plus.
Die Silhouette Mint ist sehr klein, sie braucht sehr wenig Platz auf eurem Schreibtisch. Ein Vorteil.
Comme la Silhouette Cameo ou Curio, la Mint est très facile à brancher. C'est une machine plug and play. Branchez la prise et le port USB et lancez le programme Mint Studio et c'est déjà prêt.
Like the Cameo or the Curio, the Mint is very easy to plug. It is a plug and play machine. Plug the power and USB cords and open Mint Studio and it's all set.
Wie die Silhouette Cameo oder Curio, ist die Mint sehr einfach anzuschliessen. Es ist eine Plug and Play Maschine. Steckt einfach das Stromkabel und das USB-Kabel ein und öffnet Mint Studio. Das ist schon alles.
Le programme Mint Studio est différent de Silhouette Studio. On retrouve la plupart des fonctions, mais il y en a moins. De manière générale, Mint Studio est facile d'utilisation.
The Mint Studio is different from the Silhouette Studio. Many of functions are the same, although there are fewer in Mint Studio. In general, Mint Studio is easy to use.
Mint Studio ist anders als Silhouette Studio. Die meisten Funktionen sind gleich, aber es gibt insgesamt weniger Funktionen in Mint Studio. Mint Studio ist einfach zu bedienen.
Pour mon exemple, j'ai choisi un motif de la bibliothèque. Il faut encore choisir la taille du tampon à imprimer sous Paramètres de tampon.
For this example, I have chosen a design from the library. Select the stamp size you want to print under Stamp Settings.
Für dieses Beispiel habe ich ein Motiv aus der Bibliothek verwendet. Ihr müsst noch die Grösse des Stempels unter Stempel-Einstellungen auswählen.
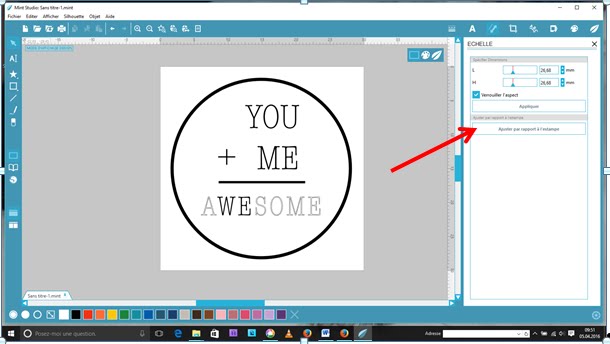
Vous pouvez ajuster automatiquement la taille du design au tampon en allant sous Echelle et cliquer sur Ajuster par rapport à l'estampe.
You can resize automatically the design to fit the stamp size by clicking Scale and Adjust.
Ihr könnt das Motiv automatisch an der Grösse des Stempels anpassen indem ihr Skala und Anpassen anklickt.
Une fois que votre motif est prêt, allumez votre Mint et pressez sur l'icône en forme de feuille tout à droite. Le motif apparaît retourné et c'est normal. Cliquez sur Lancer Mint et insérez votre tampon dans la machine.
Once you are happy with the design, start your Mint
and press the icon on the right resembling a leaf. The design will appear mirrored, which is normal. Click on Send to Mint and insert your stamp in the machine.
Sobald das Motiv bereit ist, startet ihr die Mint
und drückt auf das Icon in Form eines Blattes auf der rechten Seite . Das Motiv wird spiegelverkehrt
dargestellt, das ist normal. Klicht auf An Mint senden und führt den Stempel in die Maschine ein.
L'impression ne prend que quelques secondes.
It takes a few seconds to print.
Der Druckvorgang dauert einige Sekunden.
Appliquez ensuite l'encre de la couleur de votre choix sur le motif et patientez environ 10 minutes.
Apply the color of ink of your choice to the design and wait around 10 minutes.
Verseht das Motiv mit der Tintenfarbe eurer Wahl und wartet dann ungefähr 10 Minuten.
Prenez une feuille de papier brouillon pour tamponner plusieurs fois pour enlever l'excédent d'encre.
Take a sheet of draft paper and stamp a few times in order to get rid of the superfluous ink.
Nehmt ein Sudelpapier und stempelt einige Male, um die überflüssige Tinte loszuwerden.
Et voilà, votre tampon est prêt.
Your stamp is now ready.
Damit ist der Stempel einsatzbereit.
Encore quelques informations: la Mint est livrée avec 2 tampons et 4 couleurs d'encres. Il existe actuellement d'autres couleurs et je vous conseille d'acheter plusieurs tampons pour toujours en avoir en réserve.
Some more information: The Mint comes with 2 stamps and 4 different color inks. There are other colors available and I recommend to get a few more spare stamps.
Zusatzinfos: Die Mint kommt mit 2 Stempeln und 4 Tintenfarben. Man kann noch andere Farben kaufen und ich empfehle, einige zusätzliche Stempel auf Vorrat anzuschaffen.
J'espère que ce tuto vous sera utile.
I hope that you found this useful.
Ich hoffe, dass Ihr das Tutorial nützlich findet.
A bientôt


