Affichage des articles dont le libellé est Distress Ink. Afficher tous les articles

vendredi 21 février 2025

Playing with distress reinkers


Buongiorno creative,

anche stavolta vi mostro una card usando l'embossing folder Blooming butterfly di Spellbinders, ma utilizzando la parte floreale. Ho usato un pezzo di vellum ed una volta embossato ho colorato con l'inchiostro rose gold di altenew e uno nero le parti in rilievo.


Good morning creative,

once again I show you a card using the


from Spellbinders, but using the floral part. I used a piece of vellum and once embossed I colored the embossed parts with altenew's rose gold ink and a black one.


In seguito usando un cartoncino d'acquarello, con un pennello ho bagnato la carta e poi lasciato scivolare una goccia di colore del Distress ink reinker in modo da far colare il colore per tutto il cartoncino. Ho ripetuto questo passaggio con i colori: dried marigold ,  squeezed lemonade, shabby shutters, peacock feathers, wilted violet, seedless preserves and picked raspberry.

Next using a watercolor card, I wet the paper with a brush and then let a drop of color from the Distress ink reinker slide in so that the color ran all over the card. I repeated this step with the colors: dried marigold , squeezed lemonade, shabby shutters, peacock feathers, wilted violet, seedless preserves and picked raspberry.


Per completare la mia card ho incollato il vellum , timbrato un sentiment dal set Crafty life stamp di Altenew ed incollato una farfalla di Spellbinders.
Spero vi piaccia, vi auguro una splendida giornata.

o complete my card I glued the vellum , stamped a sentiment from Altenew's Crafty life stamp set and glued a butterfly from Spellbinders.
I hope you like it, have a wonderful day.

Quyen


lundi 26 février 2024

Spellbinders Cosmos bundle

 Buona sera creative!

volevo mostrarvi questo bellissimo bundle di Spellbinders Cosmos backdrop, é una press plate in combinazione dello stencil. Ho voluto sperimentare diversi medium per la colorazione di questo sfondo. Dapprima ho usato la press plate per foilizzare con la hot foil glimmer con un foil dorato su 2 cartoncini d'acquarello per la better press e su un cartoncino bianco liscio.

Good evening creative!

I wanted to show you this beautiful bundle of Spellbinders Cosmos backdrop, it is a press plate in combination of the stencil. I wanted to experiment with different mediums for coloring this backdrop. First I used the press plate to foil with hot foil glimmer with a gold foil on 2 watercolor cards for the better press and on a plain white cardstock.


Su un cartoncino d'acquarello ho usato lo stencil insieme  i distress ink mentre il secondo sfondo l 'ho colorato con acquarelli e matite colorate. 

On a watercolor board I used the stencil together distress inks while the second background I colored with watercolors and colored pencils.


L'ultima versione invece l'ho colorata usando i Copic marker.

Per completare le cards ho usato i sentiment sempre da una press plate You are everything sentiments.


The last version, on the other hand, I colored using Copic markers.

To complete the cards I used sentiments again from a press plate You are everything sentiments.


Mi son divertita molto a giocare con questi diversi medium, anche se ho trovato un po' di difficoltà con gli acquarelli ed il risultato finale non mi é piaciuto molto.  Voi cosa ne pensate? vi piace provare diverse colorazioni?

buona serata 

I had a lot of fun playing with these different mediums, although I found some difficulty with the watercolors and didn't like the end result very much.  What do you guys think, do you like to try different colorings?

have a good evening

                                                                                    Quyen

mercredi 13 décembre 2023

Foiling with Betterpress plate

Hellooooo!
spero di trovarvi bene!
Quando é uscita la Betterpress ho visto tantissimi video sul loro utilizzo ed anche che le plate per Betterpress potevano esser usate con la hot foil glimmer machine. Ho sempre voluto provare e finalmente ho trovato l'occasione per farlo! Cosa ne pensate? Il risultato mi sembra davvero bello!
Ho quindi usato la press plate Season's Greetings Evergreens con il foil Aura su un cartoncino verde del pad  Studio Light Magical ChristmasHo voluto intensificare il verde, sfumando il Distress ink Forest moss e ai bordi un po' di Black soot, poi ho usato un cartoncino iridiscente oro di Studio Tonic.

Hellooooo!
I hope to find you well!
When Betterpress came out I saw so many videos about their use and also that the plates for Betterpress could be used with the hot foil glimmer machine. I've always wanted to try it and finally got the chance to do it! What do you guys think about it? The result looks really good to me!
So I used Season's Greetings Evergreens press plate with Aura foil on a green cardstock from the pad Studio Light Magical Christmas.  I wanted to intensify the green by blending Distress ink Forest moss and at the edges some Black soot, then I used a gold iridiscent cardstock from Studio Tonic.


Come elemento principale ho colorato l'orsetto polare di MFT North pole pals con i copic markers ed embossato a caldo il sentiment della stessa plancia con la polvere della WOW Polish gold super fine.

As the main element I colored the polar bear from MFT North pole pals with copic markers and hot embossed the sentiment of the same plank with WOW Polish gold super fine powder.

Voila card finita! Cosa ne pensate? Spero vi sia piaciuta!
buona serata 


Voila finished card! What do you guys think of it? Hope you enjoyed it!
have a nice evening 

Quyen


jeudi 24 août 2023

Lawfawn's winter 2023 release

 Buona sera creative!

siete felici che oggi sia uscita la nuova release della Lawnfawn? Per l'occasione ho creato questa card usando la fustella Spooky forest Backdrop ed un cartoncino di carta d'acquarello ed ho colorato gli alberi con il distress ink vintage photo, cercando di lasciare un po' di bianco sui rami per creare l'effetto neve. Inoltre con la fustella Slimline stitched hillside borders ho creato delle collinette di neve dietro allo scenario. Per lo sfondo ho sfumato i distress ink mermaid lagoon, chipped sapphire e black soot e usato lo Snow Flurries Background Stencil con la pasta stencil paste white. Per incorniciare la card ho usato un cartoncino nero e la fustella Stitched Rectangle Frames.

Good evening creative!

Are you happy that the new Lawnfawn release is out today? For the occasion, I created this card using the Spooky forest Backdrop die and a watercolor paper cardstock and colored the trees with Distress Ink vintage photo, trying to leave some white on the branches to create the snow effect. Also with the Slimline die cut stitched hillside borders I created snow hillocks behind the scenery. For the background I blended the distress inks mermaid lagoon, chipped sapphire and black soot and used the Snow Flurries Background Stencil with stencil paste white. To frame the card I used black cardstock and the Stitched Rectangle Frames die cut.


Passiamo alla colorazione con i Copic, per questa scena ho voluto che i protagonisti fossero i due topini che si baciano sotto al vischio(Christmas before and afters) mentre l'altro trio di topolini son nascosti a  spiarli (Hay there hayrides mice add on).

Per completare la card ho aggiunto il sentiment let it snow dalla foil plate  Winter Big Scripty Words ed il sentiment "meet me under the mistletoe" incluso nella plancia Christmas before 'n afters.

Spero che vi piaccia e vi auguro di creare tante nelle card con queste novità!

Buona serata !


Let's move on to coloring with Copics, for this scene I wanted the main characters to be the two mice kissing under the mistletoe(Christmas before and afters) while the other trio of mice are hiding spying on them(Hay there hayrides mice add on).

To complete the card I added the let it snow sentiment from the Winter Big Scripty Words foil plate and the "meet me under the mistletoe" sentiment included in the Christmas before 'n afters stamp set.

I hope you enjoy it and wish you many in the cards with these new release!


Good evening !

Quyen


samedi 8 juillet 2023

Ready to Be Impressed?

Buona sera creative, 

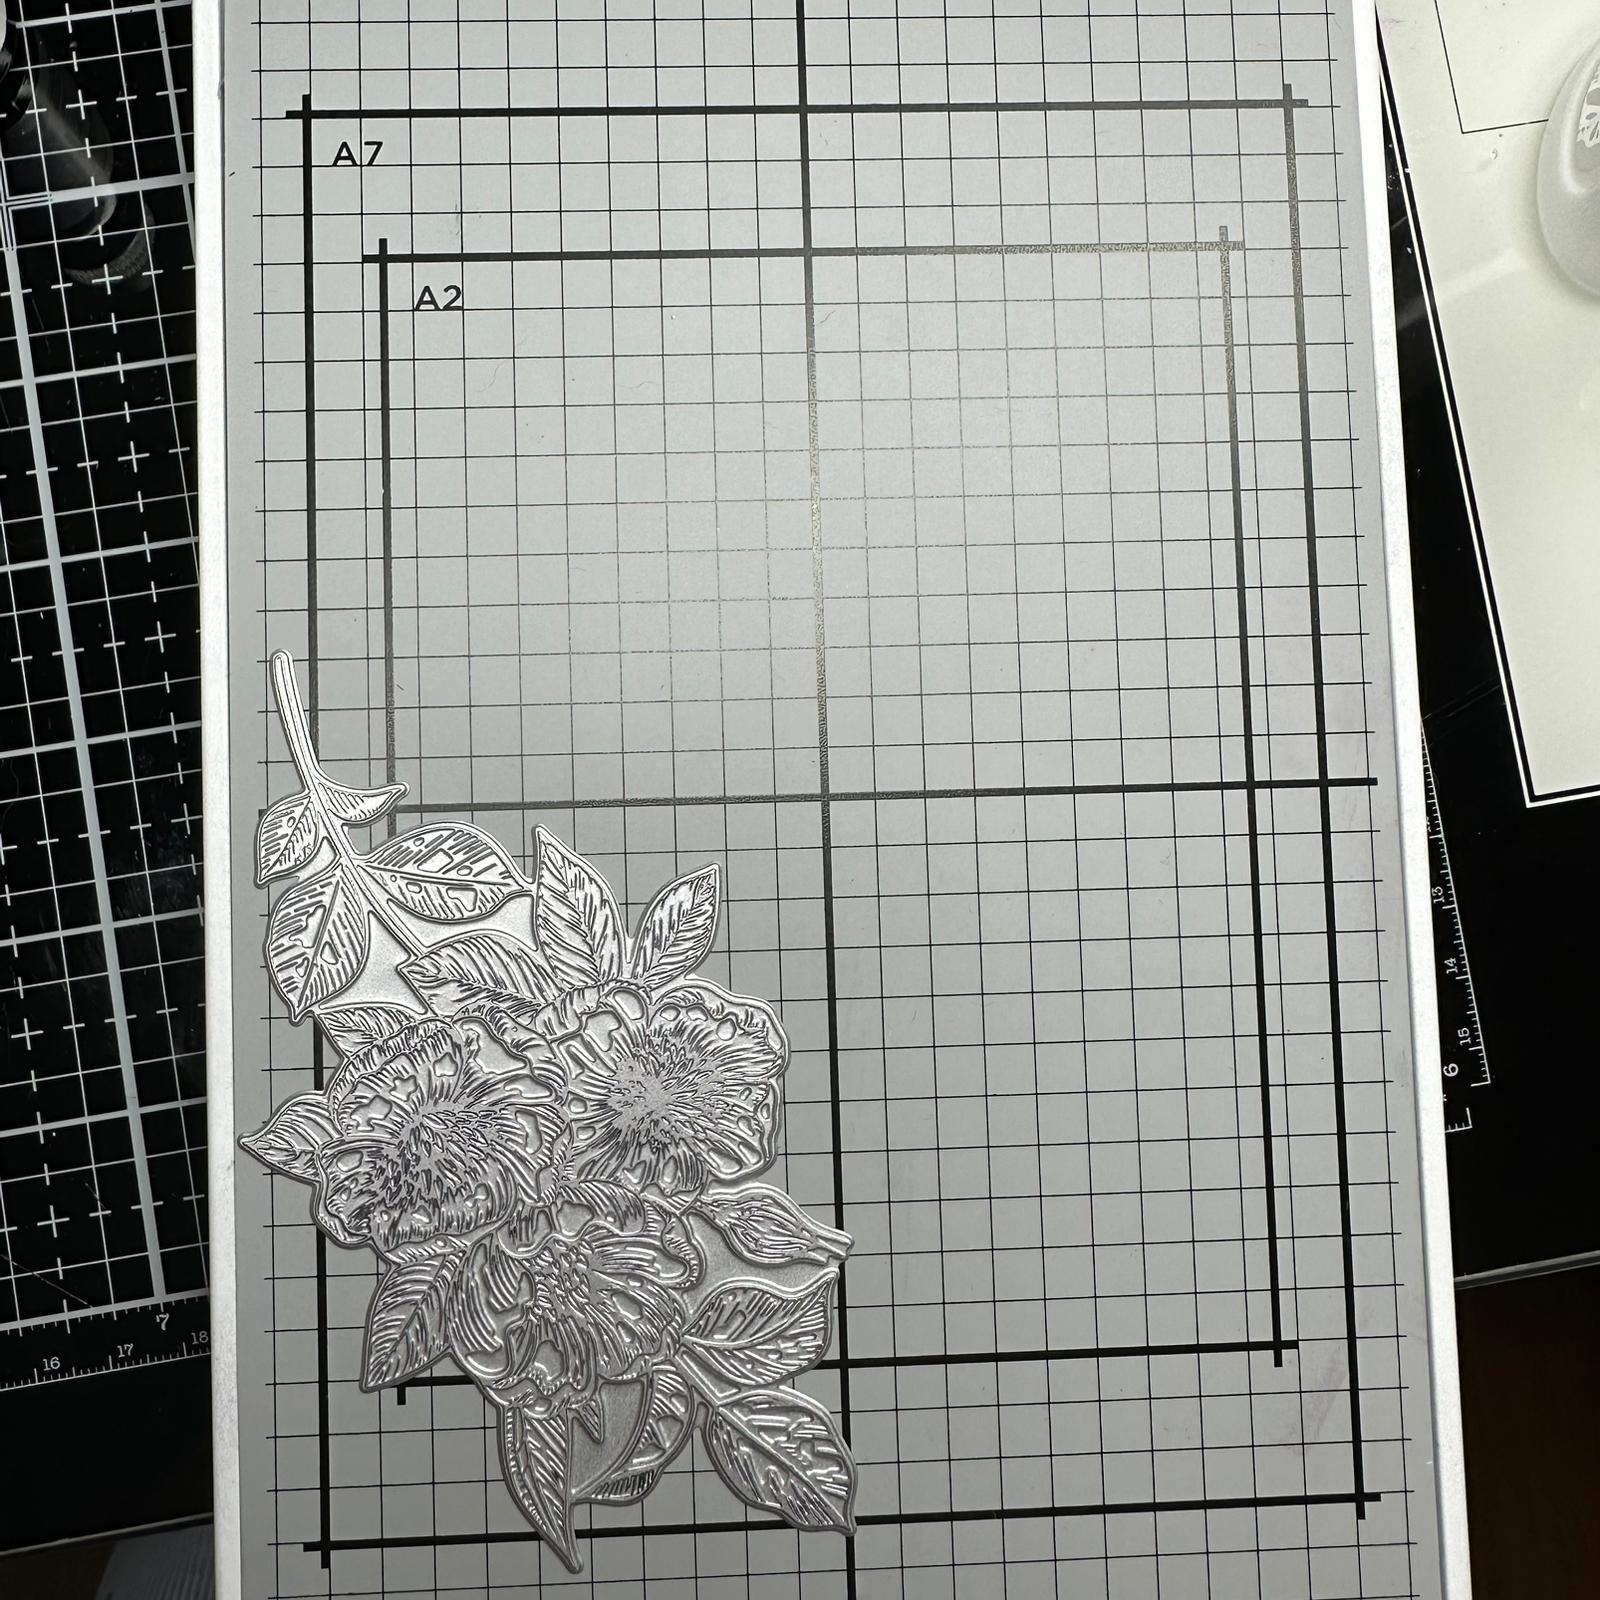
avete visto anche voi la novità dell'anno di Spellbinders? La Betterpress!!!Da ora é disponibile anche nello shop di Scraphouse!!!Evvivaaaa!!! Ad esser sincera all'inizio ero indecisa sull'acquisto, avevo guardato diversi video di dimostrazione, ed alla fine spinta dalla curiosità di provarla , l'ho acquistata! Cosa posso dire? Innanzi tutto é facilissima da usare ed é compatibile con la mia Big shot :D , grazie alle griglie e linee guida, é molto semplice capire dove voler posizionar gli elementi sulla card. Insieme alla Betterpress, c'é un kit di partenza: cartoncini in cotone per acquarello, un tape, una plate e un'inchiostro. Ho voluto creare qualcosa di diverso con la plate in dotazione ed ho ricreato una cornice di fiori.


Good evening creative, 

have you also seen Spellbinders' new product of the year? The Betterpress!!!It is now also available in the Scraphouse shop!!!Yayaaa!!! To be honest at first I was undecided about buying it, I had watched several demonstration videos, and finally driven by curiosity to try it , I bought it! What can I say? First of all, it's super easy to use and it's compatible with my Big shot :D , thanks to the grids and guidelines, it's very easy to figure out where you want to place the elements on the card. Along with the Betterpress, there's a starter kit: cotton watercolor cards, a tape, a flower plate+sentiments and ink. 

For my card I wanted to create something different with the supplied plate and recreated a frame of flowers.


Come vi ho anticipato precedentemente, la Betterpress é dotata di questo tappetino magnetico con griglia, quindi sapendo dove avrei posizionato il mio cartoncino, é stato facile posizionare la plate fiore. Ho cominciato mettendo il fiore del rettangolo in basso a destra, inchiostrato e passato attraverso la mia bigshot. Al secondo giro, ho solo girato la placca in plexiglass dall'altro verso. Poi ho messo la plate nell'angolo in basso a sinistra e rifatto i medesimi passaggi. 

As I mentioned earlier, the Betterpress comes with this magnetic mat with grid, so knowing where I would place my cardstock, it was easy to place the flower plate. I started by placing the flower from the bottom right rectangle, inked and passed through my Bigshot. On the second round, I just turned the plexiglass plate the other way. Then I put the plate in the lower left corner and did the same steps again.


Una volta fatto la mia cornice di fiori ho posizionato al centro il sentiment che era nel kit.
Ho voluto colorare i fiori in maniera un po' astratta ed ho usato i seguenti Distress ink reinker ed aggiungo delle gocce dorate con la Nuvo spray oro.

Once I made my flower frame I placed the sentiment that was in the kit in the center.
I wanted to color the flowers somewhat abstractly and used the following Distress ink reinker and added gold drops with Nuvo gold spray.


Ed infine per completare la mia card ho incollato il cartoncino di carta d'acquarello su un cartoncino nero e uno oro. 
Che cosa ne pensate? Vi ispira la Bettepress?
Un abbaccio 

And finally to complete my card, I glued the watercolor paper card to a black and a gold card. 
What do you guys think? Does the Bettepress inspire you?
A hug

Quyen


lundi 26 juin 2023

Make a Wish

Buona sera amiche creative!

Vi é piaciuta la nuova release della Lawn fawn? Oggi vi mostro cosa ho fatto con le novità:D 


Good evening creative friends!

Did you enjoy the new Lawn fawn release? Today I show you what I did with the new features:D


Mi sono subito innamorata della fustella Make A Wish, forse perché da qualche parte mi piace sognare ed esprimere desideri!;)
Ho cominciato a creare l'erba con il nuovo stencil Slimline Grassy con i distress ink Moved Lawn e Twisted citron. Poi come coperto l 'erba con lo stesso stencil ed ho colorato il cielo con Tumbled glass e Mermaid lagoon.
Poi ho colorato i personaggi con i copic usando i set Yappy Birthday  e Yappy Birthday add-on. Per la base ho usato un cartoncino nero, poi ho incollato lo sfondo erba-cielo, la scritta make a wish ricavata da un cartoncino oleografio ed infine i cagnolini e i palloncini. 
Buona serata a tutti 

I immediately fell in love with the Make A Wish die, maybe because somewhere I like to dream and make wishes!;)
I started creating the grass with the new Slimline Grassy stencil with Moved Lawn and Twisted citron distress inks. Then i masked the grass with the same stencil, and then I colored the sky with Tumbled glass and Mermaid lagoon.
Then I colored the characters with Copics using Yappy Birthday and Yappy Birthday add-on sets. For the base I used a black cardstock, then I glued the grass-sky background, the make a wish sign made from an oleographic cardstock and finally the little dogs and balloons. 
Have a nice evening everyone

Quyen


mercredi 1 mars 2023

Easel Card

Buongiorno creative,
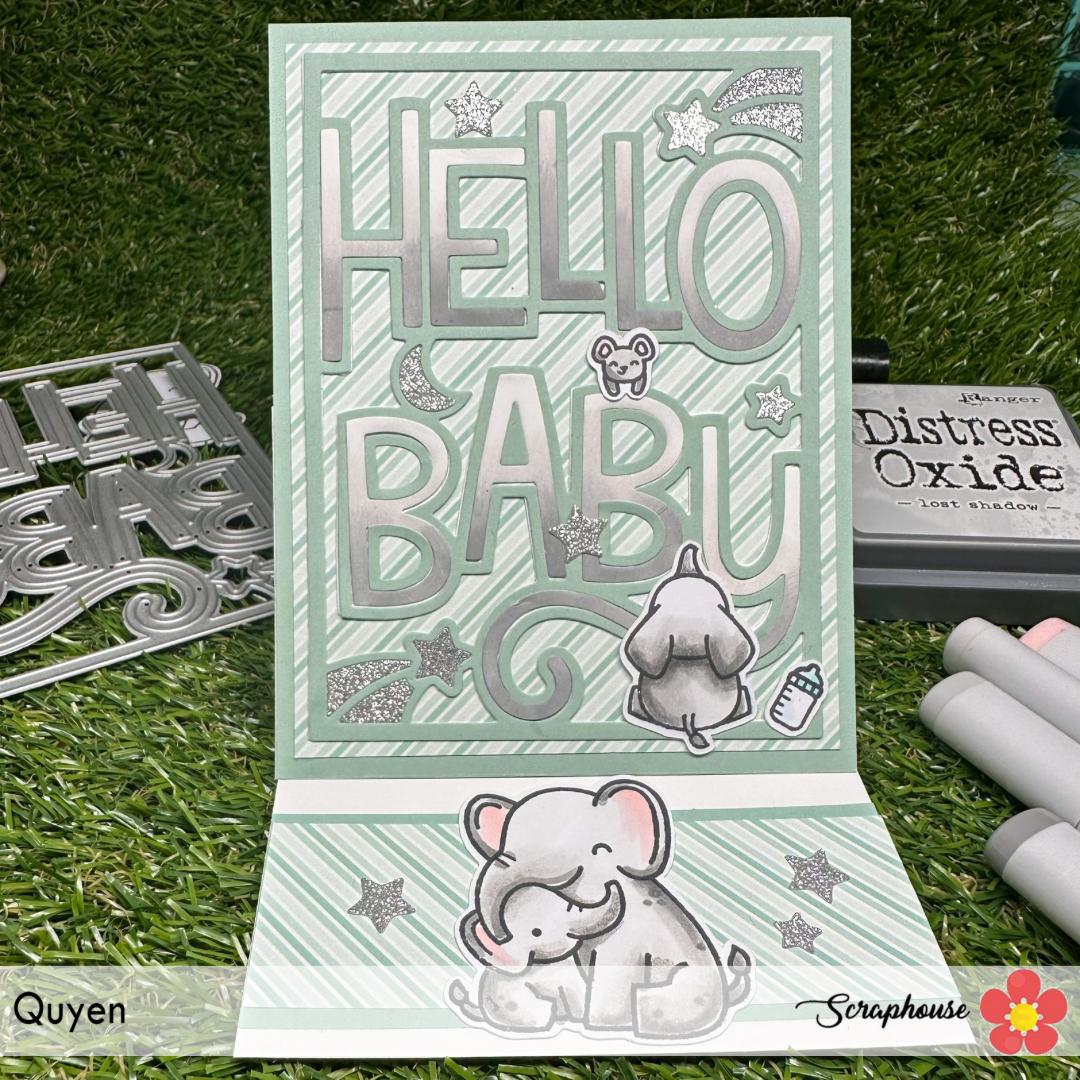
eccomi qui di nuovo con una card nascita! Quando ho visto la Giant dies outlined Hello Baby della Lawnfawn l'ho voluta avere assolutamente per creare card nascita semplici e veloci per quando mi sarebbe mancato il tempo per colorare. 


Good morning creative,
here I am again with a birth card! When I saw the Giant dies outlined Hello Baby from Lawnfawn I absolutely wanted to have it to create quick and easy birth cards for when I would run out of time to color.


Cominciamo dalla facciata della card, ho fustellato il Giant dies due volte, una con la carta verde tiffany e un'altra con la carta bianca. Ho tenuto le lettere che compongono la scritta hello baby con la carta bianca e le ho colorate usando la spugnetta da dito con Distress ink hickory smoke e l'oxide lost shadow.

Starting with the front of the card, I die-cut the Giant dies twice, once with tiffany green paper and once with white paper. I kept the letters that make up the word hello baby with white paper and colored them using the finger sponge with Distress ink hickory smoke and lost shadow oxide.


Ho incollato tutti i pezzi su un foglio a righe dal nuovo pad Stripes 'n sprinkles petite paper pack. COn i copic poi ho colorato l'elefantino e il topino dal set Flight high 

Una volta finito la copertina della mia card son passata a creare la struttura della Easel card con le misure standard. Ho tagliato un foglio bianco a 4 1/4 inches  ed a 11 inches. Poi ho cordonato a 5 1/2 ed a 2 3/4 inches. Ho incollato la mia card al pezzoo che misura 2 3/4.


I glued all the pieces onto a striped sheet from the new Stripes 'n sprinkles petite paper pack pad. With Copics I then colored the little elephant and mouse from the Flight high set

Once I finished my card cover I moved on to creating the easel card structure with the standard measurements. I cut a blank sheet to 4 1/4 inches and 11 inches. Then I scored at 5 1/2 and at 2 3/4 inches. I glued my card to the piece that measuring 2 3/4.


Come saprete l'easel card ha bisogno di uno stopper e quindi no colorato la coppia di elefanti dal set Elephant parade  e l'ho incollato all'interno della card.
As you know the easel card needs a stopper and so no colored the pair of elephants from the Elephant parade set and I glued it inside the card.


Spero via sia piaciuta, alla prossima,

I hope you liked it, see you soon,

Quyen

mercredi 21 septembre 2022

Autumn leaves

Buongiorno care amiche!
Oggi vi mostro questa card semplice semplice ma trovo che metta bene in risalto il colore delle foglie autunnali.

Good morning dear friends!
Today I am showing you this simple plain card but I find it brings out the color of autumn leaves well.


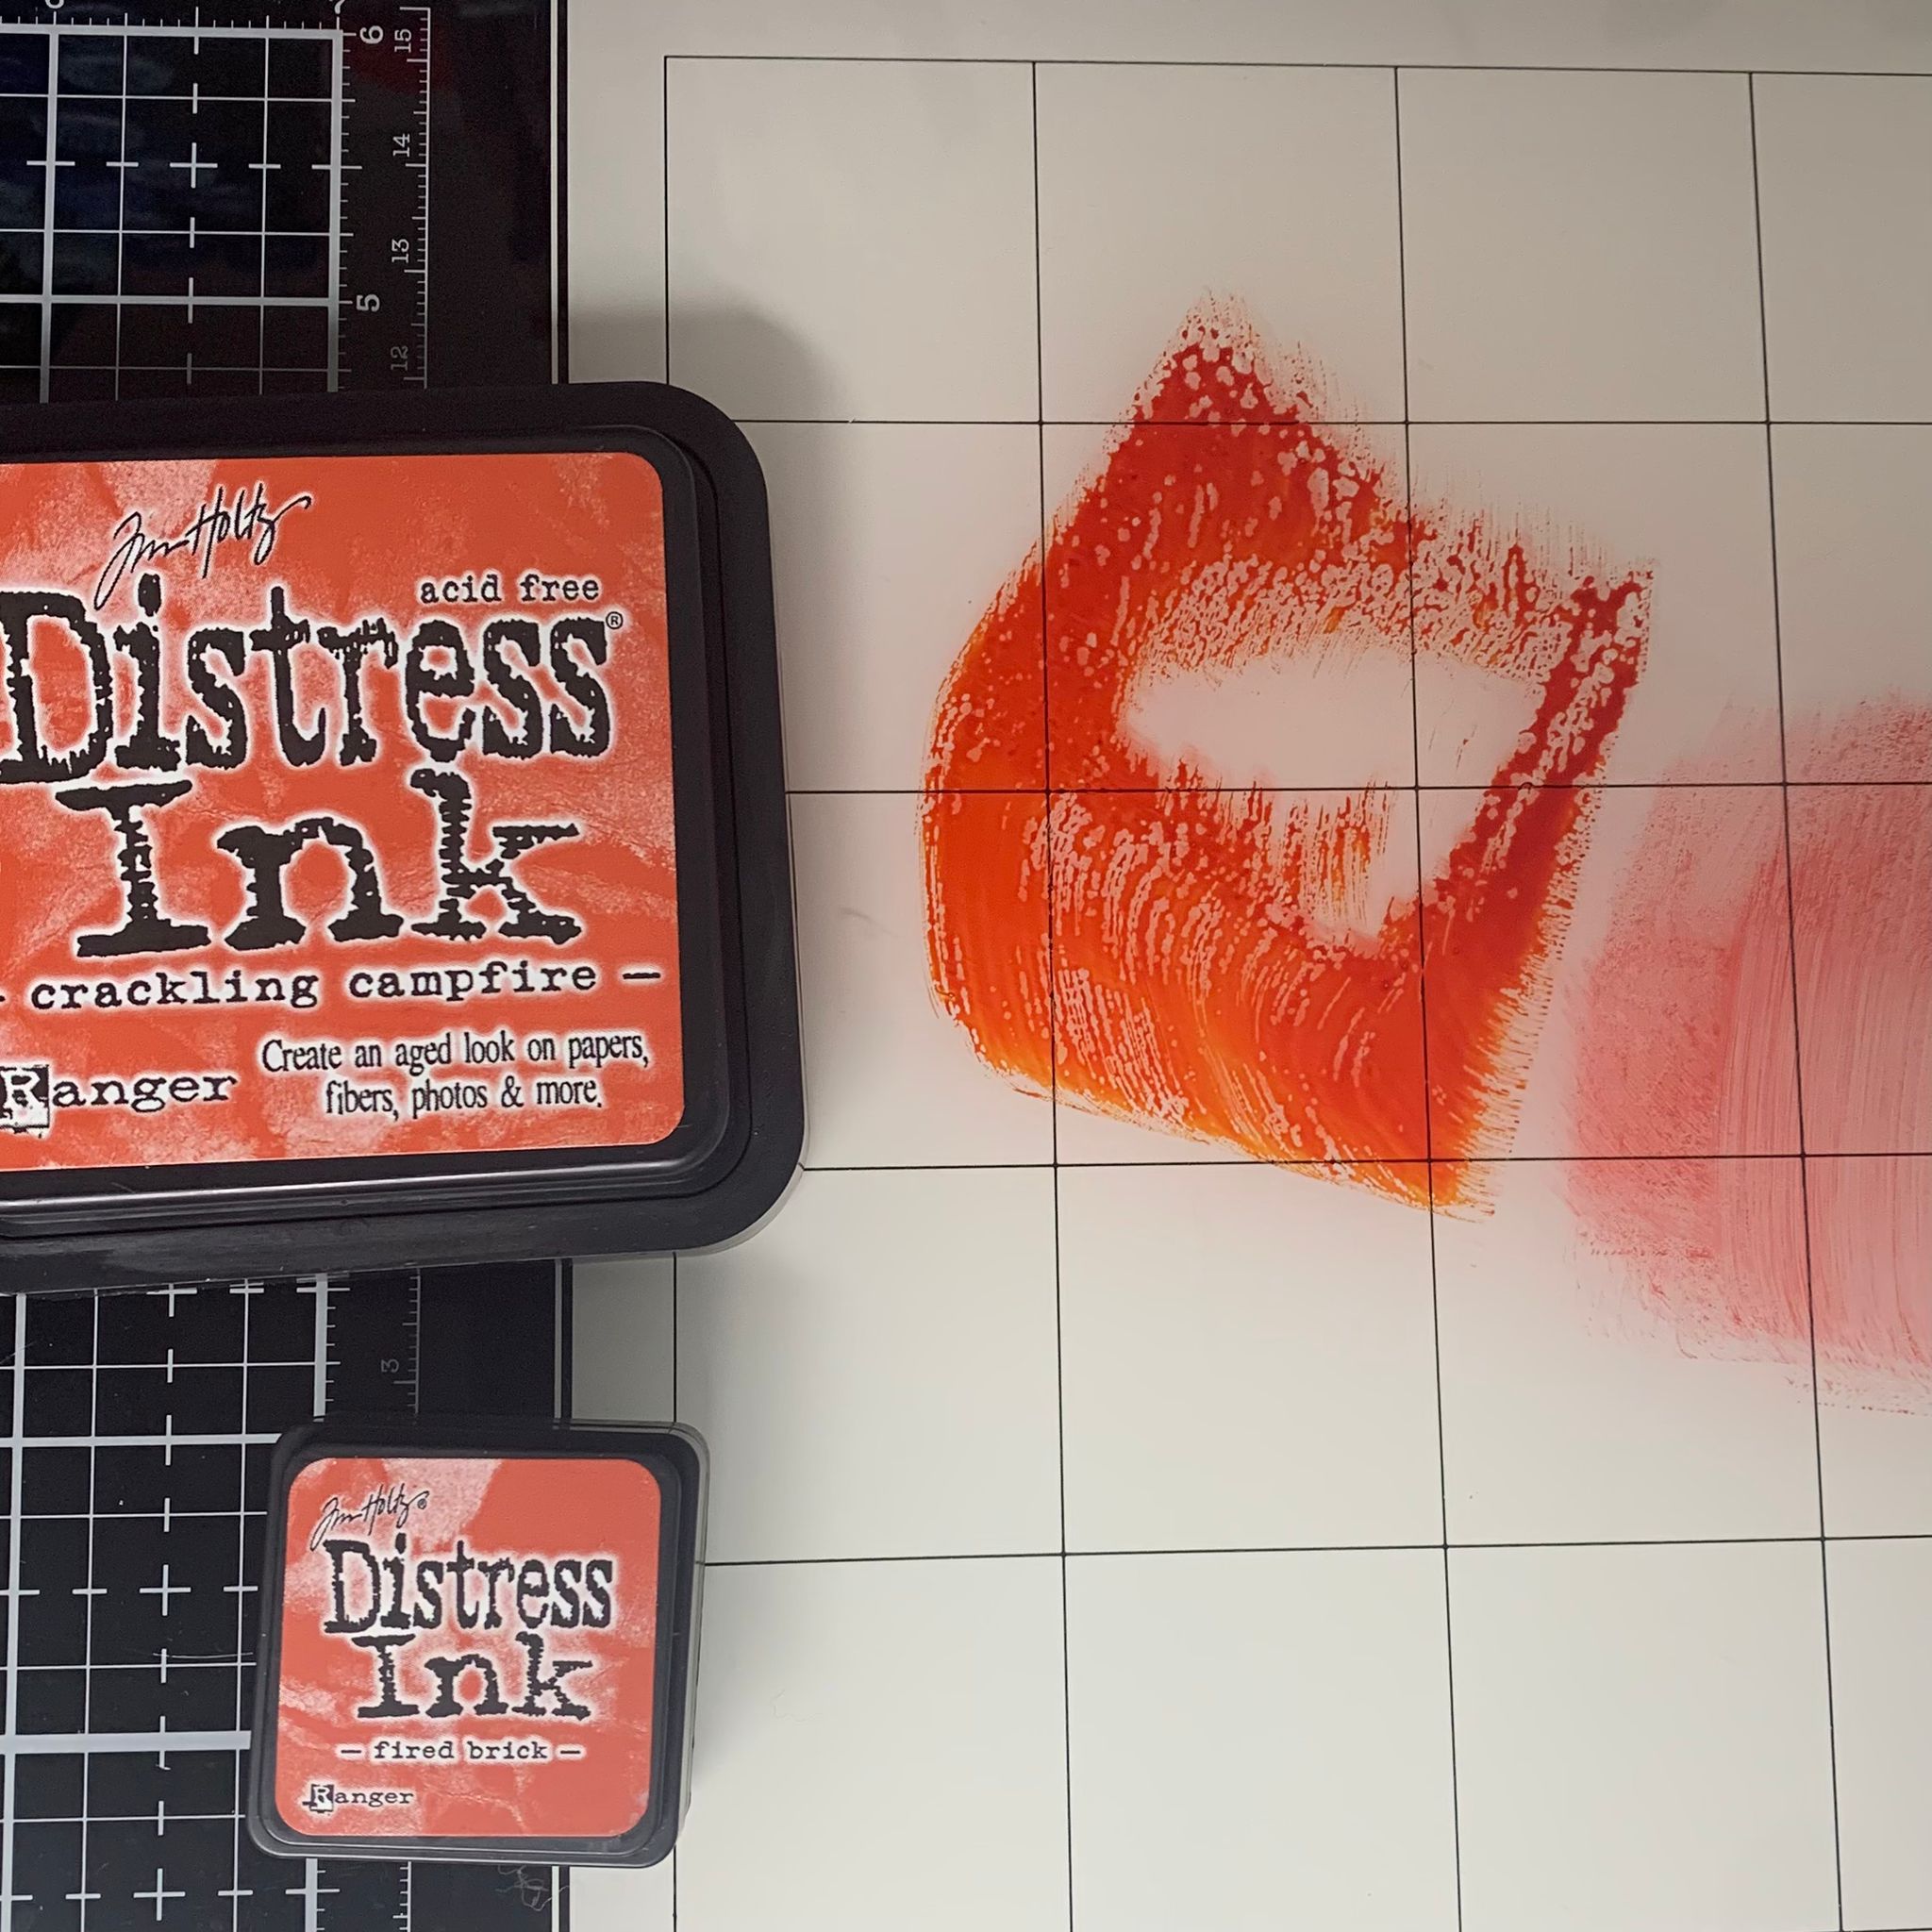
Per prima ho cominciato a colorare delle carta ad acquarello, usando i distress inks. Ho tamponato l'inchiostro su una base vetro, spruzzato dell acqua e poi appoggiato sopra la carta. Ho ripetuto più volte il passaggio con colori differenti, aspettando sempre che il colore precedente  si fosse asciugato, finchè non ho ottenuto il risultato desiderato. Ho usato i seguenti colori: crackling campfire, fired brick, mustard seed, peeled paint.

First I started coloring watercolor papers, using distress inks. I dabbed the ink on a glass base, sprayed some water and then laid it on top of the paper. I repeated the step several times with different colors, always waiting for the previous color to dry, until I got the desired result. I used the following colors: crackling campfire, fired brick, mustard seed, peeled paint.


Ho ritagliato le mie foglie con la fustella Sokai So'Nature dies feuilles d'automne.
I cut out my leaves with the Sokai So'Nature dies feuilles d'automne dies.


Ho timbrato il sentiment dal set di Chou & Flowers  Cling la Balancoire con un inchiostro marrone, ho incollato di fianco le 3 foglie che mi sembravano stessero bene insieme , aggiunto un nastrino . Infine ho incollato tutto su un cartoncino marrone usando un biadesivo spessorato.
Spero vi piaccia, buona giornata a voi!


I stamped the sentiment from the Chou & Flowers Cling la Balancoire set with a brown ink, glued the 3 leaves on the side that I felt looked good together , added a ribbon . Finally I glued everything on a brown cardboard using thick double sided tape.
I hope you like it, have a nice day!

Quyen


dimanche 25 juin 2017

Carola - Upon a Star

Mit einigen Stempeln aus dem Set "Upon a Star" von Lawn Fawn habe ich eine erste Karte gemacht. Den Hintergrund habe ich mit den Ranger Distress Oxide Stempelkissen "Fossilized Amber", "Cracked Pistachio", "Faded Jeans" und "Wilted Violet" sowie Distress Ink "Black Soot" gewischt, etwas Wasser aufgesprüht, mit Deckweiss ein paar weisse Punkte aufgebracht und zuletzt noch "Perfect Pearls" aufgetragen, um den Himmel ein bisschen strahlen zu lassen.

J'ai fait une première carte avec quelques tampons du set "Upon a Star" de Lawn Fawn. Sur le fond j'ai "essuyé" avec les encres Distress Oxide "Fossilized Amber", "Cracked Pistachio", "Faded Jeans" et "Wilted Violet"de Ranger ainsi que l'encre Distress "Black Soot", puis j'ai appliqué quelques gouttes d'eau, mis quelques petits points blancs avec du blanc couvrant et à la fin j'ai encore mis "Perfect Pearls" pour faire briller un peu le ciel.


Ich habe folgende Artikel aus dem Scraphouse Online Shop verwendet / J'ai utilisé les articles suivants du Scraphouse Online Shop:

Stempel/tampons: Lawn Fawn "Upon a Star"
Stempelkissen/Encres: Versafine "Onyx Black", Ranger Distress Ink, Distress Oxides

Schönen Abend! Bonne soirée! 

mardi 13 septembre 2016

Carola - Happy Hedgehogs

So heisst ein neues Stempelset von My Favourite Things, mit dem ich gleich zwei Karten gemacht habe. / C'est le nom de nouveaux tampons de My Favourite Things avec lesquels j'ai fait deux cartes.

Bei der ersten habe ich das Aquarellpapier mit diversen Distress Stempelkissen eingefärbt. Die Orange- und Rottöne sollen die Farben des Herbstwaldes darstellen. Den Baumstamm habe ich direkt aufs Papier gestempelt und coloriert, die Igel und Pilze habe ich ausgeschnitten und aufgeklebt.
Pour la première carte j'ai mis divers encres Distress sur mon papier aquarelle. Les tons orange et rouge représentent les couleurs de l'automne. J'ai tamponné et coloré le tronc d'arbre directement sur le papier, les hérissons et champignons sont coupés et collés sur le papier.


Meine zweite Karte ist ganz schlicht im CAS Stil gemacht. Hier habe ich Igel, Pilze und den Baumstamm nach dem Colorieren ausgeschnitten und auf Cardstock aufgeklebt.
Ma deuxième carte est faite tout simplement en style CAS. Ici j'ai coupé les hérissons, les champignons et le tronc d'arbre et après les avoir colorés je les ai collés sur le cardstock.


Ich habe folgende Artikel aus dem Scraphouse Online Shop verwendet: / J'ai utilisé les articles suivants du Scraphouse Online Shop:

Stempel/Tampons: My Favourite Things
Stempelkissen/Encre: Versafine "Onyx Black", Ranger Distress Inks

Schönen Abend ! Bonne soirée!

vendredi 1 juillet 2016

Carola - Flop card circle

Von My Favourite Things gibt es neue Stanzformen "Flop card" und mit der Stanzform "Flop card circle" habe ich eine erste Karte gemacht und zwar eine sogenannte "easel card". Es gibt diese "Flop card" Stanzen in vier verschiedenen Formen und man kann damit leicht eine spezielle Karte machen.

De My Favourite Things il existe une nouvelle sorte de dies "flop card" et avec le die "Flop card circle" j'ai fait une première carte, à savoir une carte nommée "easel card". Les "flop card" dies sont disponibles en 4 formes différentes et en peut vite faire une carte spéciale.


Dies ist die Karte, wenn sie geschlossen ist: / C'est la carte quand elle est fermée:


Ich habe folgende Artikel aus dem Scraphouse Online Shop verwendet: / J'ai utilisé les articles suivants du Scraphouse Online Shop:

Stempel/Tampon: Penny Black Clear Stamps "Hugs"
Stempelkissen/Encres: Versafine "Onyx Black", Ranger Distress Inks
Embossing Folder/Pochette d'embossage: Cuttlebug
Stanzform/die: My Favourite Things dies "Flop card circle"
 
Schönes Wochenende! Bon week-end!

mardi 17 mai 2016

Carola - Crazy birds Party

Mit den "mini crazy birds" von Tim Holtz habe ich nochmals eine Karte im CAS (Clean And Simple) Stil gemacht. Coloriert habe ich sie wieder mit den Distress Ink Pads.

Avec les "mini crazy birds" de Tim Holtz j'ai fait une autre carte dans le style CAS (Clean And Simple). Pour leur coloration j'ai de nouveau utilisé les encres Distress.


Ich habe folgende Artikel aus dem Scraphouse Online Shop verwendet: / J'ai utilisé les articles suivants du Scraphouse Online Shop:

Stempel/tampons: Tim Holtz Stamps "Mini bird crazy"
Stempelkissen/encres: Versafine "Onyx Black", Ranger Distress Inks

vendredi 1 avril 2016

Carola - Tweet, Tweet

Mit den lustigen Vögeln von Avery Elle habe ich eine Geburtstagskarte gemacht, für die ich die "Acrylblocktechnik" angewandet habe: ich habe mehrere Distress Stempelkissen auf einen Acrylblock gedrückt, diesen dann mit Wasser eingesprüht und anschliessend aufs Papier gedrückt. Als alles trocken war, habe ich nur noch die Vögel und den Schriftzug aufgestempelt.

Avec les oiseaux drôles d'Avery Elle j'ai fait une carte pour laquelle j'ai utilisé la technique "bloc acrylique": j'ai pressé plusieurs encres Distress sur un bloc acrylique, puis j'ai vaporisé de l'eau sur ce bloc et ensuite je l'ai pressé sur le papier. Quand tout était sec, j'ai simplement encore tamponné les oiseaux et le sentiment.


Ich habe folgende Artikel aus dem Scraphouse Online Shop verwendet: / J'ai utilisé les articles suivants du Scraphouse Online Shop:

Stempel/Tampons: Avery Elle "Tweet, Tweet"
Stempelkissen/Encre: Versafine "Onyx Black", Ranger Distress Inks
Papier: Ranger Watercolor Paper

mardi 12 mai 2015

Carola - Tulpenkarte

Tulpen gefallen mir immer gut und heute zeige ich Euch eine Karte mit diesen Blumen. Ich habe die Stempel mit Distress Stempelkissen eingefärbt, mit Wasser besprüht und dann auf Aquarellpapier gestempelt.

Les tulipes sont des fleurs que j'aime toujours bien et aujourd'hui je veux vous montrer une carte avec ces fleurs. J'ai mis des encres Distress sur les tampons, je les ai vaporisés avec un peu d'eau et puis j'ai tamponné sur du papier aquarel.


Ich habe folgende Artikel aus dem Scraphouse Online Shop verwendet. / J'ai utilisé les articles suivants du Scraphouse Online Shop:

Stempel/Tampons: My Favourite Things
Stempelkissen/Encres: Distress Ink Pads, Versafine "Onyx Black"
Stanzformen/Dies: My Favourite Things "Die-Namics Dies Inside and Out Diagonal Stitched Rectangle
Diverses/Divers: 3D Pads

Schönen Abend! / Bonne soirée!

dimanche 19 avril 2015

Carola - Honeycomb

Hallo alle miteinander / Bonjour à tout le monde

Es freut mich sehr, dass ich ab sofort Mitglied im Design Team von Scraphouse bin und ich danke Marjolein für ihr Vertrauen. Ich komme aus Deutschland, lebe aber schon seit vielen Jahren in der Schweiz. Ich bastle gerne und mache vor allem gerne Karten, etc. mit Stempeln.

Je suis contente que dès maintenant je fais partie du Design Team de Scraphouse et je remercie Marjolein pour sa confiance. Je viens de l'Allemagne, mais je vis en Suisse déjà depuis plusieurs années. J'aime bien bricoler et j'aime surtout faire des cartes, etc. avec des tampons.

Hier kommt nun meine erste Karte als DT Mitglied / Voici ma première carte comme DT membre:


Ich habe folgende Artikel aus dem Scraphouse Online Shop verwendet. / J'ai utilisé les articles suivants du Scraphouse Online Shop:

Cardstock: Bazzill
Stempelkissen/Encres: Distress Ink Pads
Stanzform/Die:  Memory Box Rhone Butterfly Wings
Schablone/Stencil: Memory Box

Schönen Tag Euch allen! / Bonne journée à vous tous!

lundi 6 avril 2015

Isha - Birthday Wishes

Hello Everyone!
I hope you all are enjoying your long weekend. For me it's gonna be a 2 week long holidays as the schools are having Spring break. With my girls at home and hubby taking a few days off....I am not sure how much time I will get to craft as I want to enjoy with everyone :)

Anyhow, I got this lovely stamp by Penny Black and just had to color it :) I used some inks to color in the flowers....as you know my love for watercolor and also no-line coloring! Love how this card came along :) You can find all the supplies in the Scraphouse Shop HERE


Hope you got inspired. Happy Crafting!

Supplies:

Stamp: Penny Black (Petal Power), My Favorite Things (Peaceful Wildflowers)
Cardstock: Bazzill Card Shoppe (Licorice Twist), Ranger Watercolor paper, DCWV glitter pad
Inks: Ranger Distress Ink (picked raspberry, squeezed lemonade, mowed lawn, vintage photo, shabby shutters, spun sugar), VersaFine Onyx Black