lundi 30 septembre 2024

Winter Wonder Land

 Hi crafty Friends!


I’m sharing a card I created with the Season`s Greeting Evergreens Press Plate. It’s actually a Betterpress plate but as you know you can use them perfectly for foiling.

I did mine with gold hot foil. I found this looks already soo gorgeous... but I decided to add a color in the background. I colored between the trees with Alcohol markers. On the top I wanted to get darker and to achieve a more solid look, I used Ink and applied it with a blending brush. Finally, I added with splatter, so it looks like its snows. I did my sentiment in gold. And also added a white frame, like this I find I looks a little bit like a picture of a gorgeous winter scene.


Thanks for stopping by, Adriana


                                    Love the shine 😍


Hallo Bastelfreunde!


Ich zeige euch heute eine Karte, die ich mit der Season`s Greeting Evergreens Press Plate erstellt habe. Eigentlich ist es eine Betterpress-Platte, aber wie ihr wisst, kann man sie perfekt zum Folieren verwenden.

Ich habe meine mit goldener Heissolie gemacht. Ich finde, das sieht schon soo toll aus... aber ich habe beschlossen, dem Hintergrund noch etwas Farbe zu geben. Ich habe zwischen den BĂ€umen mit Alcohol Markern gemalt. Oben wollte ich es dunkler und fester machen, also habe ich Tinte verwendet und sie mit einem Pinsel aufgetragen. Zum Schluss habe ich noch Spritzer hinzugefĂŒgt, damit es so aussieht, als wĂŒrde es schneien. Ich habe mein Sentiment in Gold gemacht. Außerdem habe ich einen weißen Rahmen hinzugefĂŒgt, so sieht es ein bisschen aus wie ein Bild einer wunderschönen Winterlandschaft.

Danke fĂŒrs Vorbeischauen, Adriana

vendredi 27 septembre 2024

Winter Rose Betterpress and Stencil Set


Buongiorno Creative, come state?
Eccomi di nuovo qui con una card creata con la combo Betterpress plate e stencil coordinato. Solitamente quando ho usato questi set mi era sempre piĂč piaciuta la resa ottenuta con i Marker che con gli stencil, ma queste ultime volte mi son ricreduta! Adoro l'effetto con lo stencil! Voi cosa preferite?
Qui ho usato il set Winter Rose Background di Spellbinders che ho foilizzato in oro.

Good Moring crafters , how are you?
Here I am again with a card created with the Betterpress plate and matching stencil combo. Usually when I've used these sets I've always liked the rendering achieved with the Markers better than with the stencils, but these last few times I've come around! I love the effect with the stencil! What do you guys prefer? Here I used the Winter Rose Background set from Spellbinders that I foil stamped in gold.


In seguito ho usato gli stencil coordinati alla pressplate e con i distress ink Barn door e Aged Mahogany ho colorato i fiori, mentre per le foglie ho usato Peeled paint e Forest moss. Infine ho colorato con Olo markers YG8.7 gli spazi bianchi rimasti dopo la colorazione con gli stencil.
In seguito ho preso 2 fustelle del set Notched corner frames etched dies e le ho attaccate allo sfondo che ho colorato e l'ho fatta passare attraverso la mia Bigshot.

Next I used the stencils that coordinated with the pressplate and with the distress inks Barn door and Aged Mahogany I colored the flowers, while for the leaves I used Peeled paint and Forest moss. Finally I colored with Olo markers YG8.7 the white spaces left after coloring with the stencils.
Next I took 2 dies from the Notched corner frames etched dies set and attached them to the background I colored and ran it through my Bigshot machine.


Ricavando una cornice, che ho rifilato con la taglierina.

I carved out a frame, which I trimmed with the cutter.

 
Ho incollato tutti i miei pezzi su un cartoncino dorato ed abbellito con un sentiment di Hello bluebird.
Spero vi piaccia, via auguro uno splendido weekend creativo
un abbraccio 

I glued all my pieces on a gold card and embellished with a Hello bluebird sentiment.
I hope you like it, away I wish you a wonderful creative weekend
a hug 

Quyen


mardi 24 septembre 2024

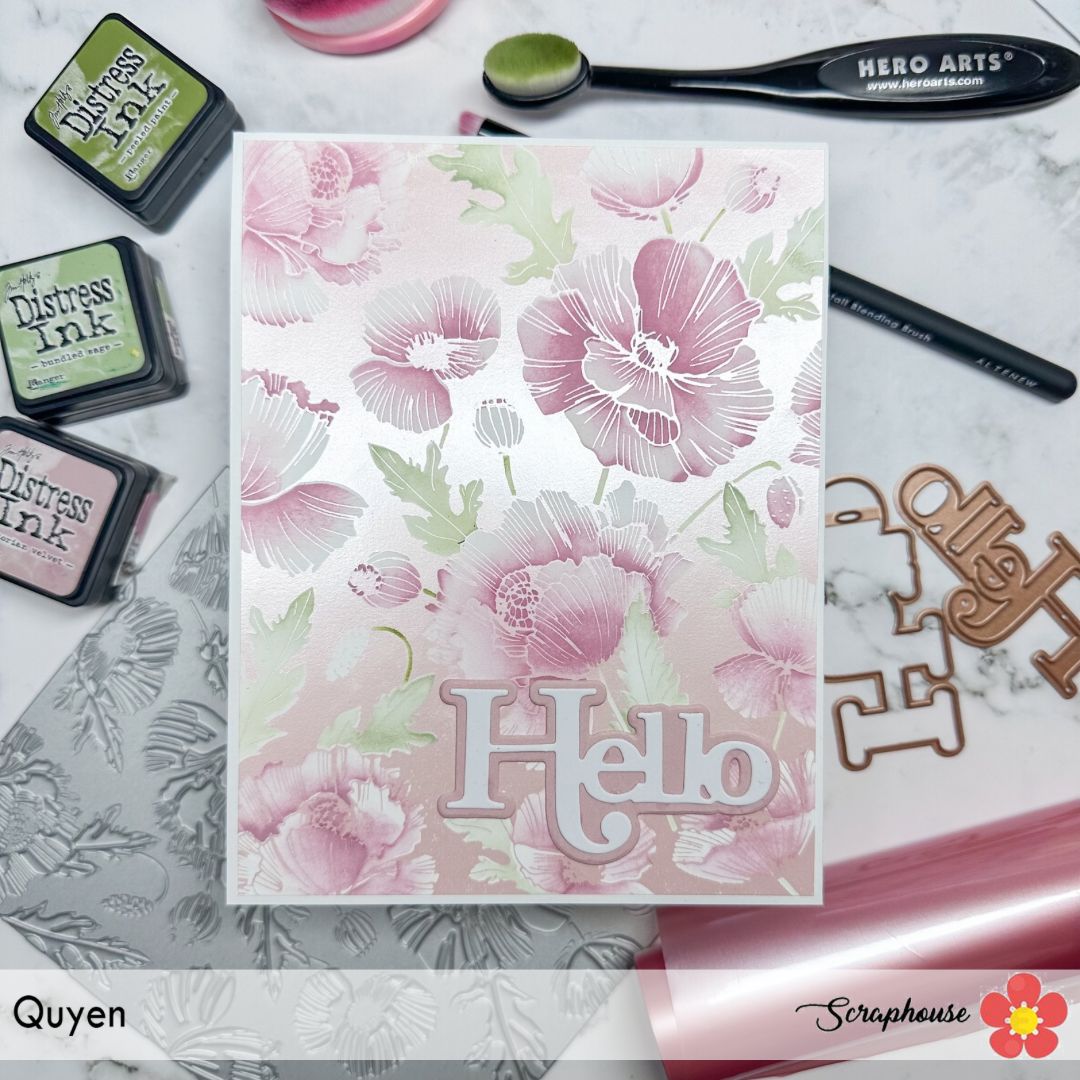
Poppy Background betterpress and stencil


Buona sera carissime crafter!

 Come state? spero tutto bene! Sono entusiasta di mostrarvi questa card stasera! La plate Poppy Background mi piaceva da parecchio ed Ă© tornata disponibile nello shop.
Come mio solito ho voluto usare la press plate per foilizzare! Ho fatto svariate prove con differenti colorazioni di foil e alla fine per questo progetto ho optato per la versione in rosa pastello del set  Satin Pastel Pack.
Volevo creare un look tono su tono e quindi con lo stencil annesso, ho usato ho colorato i fiori con il Distress ink Victorian Velvet e le foglie con Bundled sage e Peeled paint. Mi piace moltissimo il contrasto creato dalla colorazione dei distress con lo sfondo lucido del foil! Voi cosa ne pensate?
Per completare la mia cardo ho usato la fustellata Hello dal set Little Hello Clear stamp etched dies.
Spero vi piaccia, vi auguro buona serata

Good evening dear crafters! 

How are you? hope all is well! I am excited to show you this card tonight! I have liked the Poppy Background plate for quite a while and it is back available in the shop.
As my usual I wanted to use the press plate to foil! I did several trials with different colors of foil and finally for this project I opted for the pastel pink version of the Satin Pastel Pack set.
I wanted to create a tone-on-tone look and so with the stencil attached, I used I colored the flowers with Distress ink Victorian Velvet and the leaves with Bundled sage and Peeled paint. I really like the contrast created by the distress coloring with the shiny foil background! What do you guys think?
To complete my thistle I used the Hello die cut from the Little Hello Clear stamp etched dies set.
I hope you enjoy it, have a great evening

Quyen


lundi 16 septembre 2024

Birthday Balloon Card

Hi everyone!


Today I’m sharing a birthday card I created with the Party Balloons from Simon Hurley. I used the Embossing folder with a light yellow cardstock. Then I added colors with ink the coordinating stencil. I used different shades of blue. With the stencil it’s so easy to create this fun colorful background. I lost a little bit of the dimension because of the stenciling, so I put it back into my embossing folder an run it trough again. Then I took the last stencil and added Slippery When Wet Astro Paste. Love all that sparkle. I added a sentiment with the same shades of blue and added there some Astro Paste as well.


Thanks for stopping by!

Adriana


Hallo zusammen!


Heute zeige ich euch eine  Geburtstagskarte, die ich mit den Party Balloons von Simon Hurley gestaltet habe. Ich habe den PrĂ€gefolder mit einem hellgelben Papier verwendet. Dann habe ich mit Tinte die passende Schablone eingefĂ€rbt. Ich habe verschiedene Blauschattierungen verwendet. Mit der Schablone ist es so einfach, diesen farbenfrohen Hintergrund zu gestalten. Durch das Schablonieren habe ich ein wenig von der Dimension verloren, also habe ich es wieder in meinen PrĂ€gefolder gelegt und noch einmal durchlaufen lassen. Dann habe ich die letzte Schablone genommen und die Astro-Paste Slippery When Wet hinzugefĂŒgt. Ich liebe dieses Glitzern. Ich habe einen Schriftzug in denselben Blautönen hinzugefĂŒgt und auch hier etwas Astro Paste hinzugefĂŒgt.


Danke fĂŒrs Vorbeischauen!

Adriana


vendredi 6 septembre 2024

Cheesy Christmas!

Buongiorno Creative,

come state? avete visto la nuova release della Lawnfawn? Le novitĂ  mi son piaciute moltissimo!

Faccio sempre molta fatica a creare delle card Clean And Simple ed ammiro molto le card maker in grado di creare card fantastiche con pochissimi elementi. Questa volta mi son ispirata a Carly Tee su IG @carlyteeminer e voilĂ , spero che la card vi piaccia.


Good morning Cardmakers

how are you? have you seen the new Lawnfawn release? I loved the new features!

I always have a hard time creating Clean And Simple cards and I really admire card makers who can create amazing cards with very few elements. This time I was inspired by Carly Tee on IG @carlyteeminer and voila, I hope you enjoy the card.


Ho dapprima colorato 1/3 di sfondo con i Distress oxide : Rustic Wilderness e Scattered straw, poi ho fatto cadere diverse gocce d'acqua e tamponato via il colore e timbrato del pacchi regali da set di vecchi timbri di Natale della Lawnfawn.

I first colored 1/3 background with Distress oxide : Rustic Wilderness and Scattered straw, then dropped several drops of water and dabbed away the color and stamped some gift wrap from Lawnfawn's old Christmas stamp set.


Poi ho timbrato, colorato e fustellato i nuovi timbri Cheesy Christmas ed aggiunto il sentiment Merry Christmas, sempre dalla stessa plancia.

Grazie per esser passate da qui, buona giornata e buon weekend

Then I stamped, colored and die-cut the new Cheesy Christmas stamps and added the Merry Christmas sentiment, again from the same plank.

Thanks for stopping by, have a great day and have a great weekend

Quyen


lundi 2 septembre 2024

Cozy flower card

 Hello everyone!


I’m sharing another card I created with the Floral Stems. This time I used the flowers for a background. I made an impression with a slightly darker color then my cardstock to create a tone on tone background. I really like this look. And because I used the Betterpress (at the moment on sale) it also gives an amazing texture.

Then I also did a Flower with Versafine Fallen Leaves. This is quite dark, but not as harsh as black. I think this gives a cozy look. Then I colored the flower with markers. I assembled everything together and added a sentiment. I therefor also used the same markers to match my flower.


Thanks for stopping by.

Adriana


Hallo zusammen!


Ich teile eine weitere Karte, die ich mit den Floral Stems gestaltet habe. Diesmal habe ich die Blumen als Hintergrund verwendet. Ich habe einen Abdruck mit einer etwas dunkleren Farbe als mein Papier gemacht, um einen Ton in Ton Hintergrund zu schaffen. Dieser Look gefĂ€llt mir sehr gut. Und da ich den Betterpress (gerade Aktion!) verwendet habe, ergibt sich auch eine tolle Textur.


Dann habe ich auch eine Blume mit Versafine Fallen Leaves gemacht. Das ist ziemlich dunkel, aber nicht so hart wie Schwarz. Ich finde, das gibt ein gemĂŒtliches Aussehen. Dann habe ich die Blume mit Markern koloriert. Ich habe alles zusammengefĂŒgt und einen Spruch hinzugefĂŒgt. DafĂŒr habe ich auch die gleichen Marker verwendet, um meine Blume anzupassen.


Danke fĂŒrs Vorbeischauen.

Adriana