Affichage des articles dont le libellé est Marianne Design. Afficher tous les articles

dimanche 28 janvier 2024

Marianne design stamp and dies

 Buona sera creative!

ecco qui con questa card colorata a mano con i Copic Markers. Ho cominciato fustellando il rettangolo più grande del set Scalloped rectangles di Marianne designAl centro di esso ho timbrato i due coniglietti dell timbro Stick wolke rabbits friends. Una volta colorati i coniglietti ho immaginato di creare uno sfondo sempre con i copic. Infine ho usato la la fustella scalloped più grande aggiungendo anche la fustella che crea il bordo puntinato. 

Grazie per esser passate qui a leggere il blog!

Buona serata


Good evening creative!

Here it is with this hand colored card using Copic Markers. I started by die-cutting the larger rectangle from the Scalloped rectangles set from Marianne design.  In the center of it I stamped the two bunnies from the Stick wolke rabbits friends stamp. Once the bunnies were colored in I imagined creating a background again with the copics. Lastly, I used the larger scalloped die adding the die that creates the dotted border as well. 

Thanks for stopping by and reading the blog!

Have a great evening

 Quyen


vendredi 12 mai 2023

You are my lucky charm!

 Buongiorno carissime creative!

Come state? Spero tutto bene! Sono in partenza per le vacanze ma prima di andare via, volevo mostrarvi questa card! Onestamente le fustelle a forma di quadrifoglio avevano catturato la mia attenzione quando erano state presentate lo scorso anno da Lawnfawn ma non avevo fatto in tempo ad acquistarle. Quindi appena ho visto questa fustella di Marianne design Lucly clovers, l'ho presa subito! Mi piace molto poter avere le due misure di quadrifoglio, voi cosa ne pensate?


Good morning dear creatives!

How are you? I hope all is well! i'm off on vacation but before i leave i wanted to show you this card! Honestly the clover shaped die cuts had caught my attention when they were introduced last year by Lawnfawn but i hadn't gotten around to buying them. So as soon as I saw this die cut by Marianne design Lucly clovers, I grabbed it right away! I really like being able to have the two clover sizes, what do you guys think?


Ho fustellato diverse volte i quadrifogli usando un cartoncino verde dal Studio light essentials pad Lemonade ed ho un po' scurito le estremità delle foglie con in Distress ink Lucky clover e poi schizzato dell'acquarello dorato da un set di Kuretake. In seguito con l'alfabeto Henry's ABC della Lawnfawn ho ritagliato la scritta Lucky prima con un cartoncino glitterato e poi con un cartoncino di Tonic Studios Iridiscent inca gold, mentre la scritta "You are my" e "Charm" l'ho ottenuta stampandola dalla macchinetta MakeId. Una volta pronti tutti i miei elementi, ho ritagliato un rettangolo di vellum dorato di Tonic Studios (pearled gold) che ho attaccato a sua volta su un cartoncino bianco, per poter dare un po' di rigidità alla card. Infine ho incollato una cornicetta verde ricavata dalla fustella Stitched rectangle frame sempre della Lawnfawn ed aggiunto tutti gli elementi decorativi preparati in precedenza.

Spero vi piaccia la mia card e vi auguro uno splendido weekend!

un abbraccio 

I die-cut the shamrocks several times using a green cardstock from the Studio light essentials pad Lemonade and somewhat darkened the ends of the leaves with in Distress ink Lucky clover and then splattered some gold watercolor from a set of Kuretake. Next with Henry's ABC alphabet from Lawnfawn I cut out the Lucky lettering first with glitter cardstock and then with cardstock from Tonic Studios Iridiscent inca gold, while the words "You are my" and "Charm" I got by printing them from the MakeId machine. Once all my elements were ready, I cut out a rectangle of Tonic Studios gold vellum (pearled gold), which I attached to a white cardstock , in order to give the card some rigidity. Finally, I glued a green frame made from the Stitched rectangle frame die also from Lawnfawn and added all the decorative elements prepared earlier.

I hope you enjoy my card and have a wonderful weekend!

a hug

Quyen


vendredi 25 novembre 2022

Quick Platform Pop-Up Cared combined with Marianne Design Die Cut :)

 Quick Platform Pop-Up Card combined with Marianne Design Die Cut. :)

Schnelle Platform Pop-Up Karte kombiniert mit einer Stanze von Marianne Design. :)


Another sleepless night and a few more die cut animals from Marianne Design finished,
I decided to stick this one on a Platform Pop-Up interactive cardbase from Lawn fawn. You can find the insert add-ons as well as the giant Merry Christmas in the Shop.
As mentioned the Reindeer is from Marianne Design.

Nach einer weiteren schlaflosen Nacht und ein paar mehr ausgestanzte Tierchen von Marianne Design fertig, entschied ich diese auf einer Pop-up Platform von Lawn Fawn zu befestigen.
Die Add Ons für die Einsätze sowie die "Giant Merry Christmas" Stanze sind im Shop gerade an Lager. 
Das Rentier ist wie schon erwähnt von Marianne Design.


In the back I inkblended a moon with the stencil from Lawn Fawn and added a stitched mountain border in black to stress the night time mood. Then I spritzed some Glitter Spray all over the background for some sparkly highlights.
Aaand finished! :)

Im Hintergrund habe ich einen Mond mit einer Stanze und Distress Oxiden kreiert. Dann noch eine "stitched Mountain Border" in schwarz hinzugefügt für den gewissen Nacht-Look. Danach habe ich das Ganze grosszügig mit Glitzerspray eingesprüht für ein paar glitzrige Highlights.
Et voilà, c'est fini! :)


Thank You for stepping by and see you in the next one. :)

Mercii fürs verbii luegä und bis zum nöchschte Mol! :)
liebi Grüessli
Andrea


jeudi 17 novembre 2022

Eine Stanze von Marianne Design - Drei unterschiedliche Karten

 Hello Everybody :) 

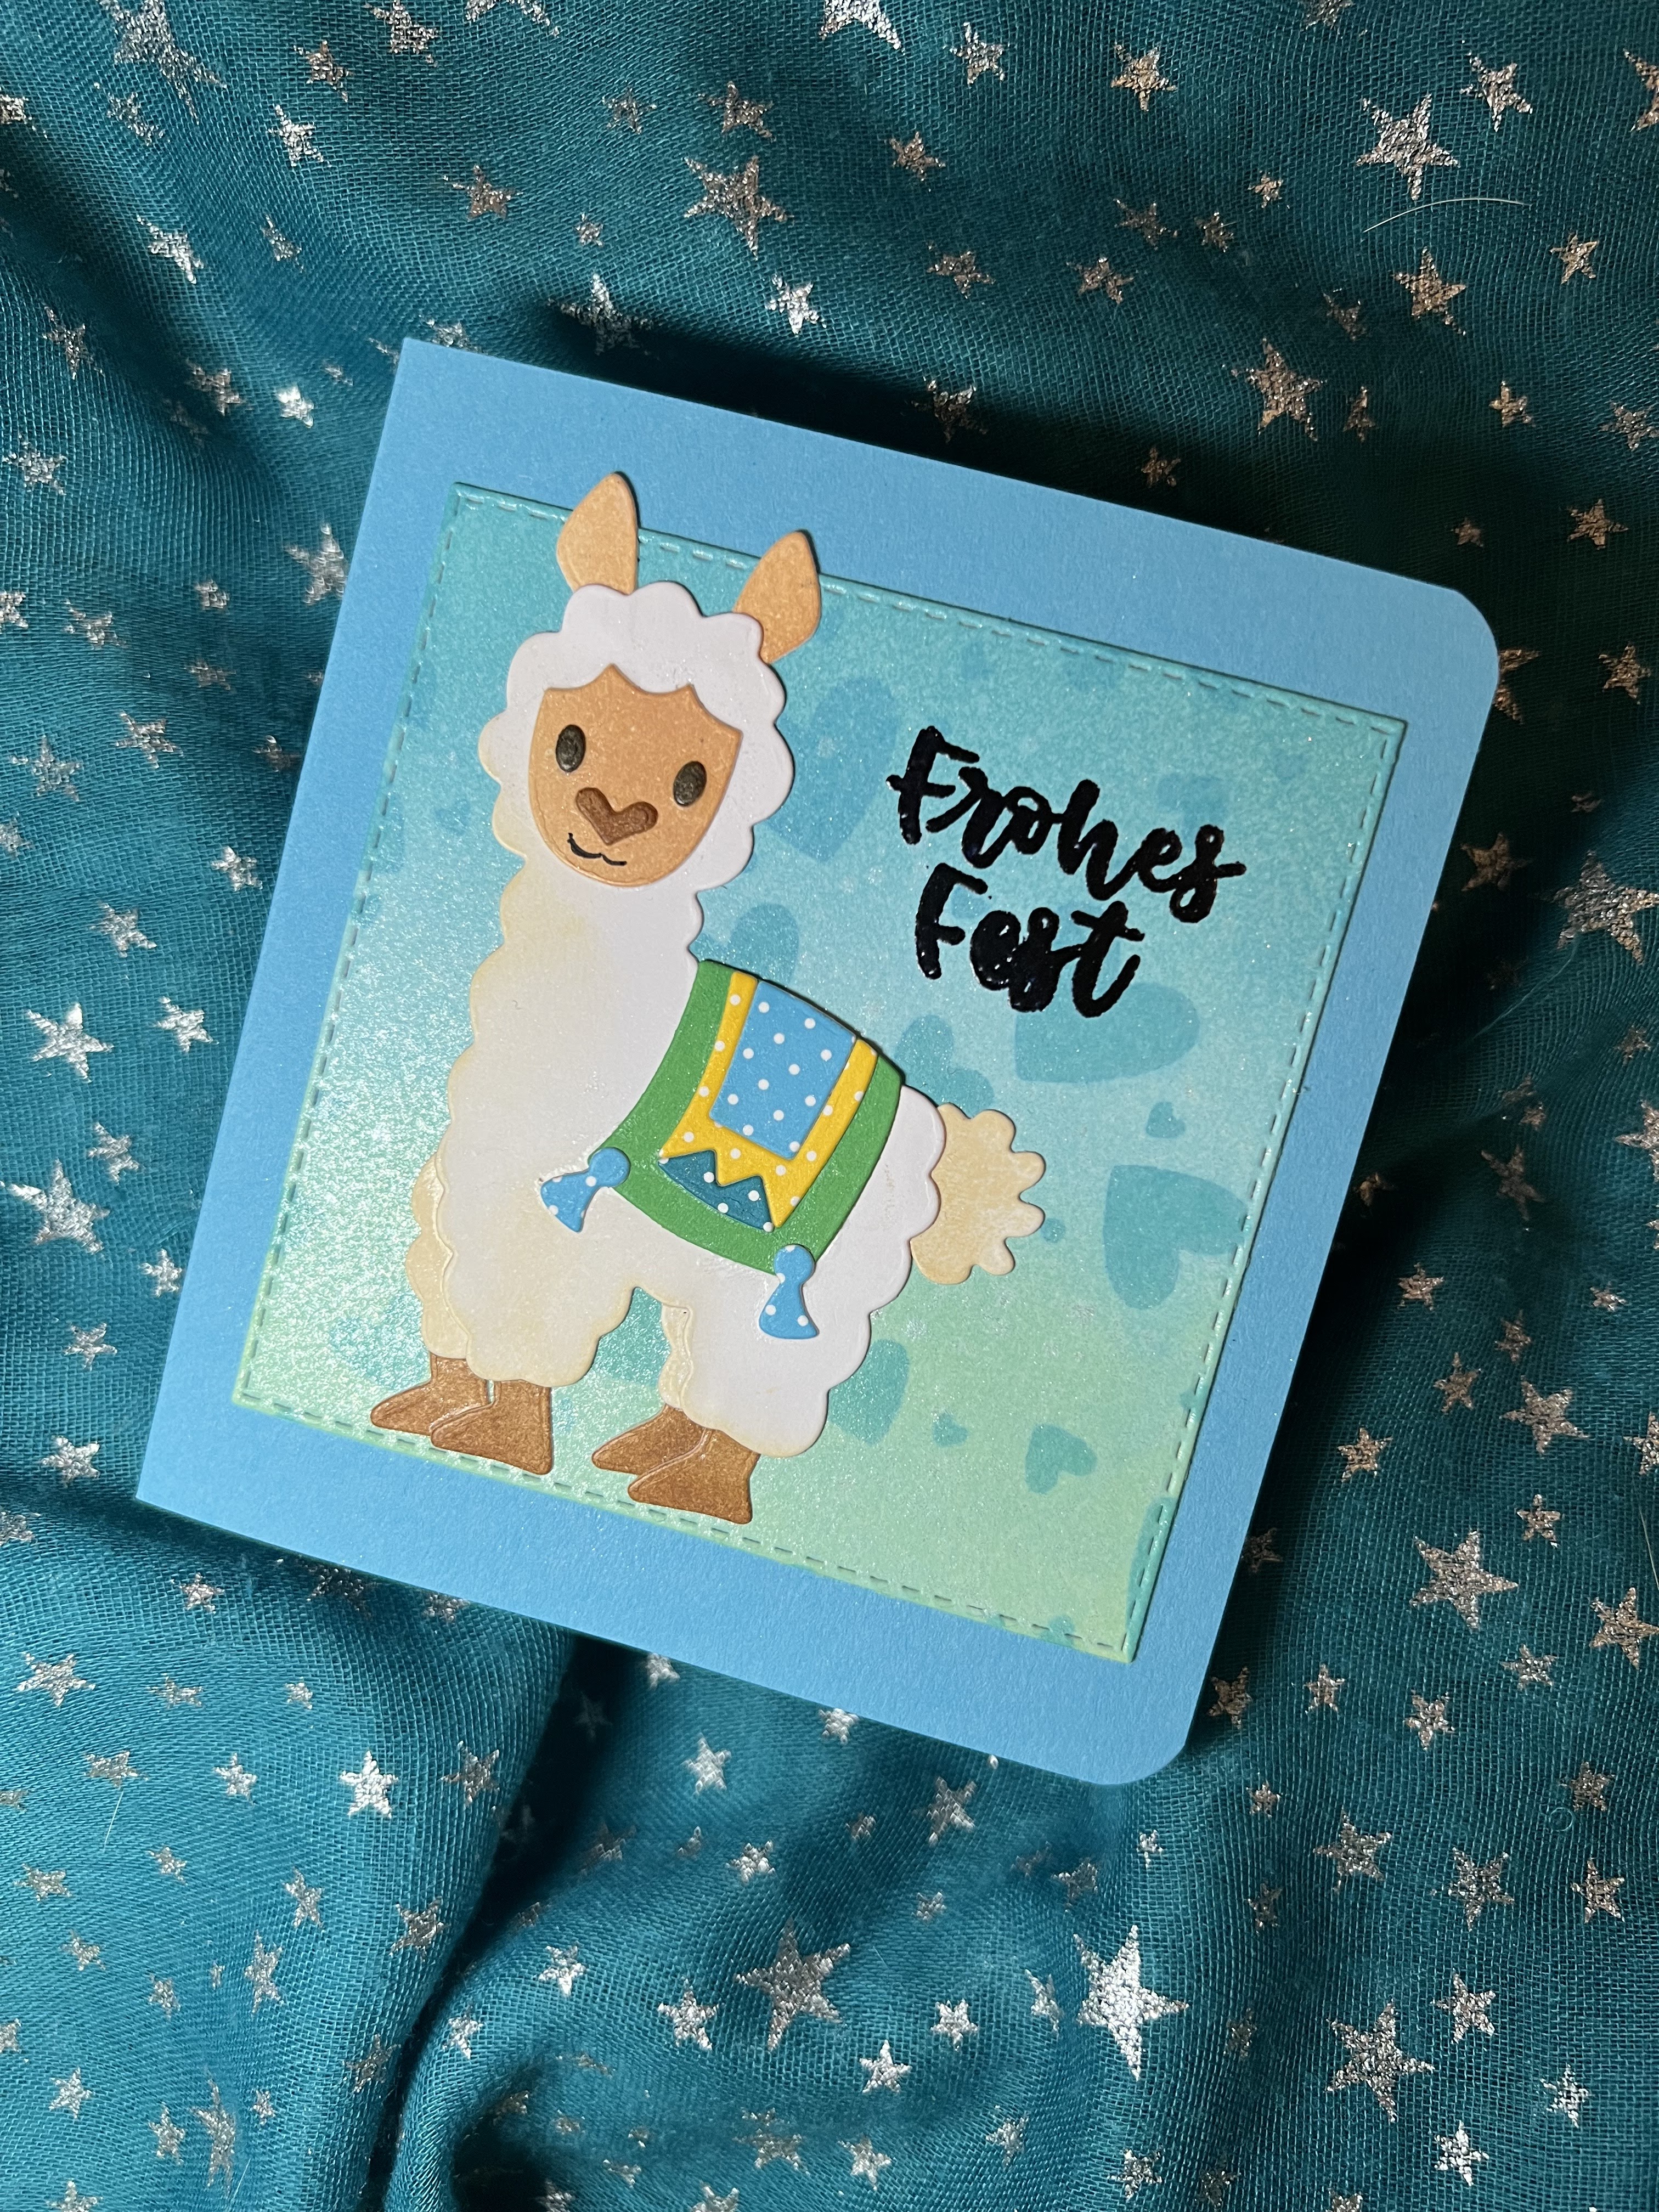
Today I show you three cards with the Alpaca Die Cut set from Marianne Design. I had prepared the Alpacas in a sleepless night, that is quite cool to fill an otherwise wasted night with something that brings out such a cute product! :)

To make the three cards I just distress oxide blended the background, used a stencil from Lawn Fawn on top with distress inks (for sharper contures) and added some glitter spray. Also I used black embossing powder for the sentiments on all three cards. The German ones are from Craftemotions and the dutch one from Marianne design.

Hallo zusammen :)

Heute zeige ich euch drei Karten mit demselben Alpaca Stanzenset von Marianne Design. Die Alpacas habe ich in einer schlaflosen Nacht gewerkelt. Das ist wenigstens ein Aufsteller, bei so einer bescheidenen Nacht am Ende wenigstens ein schönes Produkt in den Händen zu halten. :)

Um diese Karten zu machen habe ich den Hintergrund mit Distress Oxiden coloriert und mit Distress Inks und Schablone von Lawn Fawn verziert. Distress Inks mag ich lieber für Schablonen, da sie schärfere Konturen hervorbringen. Am Schluss habe ich noch etwas Glitzerspray darüber gespritzt. Die Sprüche sind alle mit schwarzem Embossing Puder embosst. Die Deutschen sind von Craftemotions und der niederländische von Marianne Design.


For the "Frohes Fest" (Merry Christmas) card I used Cracked Pistacchio, Salvaged Patina and Peacock Feathers Distress Oxides as well as Peacock Feathers and Mermaid Lagoon Distress Inks. I cut the panel out with the Nest Dies from Crealies.

Für die "Frohes Fest" Karte habe ich Cracked Pistacchio, Salvaged Patina und Peacock Feathers Distress Oxide sowie Peacock Feather und Mermaid Lagoon Distress Inks verwendet. Den Hintergrund habe ich mit einer der Nest Stanzen von Crealies ausgestanzt.


For the "Danke" (thank You) Card I used Salty Ocean, Blueprint Sketch and Chipped Sapphire Distress Oxides. The Opening for the Shaker Card I cut out with those supercool stitched Crea Nest Dies from Crealies. I glued the Cutout onto the cardbase, adhered acetate to the uper part and after adding glitter and other sparkly stuff attached that with 2mm high foam tape.

Für die Danke Karte habe ich Salty Ocean, Blueprint Sketch und Chipped Sapphire Distress Oxide verwendet. Die Öffnung für die Shaker Karte habe ich mit der supercoolen stitched Crea Nest Stanze von Crealies ausgestanzt. Das Ausgeschnittene habe ich dann auf die Kartenbasis geklebt, eine Folie hinter der Öffnung befestigt, Glitter und andere Glitzersachen hinzugefügt und das Ganze dann mit 2mm hohem 3D Klebeband zusammen gemacht.


For the "fijne Verjaardag" (Happy Birthday) Card I used Squeezed Lemonade, Carved Pumpkin and the new Lumberjack Plaid Distress Oxide as well as Fossilized Amber, Crackling Campfire and Fired Brick Distress Inks with the Heart Stencil.

Für die "fijne Verjaardag" (Alles Gute zum Geburtstag) Karte habe ich Squeezed Lemonade, Carved Pumpkin und das neue Lumberjack Plaid Distress Oxid sowie Fossilized Amber, Crackling Campfire und Fired Brick Distress Ink mit der Herzchen Schablone verwendet.


Et voilà 1 Die cut set - 3 different cards. :)
Thank you for stepping by and cya in the next one.
Hearty Greetings
Andrea

Et voilà 1 Stanzenset - 3 verschiedene Karten. :)
Vielen Dank fürs Vorbeischauen!
liebi Grüessli
Andrea


mardi 20 septembre 2022

Individuelle Toblerone Verpackung

 Hallo miteinander :)

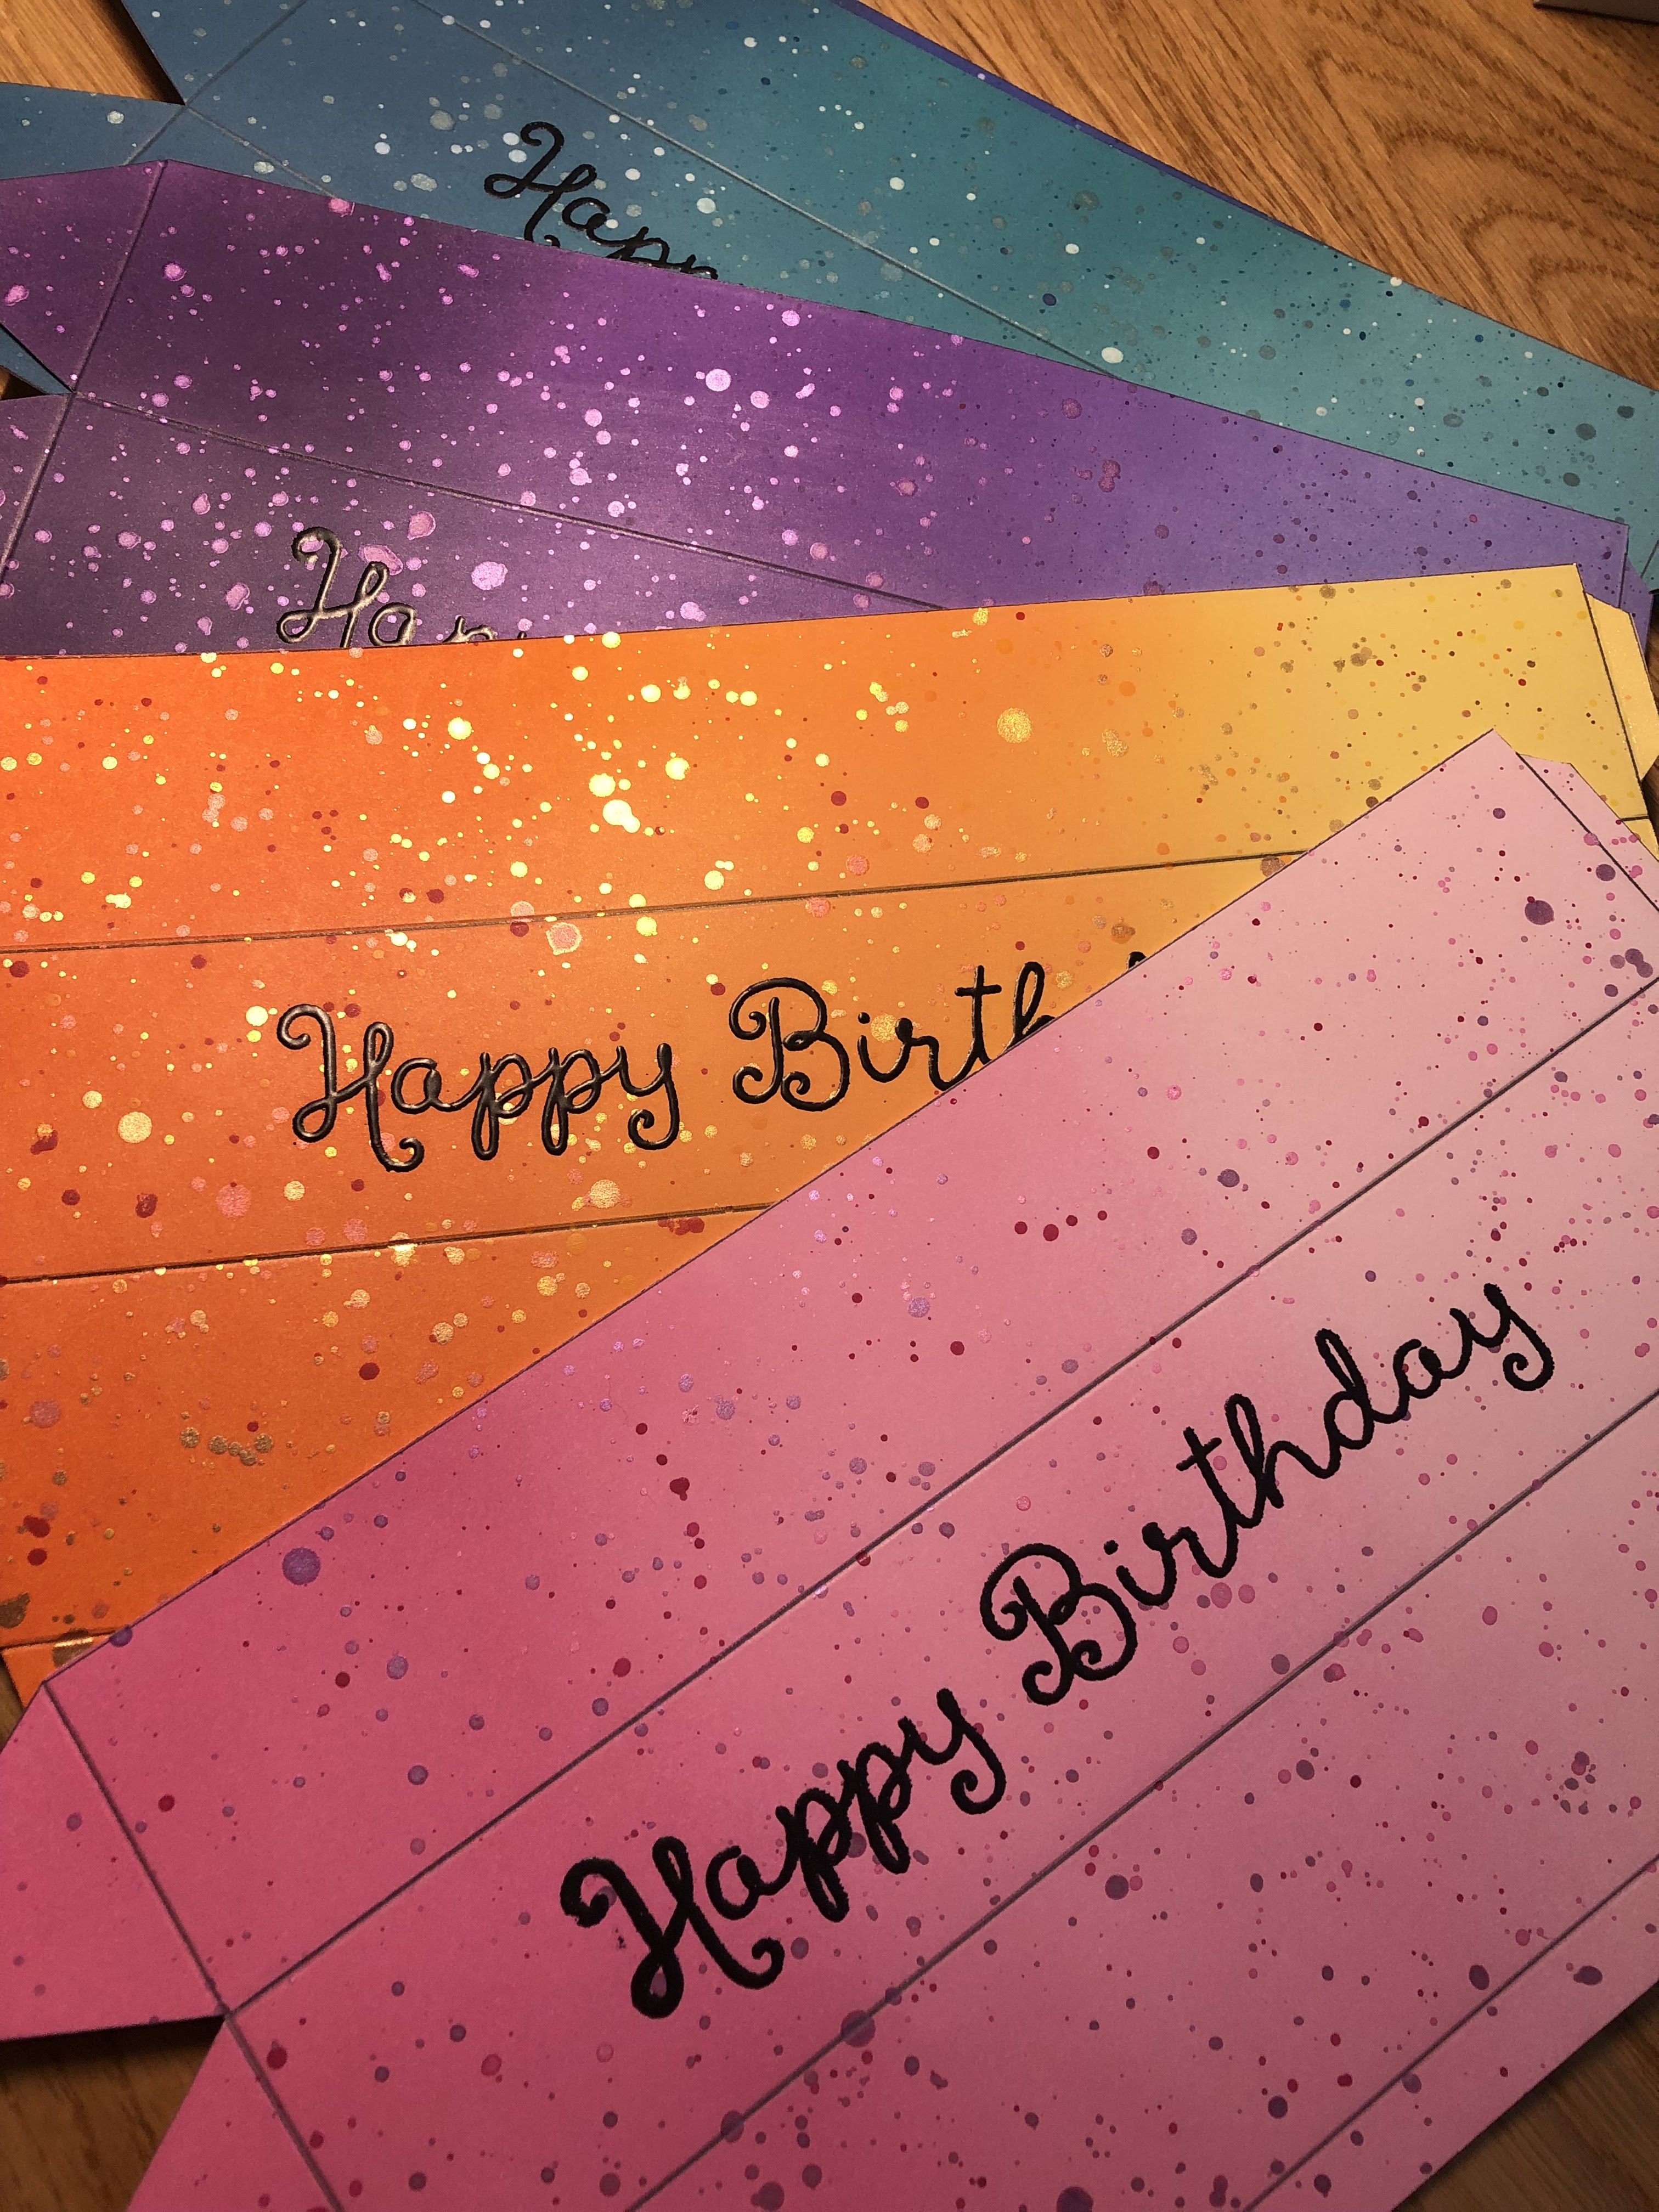
Heute möchte ich euch eines meiner letzten Projekte kurz vorstellen: Verpackung einer 100 grämmigen Toblerone selber herstellen. Hier sind einige dekorierte Beispiele mit Stempeln von My Favorite Things, Lawn Fawn, Hello Bluebird und Marianne Design Stanzen.

Hello everybody :)

Today I would like to present to you one of my latest projects: a homemade packaging for a 100 gr Toblerone. Here are a few decorated examples with stamps from My Favorite Things, Lawn Fawn, Hello Bluebird and Marianne Design die cuts.


Für die Verpackung habe ich im Office Word einen Grundriss erstellt und mir diesen auf 300 Gramm Papier ausgedruckt. Das Foto ist eine A4 Seite, dann sollten die Dimensionen für die Verpackung stimmen.

I prepared a template in an Office Word document for the packaging and printed it onto 300 gr heavy cardstock. This picture is of a full A4 page so if you print it in those dimensions, it should work out.
Zuerst habe ich die Teile mit Distress Oxiden eingefärbt, dazu habe ich jeweils drei Farbkombinationen verwendet.

First I colored all the parts with Distress Oxides, for that I used three different color combinations per packaging.


Danach habe ich alle Teile mit Wasserfarbe und Perfect Pearls besprenkelt. Als sie trocken waren dann ausgeschnitten und ein "Happy Birthday" mit Versamark Tinte gestempelt und mit schwarzem Puder embosst.

Then I cut out all the parts and used watercolors and perfect pearls to make speckles. When they were dry I cut them all out and used versamark ink to embosse a "Happy Birthday" with black embossing powder onto them.


Vor dem Falten habe ich alle Falzlinien mit einem Falzbein vorbereitet, um danach schöne saubere Kanten zu haben. Dann hat die Kleberei begonnen. Für den Deckel habe ich Flüssigleim verwendet. Es war ein bisschen schwierig da irgendwie alle Teile zur selben Zeit geklebt werden. Die kleine Lasche geht unter die andere (siehe Foto unten rechts). Eventuell müsst ihr einige Ecken ein bisschen mehr trimmen als es auf der Vorlage gezeigt ist. Ich hoffe das klappt bei euch!

Before I folded all the lines, I scored them to get sharp, neat creases. Then the gluey part started. I used liquid adhesive for the lid and it was a bit tricky as all the parts kind of needed to be glued and attached at the same time. The smaller flap goes under the other one (as shown in the picture to the right). Maybe you would have to cut a bit off those parts in order to make it work. I do hope you get it to work!


Den Hauptkörper habe ich zusammen geklebt mit einer Toblerone in der Mitte um die Klebelaschen besser andrücken zu können. Für die lange Kante habe ich doppelseitiges Klebeband verwendet, für die Dreieckseiten Flüssigleim. Et voilà, dekorieren und fertig. :)
Ich hoffe ihr probiert es auch aus mit dem eingefügten Grundriss für diese Toblerone Schachtel.

Herzlichen Dank fürs Vorbeischauen und bis zum nächsten Mal.
Liebi Grüessli
Andrea

The long side of the main body I adhered with score tape and the triangle parts with liquid adhesive. To make the whole assembling easier I wrapped it around a Toblerone so it wouldn't collapse when I put pressure onto the parts which needed to stick together. And just like that you can decorate it and are finished! :)
I do hope you try it out with the inserted picture of the template.

Thank you so much for stepping by and cya in the next one.
Hearty Greetings
Andrea


vendredi 26 août 2022

Marianne Design, Lawn Fawn and Distress Oxides

  Good morning everybody 😃

I am very excited to join the scraphouse design team! 🥳 My name is Andrea Auf der Maur, I live in Schaffhausen with two cats (Muzzina & Zilly) and I started making cards two years ago after seeing a Lawn Fawn video on Youtube. Today I would like to share a short tutorial for a card using the swan from Marianne Design Collectables and the Bayou Backdrop as well as the Cattails Border from Lawn Fawn.

Guetä Morgä mitenand 😃

Ich freue mich sehr neu im Design Team von Scraphouse dabei zu sein! 🥳 Mein Name ist Andrea Auf der Maur, ich wohne in Schaffhausen mit zwei Katzen (Muzzina & Zilly) und habe vor zwei Jahren mit dem Karten basteln begonnen nachdem ich auf Youtube ein Lawn Fawn Video gesehen habe. Heute möchte ich euch in wenigen Schritten zeigen wie ich den Schwan von Marianne Design Collectables, sowie die Bayou Backdrop Stanze und Cattails Border von Lawn Fawn für eine Karte eingesetzt habe.


I started with inking the background with Ranger Distress Oxides in the colors Broken China, Cracked Pistacchio, Salvaged Patina and Shaded Lilac. Then I sprinkled some water and perfect pearl splatters over it for some texture.

Zuerst habe ich den Hintergrund mit Ranger Distress Oxides in den Farben Broken China, Cracked Pistacchio, Salvaged Patina und Shaded Lilac eingefärbt. Danach habe ich etwas Wasser sowie Perfect Pearls darüber gesprenkelt um dem Hintergrund mehr Effekt zu verleihen.

Then I die cut the Bayou Background in three different colors and the Cattails Border in two different greens for each card. The Bayou Background needed some persuading and the use of a craft knife as it wasn‘t properly cut through in all the places. Also I prepared the swans but I had done that on another day to have them ready.

Als nächstes habe ich für jede Karte drei verschieden farbige Bayou Backgrounds und je zwei unterschiedlich grüne Cattails Border ausgestanzt. Die Bayou Backdrops brauchten etwas Überredung und den Einsatz vom Bastelmesser, da sie nicht an allen Stellen sauber ausgestanzt waren. Die Schwäne hatte ich schon am Tag zuvor vorbereitet. 

All that was left was to glue it all together starting with arranging the colors from the Bayou Backdrop. Then I added the sentiment „I just swan to say have a happy day“ from the stampset Swan Soirée from Lawm Fawn to the cattails border with black embossing powder. And finally adhered the swan in the middle with some foam squares and then attached the Cattails border with even higher foam strips. All in all I created four cards like that.

Alles was es nun noch zu tun gab war das Ganze zusammenzukleben. Ich begann mit dem Arrangieren der Farben des Bayou Hintergrunds. Danach fügte ich den Spruch „I just swan to say have a happy day“ vom Stempelset Swan Soirée von Lawn Fawn mit schwarzem Embossing Puder auf die Cattails Border. Zu guter letzt setzte ich die Schwäne auf Foam Pads in die Mitte und klebte die Schilf Bordüre mit noch höheren Foam Streifen auf die Karte. Insgesamt sind so vier Karten entstanden.


After finishing those front panels I chose the colors for the cardbases and adhered the panels on it. Two I adhered on a white card, one on light green and one on lilac.
Et voilà, cards are done! 😃

Nachdem die Szene fertig gestellt wurde entschied ich welche Farben ich für die Faltkarten benutzen wollte. Ich entschied mich für zwei weisse und je einen mintgrünen und lilanen Kartenrohling.         Tadaaa, fertig! 😃


Thank you for stepping by and I hope you are having a lovely day! ☺️

Merci fürs verbii luegä und ich wünschä ganz en schöne Tag! ☺️


mardi 10 août 2021

Valérie // Herzlichen Glückwunsch

 Bonjour!

Je suis de retour avec une carte de mariage, réalisée avec les dies Marianne Design que vous trouverez la plupart en boutique. Vous verrez, ces dies sont magnifiques! 


Venez faire un tour en boutique, il y a plein d'autres nouveautés!

lundi 22 mars 2021

Valérie // Hello toucan!

 Hello!

Joyeux lundi à tous! J'espère que vous commencez bien la semaine. Il fait encore froid mais la météo annonce une belle amélioration des températures dès mercredi. Je me réjouis. 

J'ai une carte réalisée uniquement avec des die-cuts.

Le magnifique toucan est un die de Marianne Design. Cela prend un peu de temps pour découper chaque pièce et les assembler, mais cela vaut la peine je trouve. Le résultat est bluffant! Vous le trouverez en boutique chez Scraphouse.


Merci de votre visite!

A bientôt,

Valérie

vendredi 27 mars 2020

You're my zebra - Valérie

Bonjour!

J'ai retrouvé mon MOJO (inspiration), je suis très contente. Je fais de nouveau des cartes et j'ai même commencé notre album de mariage (2014!!). Oui, je suis très en retard, je sais.

Voici une carte réalisée avec un die Marianne Design (MARIANNE DESIGN COLLECTABLES ELINES ZEBRA AND DONKEY) que vous trouverez en boutique ici.


Je vous souhaite une excellente fin de journée et un bon week-end.