Affichage des articles dont le libellé est spellbinders. Afficher tous les articles

samedi 29 août 2026

Season of sparkle


Ciao creative, come state? spero tutto bene! Dopo questa lunga estate, son felice di partire finalmente per le vacanze!! Ma prima di partire voglio mostrarvi un'altra card natalizia! Son tanto carini questi nuovi timbri di AALL&Create! Qui ho colorato con i Copic markers il timbro Season of sparkle.
Per lo sfondo invece ho usato il 3D embossing folder di Spellbinders Holiday Lights. Ho voluto dare un po' di luce e con il tampone di Lisa Horton Solid Gold, ho colorato le parti in rilievo.

Hi, crafters! How are you? I hope everything’s going well! After this long summer, I’m so happy to finally be heading off on vacation!! But before I go, I want to show you another Christmas card! These new stamps from AALL&Create are so cute! Here, I colored the “Season of Sparkle” stamp with Copic markers.
For the background, I used the Spellbinders “Holiday Lights” 3D embossing folder. I wanted to add a little sparkle, so I used Lisa Horton’s “Solid Gold” ink pad to color the embossed areas.


Con un sentiment foilizzato la mia card natalizia é pronta! Ti piace?
Buon weekend 

With a foil-embossed sentiment, my Christmas card is ready! Do you like it?
Have a great weekend
Quyen


mardi 25 août 2026

Spectacular Bear Etched Dies from Spellbinders


Buongiorno creativa, come stai? Spero tutto bene!
Eccomi qui oggi ha mostrarti queste 5 card natalizie usando la fustella Spectacular Bear Etched Dies di Spellbinders. L'ho trovata subito pazzescamente carina, e quando vedo qualcosa che mi piace tanto lo immagino subito con differenti combinazioni di colori. Cosa ne pensi? Qual'è la tua preferita?
Ad ogni dettaglio colorato dell'orso ( cuffia, sciarpa,ecc) ho deci di abbinare sfondi diversi. Tranne per la prima card con lo sfondo rosso dove ho usato un timbro di sfondo e della polvere da embossing dorata, gli altri sfondi sono stati fatti con la glimmer machine, quindi sono stati foilizzati.
Grazie per esser passata da qui, ti auguro uno splendido inizio settimana 

Good morning, creative friend! How are you? I hope everything’s going well!
I’m here today to show you these 5 Christmas cards made using the Spectacular Bear Etched Dies from Spellbinders. I thought it was absolutely adorable right away, and when I see something I really like, I immediately imagine it in different color combinations. What do you think? Which one is your favorite?
For each colorful detail on the bear (hat, scarf, etc.), I decided to pair it with a different background. Except for the first card with the red background—where I used a background stamp and gold embossing powder—the other backgrounds were created with the Glimmer Machine, so they have a foil finish.
Thanks for stopping by, and I wish you a wonderful start to the week! 


Quyen


mercredi 5 août 2026

Christmas cats


Buongiorno Card makers, 
come state? 
Nonostante questa estate caldissima che sembra non finire mai, é ora di pensare al Natale! Quindi eccomi qui con le mie prime due card natalizie, restando sempre sulla scia di una cat lover.:D 
Questa volta, anziché un timbro, ho usato il nuovo set di fustelle di Spellbinders Christmas cats etched dies combinandolo con un altro set vecchio Delivering joy etched dies
Ho voluto ricreare una scena dove il gatto, invece di arrampicarsi su un albero di Natale, lo facesse su una pila di regali che ne ricordasse la forma.
Per dare alla card un tocco speciale, ho usato il 3 d embossing folder Diamond blocks come sfondo.

Good morning card makers,
How are you? 
Even though this scorching summer seems to go on forever, it’s time to start thinking about Christmas! So here I am with my first two Christmas cards, staying true to my cat-loving style. :D
This time, instead of a stamp, I used the new Spellbinders “Christmas Cats Etched Dies” set, combining it with another older set, “Delivering Joy Etched Dies.
I wanted to recreate a scene where the cat, instead of climbing a Christmas tree, climbs a stack of presents shaped like one.
To give the card a special touch, I used the “Diamond Blocks” 3D embossing folder as the background.


Invece per la seconda car ho usato un 3d Embossing differente , Herringbone decor
Cosa ne pensate? Quale dei due vi ha colpito di più?
Vi auguro una buona giornata

For the second card, however, I used a different 3D embossing pattern: Herringbone Decor.
What do you think? Which one did you like best?
Have a great day!

Quyen


lundi 3 août 2026

Heureux comme un chat au jardin


Buongiorno Creative, come state? 
In battibaleno siamo già arrivate ad agosto! Con il grande caldo estivo di quest'anno, non ho avuto l'energie di creare card, ma dopo un giorno trascorso con un'amica cardmaker, mi é ritornata il craft mojo!
Per chi mi conosce, sa che ho un gran debole per i gatti, quindi non ho resistito ed ho preso questo timbro di  L'encre et l'image Heureux comme un chat au jardin. Non trovate adorabili i due micetti in questo set? Io li adoro!!!
Ho timbrato i mici sulla carta apposita per la colorazione con i marker ad alcool e li ho colorati con i Copic markers. 
In seguito ho pensato che sarebbe stata una buona idea "incorniciare" il gattino e quindi ho usato il nuovo embossing folder di Spellbinders Ornate Molded frame 3D . 

Good morning, Creative Friends! 
How are you all doing?
Before we knew it, it’s already August! With this year’s intense summer heat, I didn’t have the energy to make cards, but after spending a day with a fellow cardmaker friend, my crafting mojo is back!
Anyone who knows me knows I have a huge soft spot for cats, so I couldn’t resist and picked up this stamp set from L’encre et l’image called “Heureux comme un chat au jardin.” Don’t you think the two kittens in this set are adorable? I absolutely love them!!!
I stamped the kittens onto paper designed for coloring with alcohol markers and colored them with Copic markers.
Then I thought it would be a good idea to “frame” the kitten, so I used the new Spellbinders “Ornate Molded Frame 3D” embossing folder.


Per restare in tema del soggetto della mia card, il gatto nel vaso di fiori, ho pensato di usare lo stencil della Lawnfawn Daisy bloom outline background con il tampone bianco Yeti ed ho creato delle macchie dorate e pitturato il bordo della cornice con la Nuvo Sparkle Spray.

To stay on theme with the subject of my card—the cat in the vase of flowers—I decided to use the Lawnfawn Daisy Bloom Outline Background stencil with the white Yeti ink pad, and I created some golden splotches and painted the edge of the frame with Nuvo Sparkle Spray.


Infine un nel sentiment foilizzato e voilà , card pronta!
Spero vi piaccia, vi auguro un splendido inizio settimana,

Finally, add a foil-stamped sentiment, and voilà—the card is ready!
I hope you like it. Have a wonderful start to the week,

Quyen


jeudi 4 juin 2026

Kokeshi Doll

Bonjour les scrappeuses,

J'espère que vous allez bien et que vous scrappez toujours. 

Je vous présente aujourd'hui une carte réalisée avec la machine Glimmer Hot Foil de Spellbinders. C'est vraiment assez facile d'utilisation et le résultat est vraiment bluffant. 

J'ai utilisé le die Kokeshi Doll de Spellbinders mais il n'est malheureusement plus en magasin. Vous pouvez par exemple utiliser Mickey Mouse à la place. Le sentiment vient du set Wonderful Tulips.

Cette carte est parfaite pour offrir à ma belle-soeur qui est passionnée par le Japon.

Pour utiliser la Glimmer Hot Foil, il faut tout d'abord brancher la machine et l'allumer. Elle commence à chauffer et une fois la température idéale atteinte, le voyant vert Platform Ready s'allume. Pendant que la machine chauffe, découpez un morceau de foil de la taille de votre die. Placez votre die sur la plaque chauffée et le foil du côté imprimé face contre le die. Pressez le bouton Timer et quand le die est chaud, recouvrez-le de votre cardstock et des 2 plaques puis passez la dans votre machine de découpe Big Shot ou autre doucement. Retirez délicatement le foil de votre cardstock et... admirez le résultat. Attention! Le die est chaud. Le résultat est magnifique, cela fait très élégant et professionnel. J'adore! Et vous?


Merci de votre passage et bon scrap!

Valérie

dimanche 29 mars 2026

Soft Mixed Media Florals with Sizzix Studio by Isha Gupta

Hello and welcome everyone! I am Isha, sharing some mixed media cards after quite some time. There are lots of gorgeous new products in the Scraphouse shop. Check them out.

Mixed media cards always have a special charm - soft layers, beautiful textures, and a slightly imperfect artistic feel that makes every card unique. Today I’m sharing three mixed media floral cards created using Sizzix Studio by Willow Wolfe stamps, Distress inks, Spellbinders stencil and simple layering techniques.

What I love most about these cards is how easy it is to create soft artistic backgrounds and then build dimension with florals. Each card has its own personality while using similar supplies! I have used mostly these supplies. You can always use what you have.

Distress Inks
Ranger Texture Paste
Watercolor paper
Waterproof Black ink
White splatter

Card 1 — Soft Watercolor Floral Background


Start with watercolor paper for the best mixed media results
Apply Distress inks to create a watercolor wash
Stamp the delicate florals using black ink and color


Add texture using stencils, and various stamp images 
Add light splatters for extra texture
Stamp sentiment vertically for a modern look
Mount onto a card base

Card 2 — Soft Layered Floral LOVE Card


Create a soft textured background using light distress ink watercolor
Add subtle texture using stencil and embossing paste
Stamp and emboss large florals onto vellum, color and fussy cut


Add bold sentiment "LOVE"
Finish with light splatters

Card 3 — Bright Mixed Media Floral Card


Create a vibrant mixed media background using multiple distress inks
Add texture using various stamps, stencil, texture paste.
Stamp and color florals in bright tones


Cut out florals and leaves 
Arrange florals diagonally for movement
Add sentiment
Finish with splatter

What I love about mixed media is that there’s no right or wrong way. I feel it's a perfect way to de-stress too.


I'd love to know - Do you prefer soft pastel mixed media or bright bold florals?
Let me know in the comments below - I always love hearing your thoughts!
If you try these techniques, tag me - I’d love to see what you create! 

Thank you for stopping by and have a nice day!

vendredi 27 mars 2026

Tupips and Daffodils Card


 Buongiorno creative, come state? 

Oggi vi mostro questa card usando la nuova collezione disegnata da Yana Smakulaper Spellbinders. Il set che ho usato comprende una press plate e lo stencil coordinato Tulips and Daffodils.


Good morning, crafters! 

How are you? 

Today I’m showing you this card made with the new collection designed by Yana Smakulaper for Spellbinders. The set I used includes a press plate and the matching “Tulips and Daffodils” stencils.


Ho preparato con la hot foil machine 4 stampe , di cui 3 colorate con i Copic markers, mentre quella in basso a destra l'ho colorato con i Distress Oxide aiutandomi son gli stencil del set. Una volta confrontate le varie colorazioni, ho deciso di scegliere l'immagine che più ritenevo idonea con uno sfondo nero. Una volta riagliati i bordi del mazzo di fiori, le parte rimanenti bianche le ho colorate con un marker nero.

I created four foiled card using the hot foil machine, three of which I colored with Copic markers, while I colored the one in the bottom right corner with Distress Oxide ink, using the stencils from the set. After comparing the different color schemes, I decided to choose the image I thought worked best with a black background. After trimming the edges of the bouquet, I colored the remaining white areas with a black marker.


Infine ho usato l'embossing folder Molded frame con un cartoncino nero per creare lo sfondo ed ho fatto degli schizzi dorati con dell'acquarello oro ed aggiunto un sentiment foilizzato dal set  Betterpress foil and die Bouquet of Hugs.

Spero possa esservi di ispirazione, vi auguro una splendida giornata e buon weekend!

Finally, I used the Molded Frame embossing folder with black cardstock to create the background, added some gold splashes using gold watercolor paint, and included a foil-stamped sentiment from the Betterpress Foil and Die Bouquet of Hugs set.

I hope this inspires you. Have a wonderful day and a great weekend!

Quyen


vendredi 23 janvier 2026

A Special Toast


Buona sera creative, come state? La mia prima card i quest'anno é a tema matrimonio! Lo scorso anno é uscita questa magnifica fustella di Spellbinders A special toast , ma essendo alle prese con le cards di natale, l'ho lasciata in disparte. Finalmente ho trovato l'occasione di usarla. Ho sempre un po'di difficoltà quando una fustella ha tanti piccoli dettagli perché non so mai che colori combinare insieme. In questo caso ho usato le carte base di Spellbinders per esser sicura che si abbinassero bene insieme. 
Ho scelto 3 verdi differenti per le foglie e in colori sul rosa-rosso per i fiori.
Invece per lo sfondo ho usato la hot foil plate di Pinkfresh studio LushVines con del foil dorato per dargli un tocco elegante alla card.
Spero vi piaccia,


Good evening, crafters, how are you? 
My first card this year is wedding-themed! Last year, Spellbinders released this magnificent die cut, A Special Toast, but since I was busy with Christmas cards, I left it aside. Finally, I found the opportunity to use it. I always have a little trouble when a die cut has lots of small details because I never know which colors to combine. In this case, I used Spellbinders base cards to make sure they would match well together. 
I chose three different greens for the leaves and pink-red colors for the flowers.
For the background, I used Pinkfresh Studio's LushVines hot foil plate with gold foil to give the card an elegant touch.
I hope you like it,

Quyen


mercredi 5 novembre 2025

Winter Wonderland Card Trio with Isha Gupta

  Hello everyone!! Welcome to my cozy corner of winter crafting!  It's Isha here, after a long time. I saw Marjolein got the new ski-sons-greetings collection by Simon Hurley at Spellbinders  in the SHOP — featuring charming A-frame cabins, snowy trees, and a cheerful skier gliding through frosty hills. So, today, I’m sharing a trio of cards. They were so much fun to create :)


I fell in love with the small cabin and the embossing folders and the skiers are so close to my heart :) These dies make it so easy to create little winter stories — whether it’s a season of cheer, a happy new year, or winter greetings, there’s a touch of magic in every layer! 
Grab your inks, a hot drink, and let’s dive into some winter inspiration
I used Streamline 3D embossing folder, Ski Lodge Etched dies and Hit The Slope etched dies for all my cards. There is a wide range of inks and other supplies in the shop. Do check it out.

Card 1 – Season of Cheer 


For this card, I chose a deep red cabin against a soft blush pink sky. I used the Ski Lodge, Streamline embossing folder along with the Mistletoe Greetings from the previous release, which I used my glimmer to hot foil. The background has that gentle snowy swirl, created using the embossing folder for subtle texture. 


I ink-blended around the trees and roofline for contrast, then finished it off with a simple sentiment banner: “Season of Cheer”


It feels like a warm cabin glowing in the middle of a quiet snowfall :)

🎿 Card 2 – Winter Greetings


This one captures the fun and sporty side of winter! I used the Ski Lodge, Hit the Slopes, Streamline embossing folder along with the Christmas Greetings Etched Dies.


I added the adorable skier die cut, surrounded by evergreens dusted with ink-blended greens. The sentiment “Winter Greetings” is stacked in soft pastels with a touch of shimmer to bring in that frosty, magical light. I used a soft ombré blend of blue, lilac, and pink for the sky to give it that crisp winter morning vibe.

🎄 Card 3 – Happy New Year

For the final card, I went bold and bright! I used the Ski Lodge, Streamline embossing folder along with the Mistletoe Greetings from the previous release, which I used my glimmer to hot foil.


A pink A-frame cabin sits against a rich red background, dotted with white splatters to mimic falling snow. I love how the mix of warm pinks and cool greens gives a festive, slightly retro holiday feel. The banner saying “Happy New Year” ties it all together — cheerful and full of hope for new beginnings.


I had so much fun playing with this collection — it’s the perfect mix of cozy and creative!
Which one would you like to create this winter: the red cabin, the pink-frame, or out on the ski slopes? ⛷️
Thank you for stopping by and have a nice day!

jeudi 31 juillet 2025

Just for You Hydrangea card


Buongiorno creative, 
come state? eccomi qui con questa card usando alcune novità nello shop di Scraphouse.Adoro le piante d'ortensie, mi mettono sempre di buon umore, quindi ho adorato creare questa card. Ho usato la fustella di Hero Arts Layered Hydrangea etched dies con le carte Colorwheel di Spellbiders  , ed ho fatto un po' di schizzi perlati con Sparkle splatter effects.
L'ultimo strato di fiorellini li ho ricavati da del vellum perlato della Tonic studio.

Good morning, creative folks, 
how are you? Here I am with this card using some new items from the Scraphouse shop. I love hydrangeas, they always put me in a good mood, so I loved creating this card. I used the Hero Arts Layered Hydrangea etched dies with Spellbinders Colorwheel papers, and I made some pearlescent splatters with Sparkle splatter effects.
The last layer of flowers was made from pearlescent vellum by Tonic Studio.


Per lo sfondo della mia card ho usato la press plate Sweeping script sentiments e creato altri schizzi ma stavolta con il nero Raven splatter effects
Spero vi piaccia questa card , io l'adoro!
Buona giornata

For the background of my card, I used the Sweeping Script Sentiments press plate and created other splatters, but this time with Raven black splatter effects
I hope you like this card, I love it!
Have a nice day!

Quyen


mercredi 7 mai 2025

Cute Kokeshi Dolls


Buongiorno creative, 
come state? 
oggi vi mostro cards con queste adorabili Kokeshi di Spellbinders. Sono delle placche per la betterpress chiamate Kokeshi dolls spring in Kyoto.
Solitamente mi piace usare le press plate con la glimmer machine per foilizzare, ma questa volta ho voluto usare la Betterpress. Le bamboline le ho colorate con gli Zig clean color real brush.

Per la prima card ho usare la better press Cherry blossoms spring in Kyoto   per creare uno sfondo con i fiori di ciliegio. Dato che mi sembrava un po' troppo nero, ho aggiunto un pezzo di vellum perlato argento per rendere lo sfondo più delicato.

Good morning crafters,
 how are you? 
today I show you cards with these adorable Kokeshi from Spellbinders. They are betterpress plates called Kokeshi dolls spring in Kyoto.
I usually like to use press plates with the glimmer machine to foil, but this time I wanted to use the Betterpress. I colored the dolls with the Zig clean color real brush.

For the first card I used Betterpress Cherry blossoms spring in Kyoto to create a background with cherry blossoms. Since it seemed a little too black, I added a piece of silver pearl vellum to make the background more delicate.


Mentre per la seconda card ho sfumato dell'inchiostro rosa la parte superiore del cartoncino e poi disegnato sempre con gli zig dei rami ci ciliegio.
Spero vi piacciano , vi auguro un meraviglioso mercoledì,


While for the second card I shaded some pink ink the top of the card and then drew always with zigs some branches there cherry tree.
I hope you like them , have a wonderful Wednesday,

Quyen


vendredi 2 mai 2025

Japanese Cherry Blossom


Buongiorno creative, come state? 
oggi vi mostro queste due card fatte con le novità di Spellbinders che potete trovare sul sito di Scraphouse!
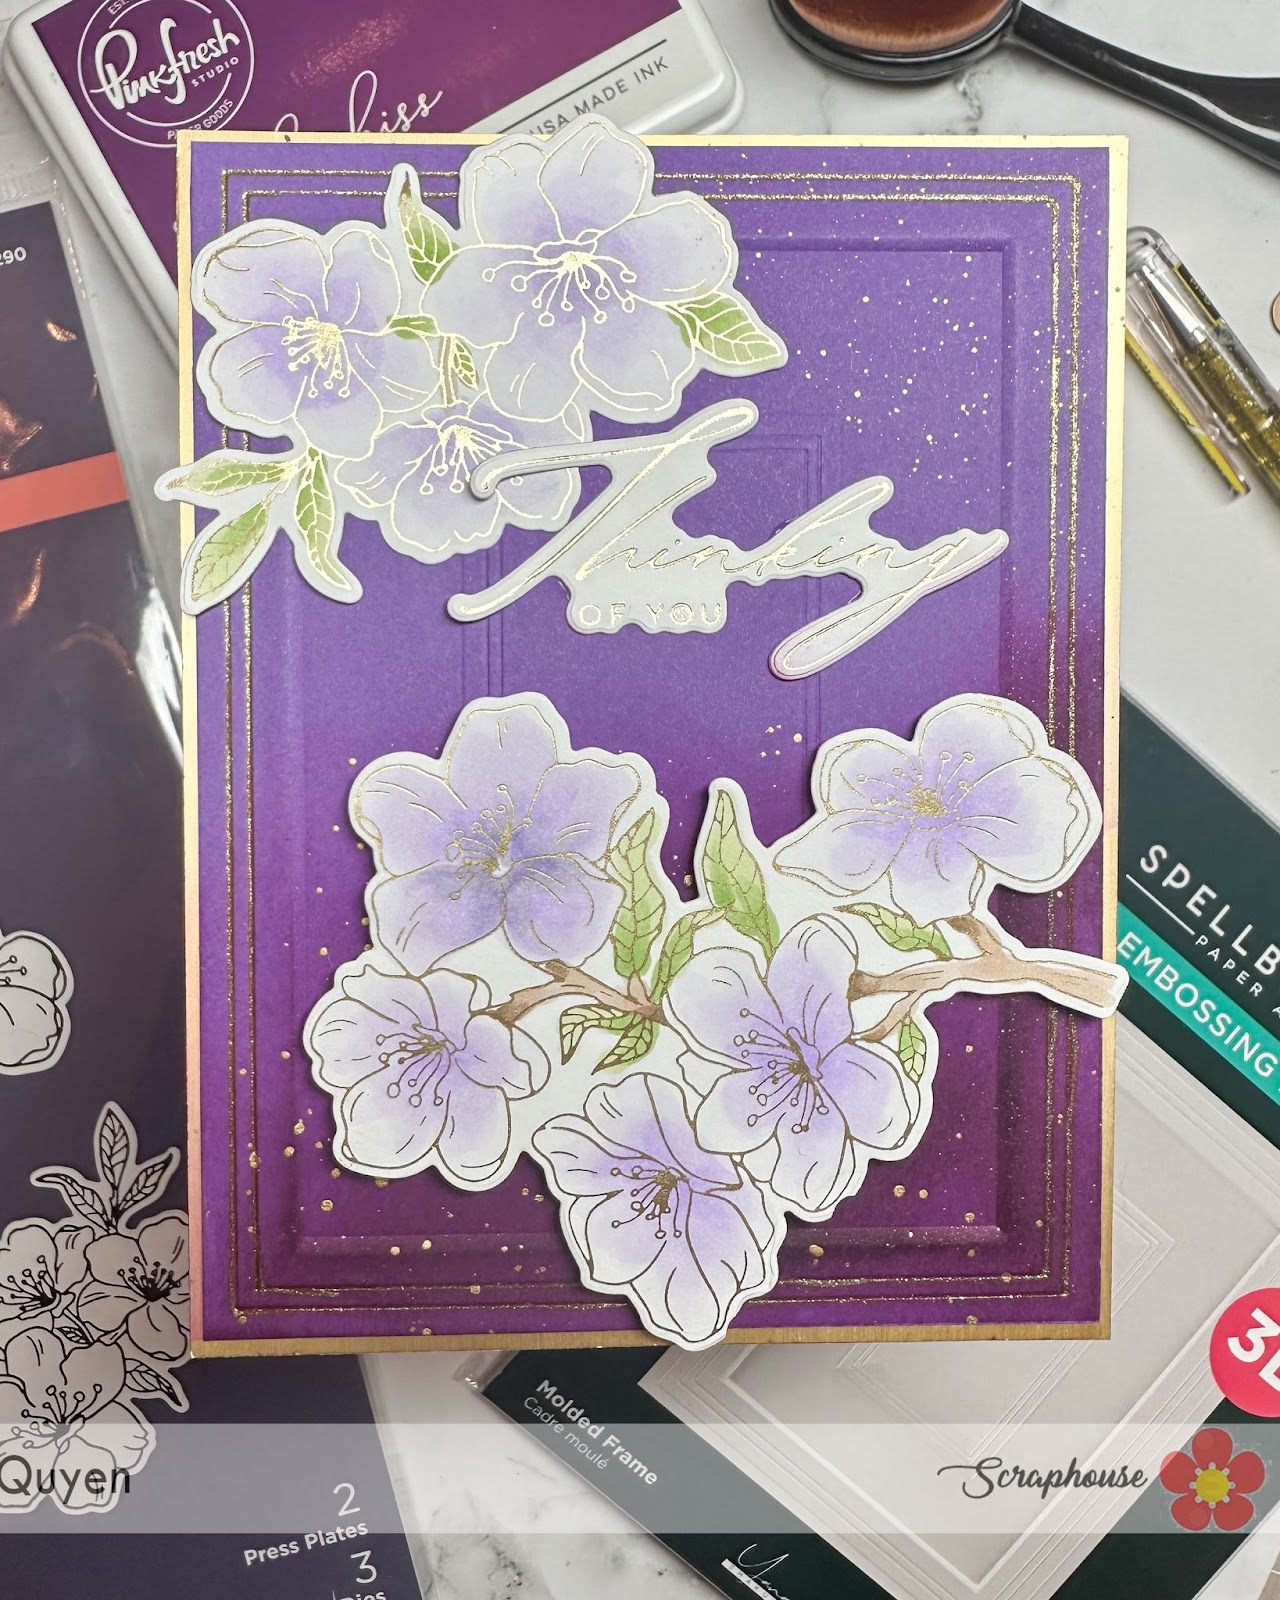
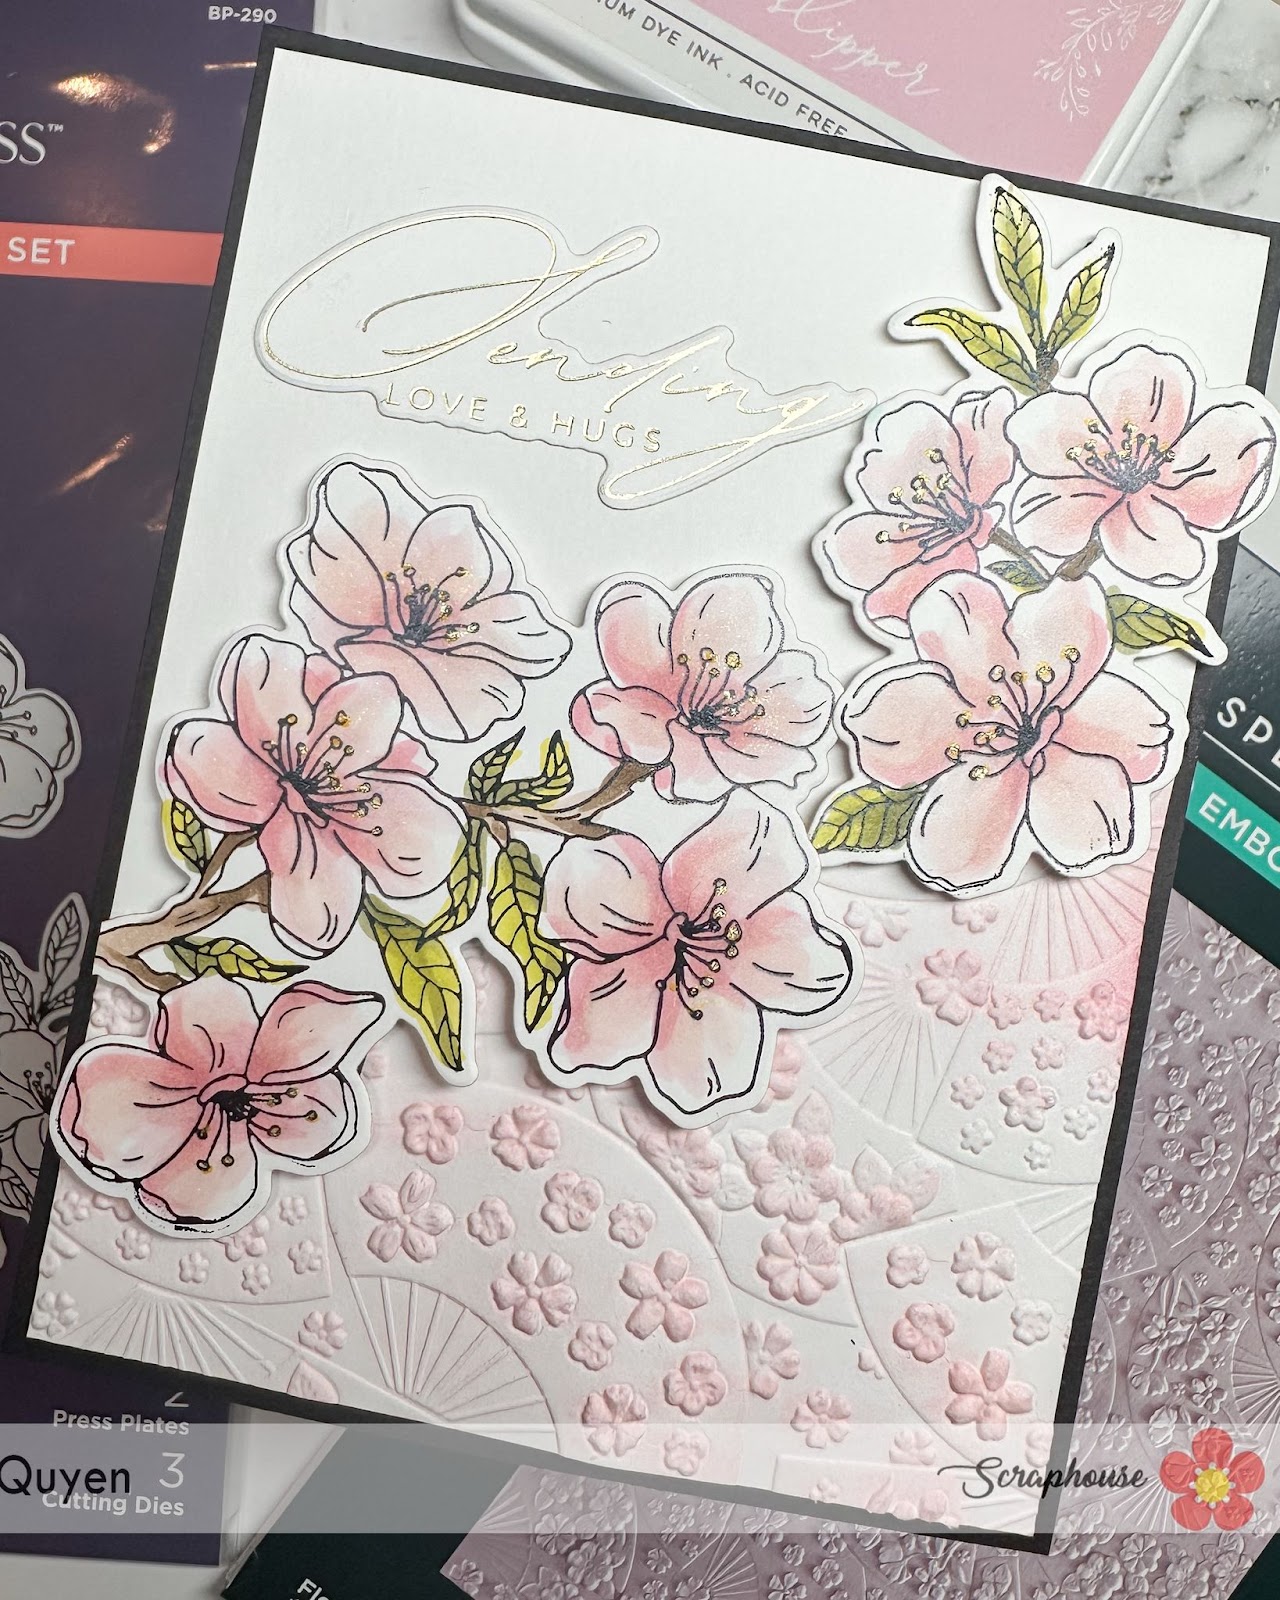
Non son stupendi questi fiori di ciliegio? Li adoro! Ho usato la press plate Cherry blossoms spring in Kyoto per foilizzare in oro ed in nero. Una volta ritagliato i fiori con la loro apposita fustella, li ho colorati con dei marker ad alcohol, in questo caso gli OLO.

Good morning creatives, how are you? 
Today I show you these two cards made with new Spellbinders that you can find on the Scraphouse website!
Aren't these cherry blossoms gorgeous? I love them! I used the Cherry blossoms spring press plate in Kyoto to foil in gold and black. Once I cut out the flowers with their appropriate die cut, I colored them with alcohol markers, in this case OLOs.


Per questa prima card preso un cartoncino viola ed embossato con il 3D embossing folder Molded frame , nella parte inferiore ho sfumato l'inchiostro Regal kiss di Pinkfresh studio, creato delle macchie dorate con un'acquarello oro e marcato i bordi del frame con una gel pen dorata.

For this first card I took a purple cardstock and embossed it with the 3D embossing folder Molded frame , at the bottom I blended Regal kiss ink from Pinkfresh studio, created gold flecks with a gold watercolor and marked the edges of the frame with a gold gel pen.


invece per questa seconda card , ho usato un embossing folder differente, Floral fans spring in Kyoto , e passato sulla parte in rilievo l'inchiostro Ballet slippers di Pinkfresh Studio. come puoi notare dall' immagine sottostante, ho embossato solo un angolo del mio cartoncino.

instead for this second card , I used a different embossing folder, Floral fans spring in Kyoto , and passed on the embossed part the Ballet slippers ink from Pinkfresh Studio. as you can see from the 'image below, I embossed only one corner of my card.


Entrambe le card le ho abbellite con dei sentiment della Betterpress plate Crafty hugs.
Spero di avervi ispirato con queste card,
buon Venerdì,

Both cards I embellished with sentiments from Betterpress plate Crafty hugs.
I hope I have inspired you with these cards,
happy Friday,

Quyen