Affichage des articles dont le libellé est Distress Oxide. Afficher tous les articles

dimanche 10 mai 2026

Whispering Daffodils Washi


Buongiorno anime creative!
come state? Innanzi tutto auguri a tutte le mamme! Dedico a tutte voi questa card floreale in onore di questa festività.
Ho usato la nuova collezione di Pinkfresh Studio Whispering Daffodils
Ho usato il Washi tape della collezione e fustellato i fiori con la loro fustella coordinata.
Per la composizione ho pensato che ci poteva stare con una cornice esagonale dorata che ho ricavato usando due fustelle di dimensioni diverse (una grande ed una più piccola ) del set Nested Hexagons. Ho usato ancora la fustella grande per ritagliare un esagono bianco che ho sfumato con il Distress Oxide Tattered rose, per usare come base dove incollare la cornicetta dorata.
Per rendere la card dinamica, ho deciso di usare la fustella Sparkling Diamonds, che gli da qual dettaglio in più alla card ma senza rubare la scena ai fiori. 
Infine ho aggiunto il sentiment che si trovava nel set di timbri coordinato ed ho aggiunto la scritta "mom" usando un timbro alfabeto della Lawnfawn.

Spero vi sia piaciuta, una splendida domenica.


Good morning, creative souls!
How are you all? First of all, happy Mother’s Day to all the moms out there! I’m dedicating this floral card to all of you in honor of this special day.
I used the new Whispering Daffodils collection from Pinkfresh Studio
I used the washi tape from the collection and die-cut the flowers with their matching die.
For the layout, I thought a gold hexagonal frame would work well, which I created using two dies of different sizes (one large and one smaller) from the Nested Hexagons set. I used the large die again to cut out a white hexagon that I distressed with Distress Oxide Tattered Rose, to use as a base for gluing the little gold frame onto.
To add some movement to the card, I decided to use the Sparkling Diamonds die, which adds that extra detail to the card without stealing the spotlight from the flowers.
Finally, I added the sentiment from the coordinating stamp set and added the word “mom” using a Lawnfawn alphabet stamp.
I hope you liked it—have a wonderful Sunday!


Go to the collection of Whispering Daffodils:

washi

dies

stamp

stencil


mardi 28 avril 2026

Spring Flowers Stencil card


Buongiorno cardmaker, 

come state? sono super felice di mostrarvi questa card realizzata con il nuovo stencil Spring Flowers della Lawn fawn! lo trovo carinissimooooooo!!! :D ho realizzato lo sfondo con i seguenti Distress Oxide: Victorian velvet e Shaded lilac per i fiori e per le foglie il Bundled sage. Invece per il pistillo ho usato la Solar paste Golden Hour per dargli quel tocco luccicante in più.


Good morning, cardmakers, 

how are you? I’m so excited to show you this card I made using the new Spring Flowers stencil from Lawn Fawn! I think it’s absolutely adorable!!! :D I created the background using the following Distress Oxide colors: Victorian Velvet and Shaded Lilac for the flowers, and Bundled Sage for the leaves. For the pistil, I used Golden Hour Solar Paste to give it that extra touch of sparkle.


Inoltre ho spalmato la Solar paste su un cartoncino bianco e lasciato da parte ad asciugare. Una volta asciugato bene, ho fustellato il sentiment Scripty thinking of you e poi aggiunto il suo Outline abbinato in rosa, lo stesso che usato anche per la mattatura. Per completare la card ho aggiungo in bannero con la scritta Friend e il topino dal set Mice Flowers.

Spero che lo stencil piacca a voi quanto piace a me!

Buona giornata


I also spread Solar Paste onto a piece of white cardstock and set it aside to dry. Once it was completely dry, I die-cut the “Scripty Thinking of You” sentiment and then added its matching pink outline, the same one I used for the matte finish. To finish the card, I added a banner with the word “Friend” and the little mouse from the Mice Flowers set.
I hope you like the stencil as much as I do!
Have a great day


Quyen


dimanche 26 avril 2026

Mice Flowers Card


 Ciao Creative, 
come state?
Oggi sono qui sul blog di Scraphouse per mostrarvi questa card fatta con l'ausilio della nuova release della Lawnfawn che potete trovare cliccando qui. Purtroppo un po' di cose sono già sold out, ma sono sicura che qualcosa che vi attira lo troverete sicuramente. Come ho preparato questa card? ho cominciato a fustellare la cornice del set Workshop Backdrop Landscape Dies usando un cartoncino beige effetto legno Woodgrain cardstock light brown.  Questa fustella é perfetta usata con il set Mice tools, però ho voluto dargli un tocco differente e quindi ho usato il set di timbri Mice Flowers. Una volta colorati con i marker ad alcool, in questo caso ho usato gli OLO, ho posizionato i personaggi nei "cassettini". Visto che volevo tenere un look abbastanza pulito per lo sfondo ho sfumato poco poco il color Bundled sage degli Oxide ink.Vi piace come é venuta la card? 
Vi auguro una buona serata e buon inizio settimana!

un abbraccio Quyen


Hi Crafty Friends, 
How are you?
Today I’m here on the Scraphouse blog to show you this card I made using the new Lawnfawn release, which you can find by clicking here. Unfortunately, some items are already sold out, but I’m sure you’ll find something that catches your eye. How did I make this card? I started by die-cutting the frame from the Workshop Backdrop Landscape Dies set using light brown woodgrain cardstock.  This die is perfect for use with the Mice Tools set, but I wanted to give it a different touch, so I used the Mice Flowers stamp set instead. Once colored with alcohol markers—in this case, I used OLO markers—I placed the characters in the “little boxes.” Since I wanted to keep the background looking fairly clean, I lightly blended the Bundled Sage color from Oxide inks. Do you like how the card turned out? 
Have a great evening and a good start to the week!


vendredi 27 mars 2026

Tupips and Daffodils Card


 Buongiorno creative, come state? 

Oggi vi mostro questa card usando la nuova collezione disegnata da Yana Smakulaper Spellbinders. Il set che ho usato comprende una press plate e lo stencil coordinato Tulips and Daffodils.


Good morning, crafters! 

How are you? 

Today I’m showing you this card made with the new collection designed by Yana Smakulaper for Spellbinders. The set I used includes a press plate and the matching “Tulips and Daffodils” stencils.


Ho preparato con la hot foil machine 4 stampe , di cui 3 colorate con i Copic markers, mentre quella in basso a destra l'ho colorato con i Distress Oxide aiutandomi son gli stencil del set. Una volta confrontate le varie colorazioni, ho deciso di scegliere l'immagine che più ritenevo idonea con uno sfondo nero. Una volta riagliati i bordi del mazzo di fiori, le parte rimanenti bianche le ho colorate con un marker nero.

I created four foiled card using the hot foil machine, three of which I colored with Copic markers, while I colored the one in the bottom right corner with Distress Oxide ink, using the stencils from the set. After comparing the different color schemes, I decided to choose the image I thought worked best with a black background. After trimming the edges of the bouquet, I colored the remaining white areas with a black marker.


Infine ho usato l'embossing folder Molded frame con un cartoncino nero per creare lo sfondo ed ho fatto degli schizzi dorati con dell'acquarello oro ed aggiunto un sentiment foilizzato dal set  Betterpress foil and die Bouquet of Hugs.

Spero possa esservi di ispirazione, vi auguro una splendida giornata e buon weekend!

Finally, I used the Molded Frame embossing folder with black cardstock to create the background, added some gold splashes using gold watercolor paint, and included a foil-stamped sentiment from the Betterpress Foil and Die Bouquet of Hugs set.

I hope this inspires you. Have a wonderful day and a great weekend!

Quyen


vendredi 20 mars 2026

Pinkfresh studio Fragrance notes

 Buongiorno card makers,
come state?
Oggi sono qui per mostrarvi queste due card usando i nuovi prodotti di Pinkfresh Studio.

 Good morning, card makers,
How are you?
Today I’m here to show you these two cards made with the new products from Pinkfresh Studio.


 Dal loro sito ufficiale potete ammirare la varietà di card che hanno creato con questo prodotti. Le cards del loro design team sono una più bella dell'altra. Ammetto che quando poi vedo così tante belle card poi un po' mi blocco perchè non vorrei creare qualcosa di "mio" senza farmi influenzare. Quindi ho deciso di fare svariati test su cartoncini di base di colori differenti, ed alla fine quello che mi é piaciuto di più era la combinazione con carta d'acquarello grigia della Canson.

I materiali che usato sono i seguenti:

- Pinkfresh Studio Fragrance notes press plate , Fragrance notes die  e Fragrance notes stencil.

- Distress Oxide Tattered rose, Saltwater taffy, Bundled sage, Speckled egg.


 On their official website, you can see the variety of cards they’ve created with these products. The cards designed by their design team are each more beautiful than the last. I admit that when I see so many beautiful cards, I get a little stuck because I don’t want to create something “of my own” without being influenced. So I decided to do several tests on different colored cardstock, and in the end, what I liked best was the combination with Canson gray watercolor paper.

The materials I used are as follows:

- Pinkfresh Studio Fragrance Notes press plate, Fragrance Notes die, and Fragrance Notes stencil.

- Distress Oxide Tattered Rose, Saltwater Taffy, Bundled Sage, Speckled Egg.


In questa prima card ho usato tutti i 4 Oxide con gli stencil sia per creare lo sfondo sia per colorare i fiori. Ho ritagliato un cerchio ed inserito delle pailettes per creare una shaker card e sullo sfondo dietro alla "finestran"ho sfumato su un cartoncino bianco l'oxide Tattered rose e Saltwater taffy.


For this first card, I used all four Oxide inks with stencils to create both the background and to color the flowers. I cut out a circle and added sequins to create a shaker card, and on the background behind the “window,” I blended Tattered Rose and Saltwater Taffy Oxide inks onto white cardstock.


Invece con la seconda card i fiori li ho colorati come la card precedente, ma lo sfondo invece ho usato solo Tattered rose e Saltwater taffy e poi creato degli schizzi di nero con l'inchiostro Raven di Spellbinders.
Spero vi siano piaciute queste card, vi auguro buona giornata e buon weekend!

For the second card, I colored the flowers the same way as on the previous card, but for the background I used only Tattered Rose and Saltwater Taffy, and then added some black splatters using Spellbinders Raven ink.
I hope you enjoyed these cards. Have a great day and a wonderful weekend!

Quyen


vendredi 6 septembre 2024

Cheesy Christmas!

Buongiorno Creative,

come state? avete visto la nuova release della Lawnfawn? Le novità mi son piaciute moltissimo!

Faccio sempre molta fatica a creare delle card Clean And Simple ed ammiro molto le card maker in grado di creare card fantastiche con pochissimi elementi. Questa volta mi son ispirata a Carly Tee su IG @carlyteeminer e voilà, spero che la card vi piaccia.


Good morning Cardmakers

how are you? have you seen the new Lawnfawn release? I loved the new features!

I always have a hard time creating Clean And Simple cards and I really admire card makers who can create amazing cards with very few elements. This time I was inspired by Carly Tee on IG @carlyteeminer and voila, I hope you enjoy the card.


Ho dapprima colorato 1/3 di sfondo con i Distress oxide : Rustic Wilderness e Scattered straw, poi ho fatto cadere diverse gocce d'acqua e tamponato via il colore e timbrato del pacchi regali da set di vecchi timbri di Natale della Lawnfawn.

I first colored 1/3 background with Distress oxide : Rustic Wilderness and Scattered straw, then dropped several drops of water and dabbed away the color and stamped some gift wrap from Lawnfawn's old Christmas stamp set.


Poi ho timbrato, colorato e fustellato i nuovi timbri Cheesy Christmas ed aggiunto il sentiment Merry Christmas, sempre dalla stessa plancia.

Grazie per esser passate da qui, buona giornata e buon weekend

Then I stamped, colored and die-cut the new Cheesy Christmas stamps and added the Merry Christmas sentiment, again from the same plank.

Thanks for stopping by, have a great day and have a great weekend

Quyen


vendredi 5 juillet 2024

JAMAIS !

 Attention très long article !
( vu la taille de cet article, je vous laisse le soin de demander à votre traducteur préféré de faire son job , merci beaucoup !)


 Ah non,non! jamais, jamais, c'est commercial ce truc !.....
c'est ce que je disais de la Betterpress à sa sortie  il y a 1 an...sauf que...jamais est arrivé mardi 2 juillet😅

Je voyais les magnifiques créations faites avec elle et j'avoue que ces derniers 3-4 mois elle commençait sérieusement à me taquiner, cette coquine !

Elle ne fait pas QUE l'embossage (creux) mais ses plaques vont AUSSI pour la machine dite Hot Foil

Je me suis donc amusée comme une fofolle à tester mon nouveau joujou et j'avoue que je l'adooore !

 Voici la chose :


 Ma première impression/utilisation a été avec l'encre noire ( pas fait de photo sorry) et la 2ème tentative à été de faire une "impression" avec 2 encres de couleurs différentes :


 que j'ai colorée avec les feutres SpectrumNoir puis ajouté un effet "mouillé" en embossant à chaud avec la WOW embossing Powder Clear Gloss :


Puis j'ai testé avec les crayons Faber Castell et la plaque Paon :


La même plaque mais coloré avec les feutres :


La plaque fleurs qui est fournie avec la Betterpress, j'ai ressortis mes aquarelles Mijello Mission Gold :


Et la plaque qu'une amie m'a offerte, première photo avec fond distress oxide , encre noire BetterpressInk 

coloration crayons:


 et bien sûr, avec ma Glimmer Hot Foil  ( divers rouleaux ), première photo j'ai utilisé  Aura ( j'en ai faite une carte mais je l'ai envoyée et oublié de faire une photo, glups):

 
Et la 2ème avec la couleur Rainbow :


J'ai aussi testé plusieurs papiers l'officiel qui est top et 3 sortes de papiers aquarelle mais je m'arrête ici car sinon vous allez vous endormir profondément hihi

Bref, j'adooore la Betterpress et vous allez me voir l'utiliser souvent !

A bientôt,

*SandraFée*

vendredi 10 mai 2024

3 different cards using Altenew Baroque Elegance

Ciao a tutti! 
Spero di trovarvi bene! oggi vi mostre 3 card diverse usando la stessa press plate di Altenew Baroque elegance.
Ho cominciato provando a colorare la press plate con le solar paste neon di Simon Hurley Tangent, Yellow Jacket, Hot mess, Mood ring, Dart frog e No Chill. Come potete notare dalla foto, alcuni punti il colore si é un po sbavato, ma nessuna paura, passando poi con l'inchiostro nero su tutto il cartoncino, andrà a coprire le parte macchiate.

Hi everyone!!! 
I hope to find you well! today I am showing you 3 different cards using the same press plate from Altenew Baroque elegance .
I started by trying to color the press plate with Simon Hurley's neon solar pastes Tangent, Yellow Jacket, Hot mess, Mood ring, Dart frog and No Chill. As you can see from the photo, some places the color smudged a bit, but no fear, going through then with black ink on the whole cardboard, will go to cover the stained parts.


In seguito ho voluto creare altre combinazioni usando i distress oxide e un inchiostro bianco sul Kraft per vedere che effetto veniva ed ho ottenuto i seguenti sfondi:

Later I wanted to create other combinations using distress oxides and a white ink on the Kraft to see what effect came and got the following backgrounds:


Infine ho scelto 3 di questi sfondi per creare il mio tris di card:

Finally, I chose 3 of these backgrounds to create my trio of cards:


Ho usato una fustella della Lawfawn Stitched rectangle frames per fagliare lo sfondo ed ho incollato i pezzi su in cartoncino olografico ed abbellito con un sentimento della concord9th.

I used a die cut from Lawfawn Stitched rectangle frames to cut out the background and glued the pieces onto holographic cardstock and embellished with a sentiment from concord9th.


Qui invece ho abbellito lo sfondo con il sentiment Best wishes line border della Lawnfawn e le margherite di Spellbinders Fresh picked daisies.

Here, however, I embellished the background with Lawnfawn's Best wishes line border sentiment and Spellbinders Fresh picked daisies.


per quest' ultima card invece ho creato una card per matrimonio usando il timbro di Les ateliers de Karine Romance.

for this last card instead I created a wedding card using the stamp of Les ateliers de Karine Romance


Spero vi siano piaciute, buon weekend

I hope you enjoyed them, have a nice weekend


Quyen


lundi 29 avril 2024

Tout en couleur

Bonjour tout le monde,

Je vais vous montrer comment j'ai crée cette carte haute en couleurs, ma première version j'avais utilisé le stencil Deco Feather avec le set de tampons Forgotten Garden que j'avais découpé à la main


Hello everybody,

  I'm going to show you how I created this colorful card, my first version I used the Deco Feather stencil with the Forgotten Garden stamp set that I cut by hand

Mais le résultat ne me plaisait pas trop, j'ai recommencé en utilisant une de mes machines de découpes et je trouve beaucoup plus joli, j'en ai profité pour tester l'autre stencil Deco Leaf mais j'ai gardé les même couleurs d'encres Distress Oxide


But I didn't like the result too much, I started again using one of my cutting machines and I found it much prettier, I took the opportunity to test the other Deco Leaf stencil but I kept the same colors. Distress Oxide inks


 J'ai collé mes fleurs sur du papier Vellum adhésif pour faire mieux ressortir les fleurs tout en gardant un maximum de fond coloré et voilà !
Passez une belle journée créative

I stuck my flowers on adhesive Vellum paper to make the flowers stand out better while keeping as much of the colored background as possible and that's it! 
 Have a lovely creative day


*SandraFée*

vendredi 3 novembre 2023

Lawn fawn mini release

 Buona sera carissime,

questa piccola release natalizia della Lawnfawn é davvero carinissima!  Se volete visitare l'account Instagram  di Scraphouse o mio di shiny_scrap troverete un reel dove mostro passo a passo la realizzazione di questa card.

Good evening dears,

this little Christmas release from Lawnfawn is really cute!  If you want to visit Scraphouse's Instagram account or mine at shiny_scrap you will find a reel where I show step by step the making of this card.


Rimanendo sul tema snow globe, ho voluto creare una shaker card. 
Ho cominciato timbrando la plancia Little snow globe e poi colorato con i Copic e fustellato inseguito con la fustella coordinata.

Poi ho sfumato i distress oxide Lumberjack plaid e Kitsch flamingo su un cartoncino d'acquarello, per creare lo sfondo della shaker. Ho aggiunto un po' di WOW SPARKLES Cotton Candy come elemento da shakerare. Per chiudere la mia card ho ritagliato la mia cornice glitterata innevata con la fustella Snow flurries backdrop.
Ad un certo punto la card sembrava un po' troppo "rossa" quindi ho voluto aggiungere un sentiment verde. Ho embossato a caldo, su un semplice cartoncino,  la polvere Verdant della WOW embossing powder e fustellato la scritta Let it snow border. 
Spero che vi piaccia, 
buona serata e buon weekend!


I ve chosen "the snow globe theme" , that's why I wanted to create a shaker card. 
I began by stamping the Little snow globe stamp set and then colored with Copic markers and die cut the images with their coordinating dies.

Then I blended Distress Oxide Lumberjack plaid and Kitsch flamingo on a watercolor cardstock to create the background of the shaker and added some WOW SPARKLES Cotton Candy as the shaker element. To close my card, I cut out my snowy glitter frame with the Snow flurries backdrop die cut.
At one point the card looked a little too "reddish" so I wanted to add a green sentiment. I heat embossed, on a plain cardstock, Verdant powder from WOW embossing powder and die cut the Let it snow border. 
I hope you all enjoy it, 
have a nice evening and a good weekend!

Quyen


mercredi 1 mars 2023

Easel Card

Buongiorno creative,
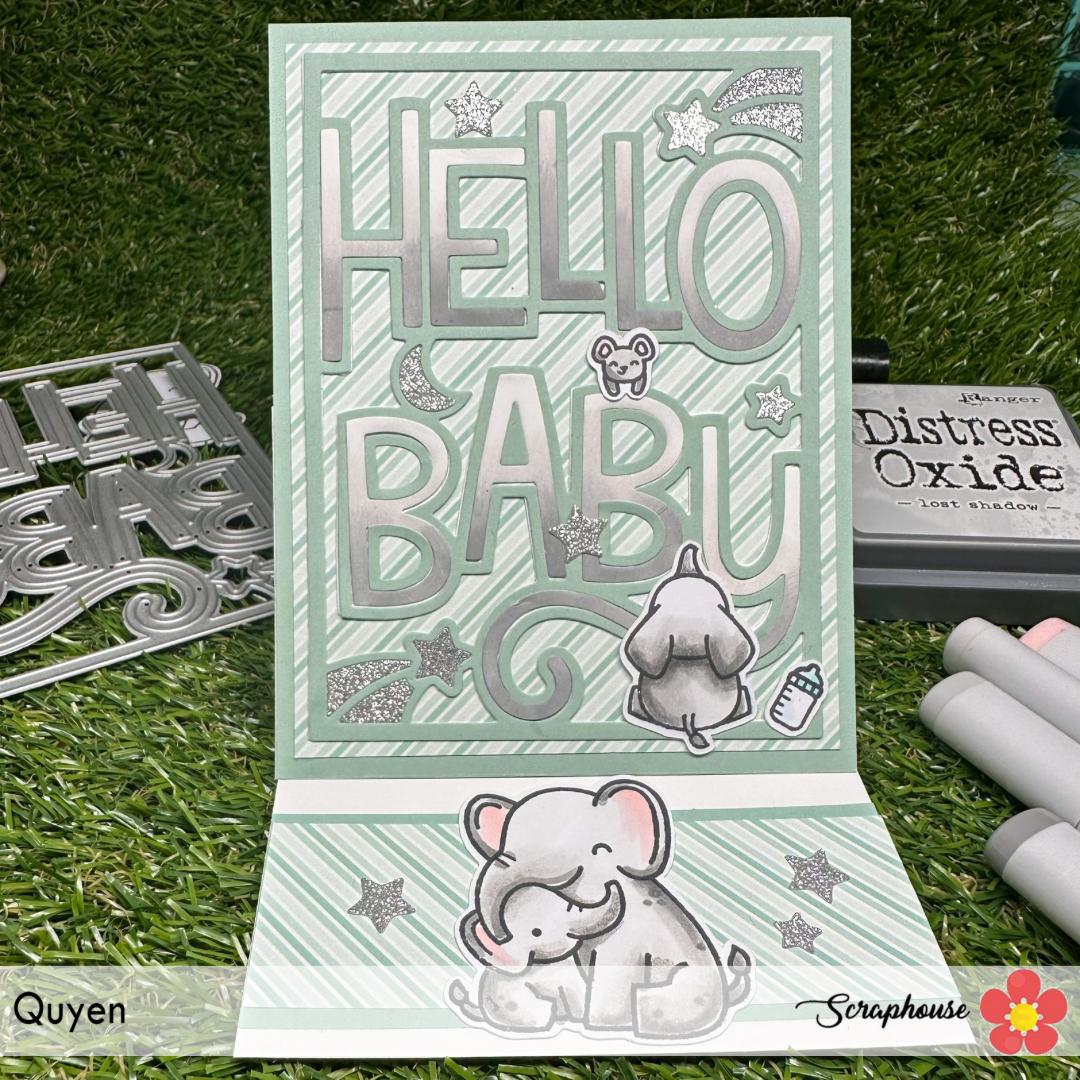
eccomi qui di nuovo con una card nascita! Quando ho visto la Giant dies outlined Hello Baby della Lawnfawn l'ho voluta avere assolutamente per creare card nascita semplici e veloci per quando mi sarebbe mancato il tempo per colorare. 


Good morning creative,
here I am again with a birth card! When I saw the Giant dies outlined Hello Baby from Lawnfawn I absolutely wanted to have it to create quick and easy birth cards for when I would run out of time to color.


Cominciamo dalla facciata della card, ho fustellato il Giant dies due volte, una con la carta verde tiffany e un'altra con la carta bianca. Ho tenuto le lettere che compongono la scritta hello baby con la carta bianca e le ho colorate usando la spugnetta da dito con Distress ink hickory smoke e l'oxide lost shadow.

Starting with the front of the card, I die-cut the Giant dies twice, once with tiffany green paper and once with white paper. I kept the letters that make up the word hello baby with white paper and colored them using the finger sponge with Distress ink hickory smoke and lost shadow oxide.


Ho incollato tutti i pezzi su un foglio a righe dal nuovo pad Stripes 'n sprinkles petite paper pack. COn i copic poi ho colorato l'elefantino e il topino dal set Flight high 

Una volta finito la copertina della mia card son passata a creare la struttura della Easel card con le misure standard. Ho tagliato un foglio bianco a 4 1/4 inches  ed a 11 inches. Poi ho cordonato a 5 1/2 ed a 2 3/4 inches. Ho incollato la mia card al pezzoo che misura 2 3/4.


I glued all the pieces onto a striped sheet from the new Stripes 'n sprinkles petite paper pack pad. With Copics I then colored the little elephant and mouse from the Flight high set

Once I finished my card cover I moved on to creating the easel card structure with the standard measurements. I cut a blank sheet to 4 1/4 inches and 11 inches. Then I scored at 5 1/2 and at 2 3/4 inches. I glued my card to the piece that measuring 2 3/4.


Come saprete l'easel card ha bisogno di uno stopper e quindi no colorato la coppia di elefanti dal set Elephant parade  e l'ho incollato all'interno della card.
As you know the easel card needs a stopper and so no colored the pair of elephants from the Elephant parade set and I glued it inside the card.


Spero via sia piaciuta, alla prossima,

I hope you liked it, see you soon,

Quyen