Hallo zusammen 😊
Hier eine Anleitung zur Herstellung eines Teebeutelspenders. Ein ideales Geschenk oder Mitbringsel in der kommenden Zeit. Dazu brauchst Du keine Stanzen, kannst aber welche einsetzen falls Du passende zu Hause hast. So etwas würde sich dafür anbieten, da kann man sich die gewünschte Grösse heraus picken.
Du brauchst 2-3 Seiten dickes A4 Papier, Massstab, Bleistift, Scheere, Scoreboard, ev.Bierfilz…. zur Dekoration habe ich "Designpapier" verwendet weil das sehr schnell geht.
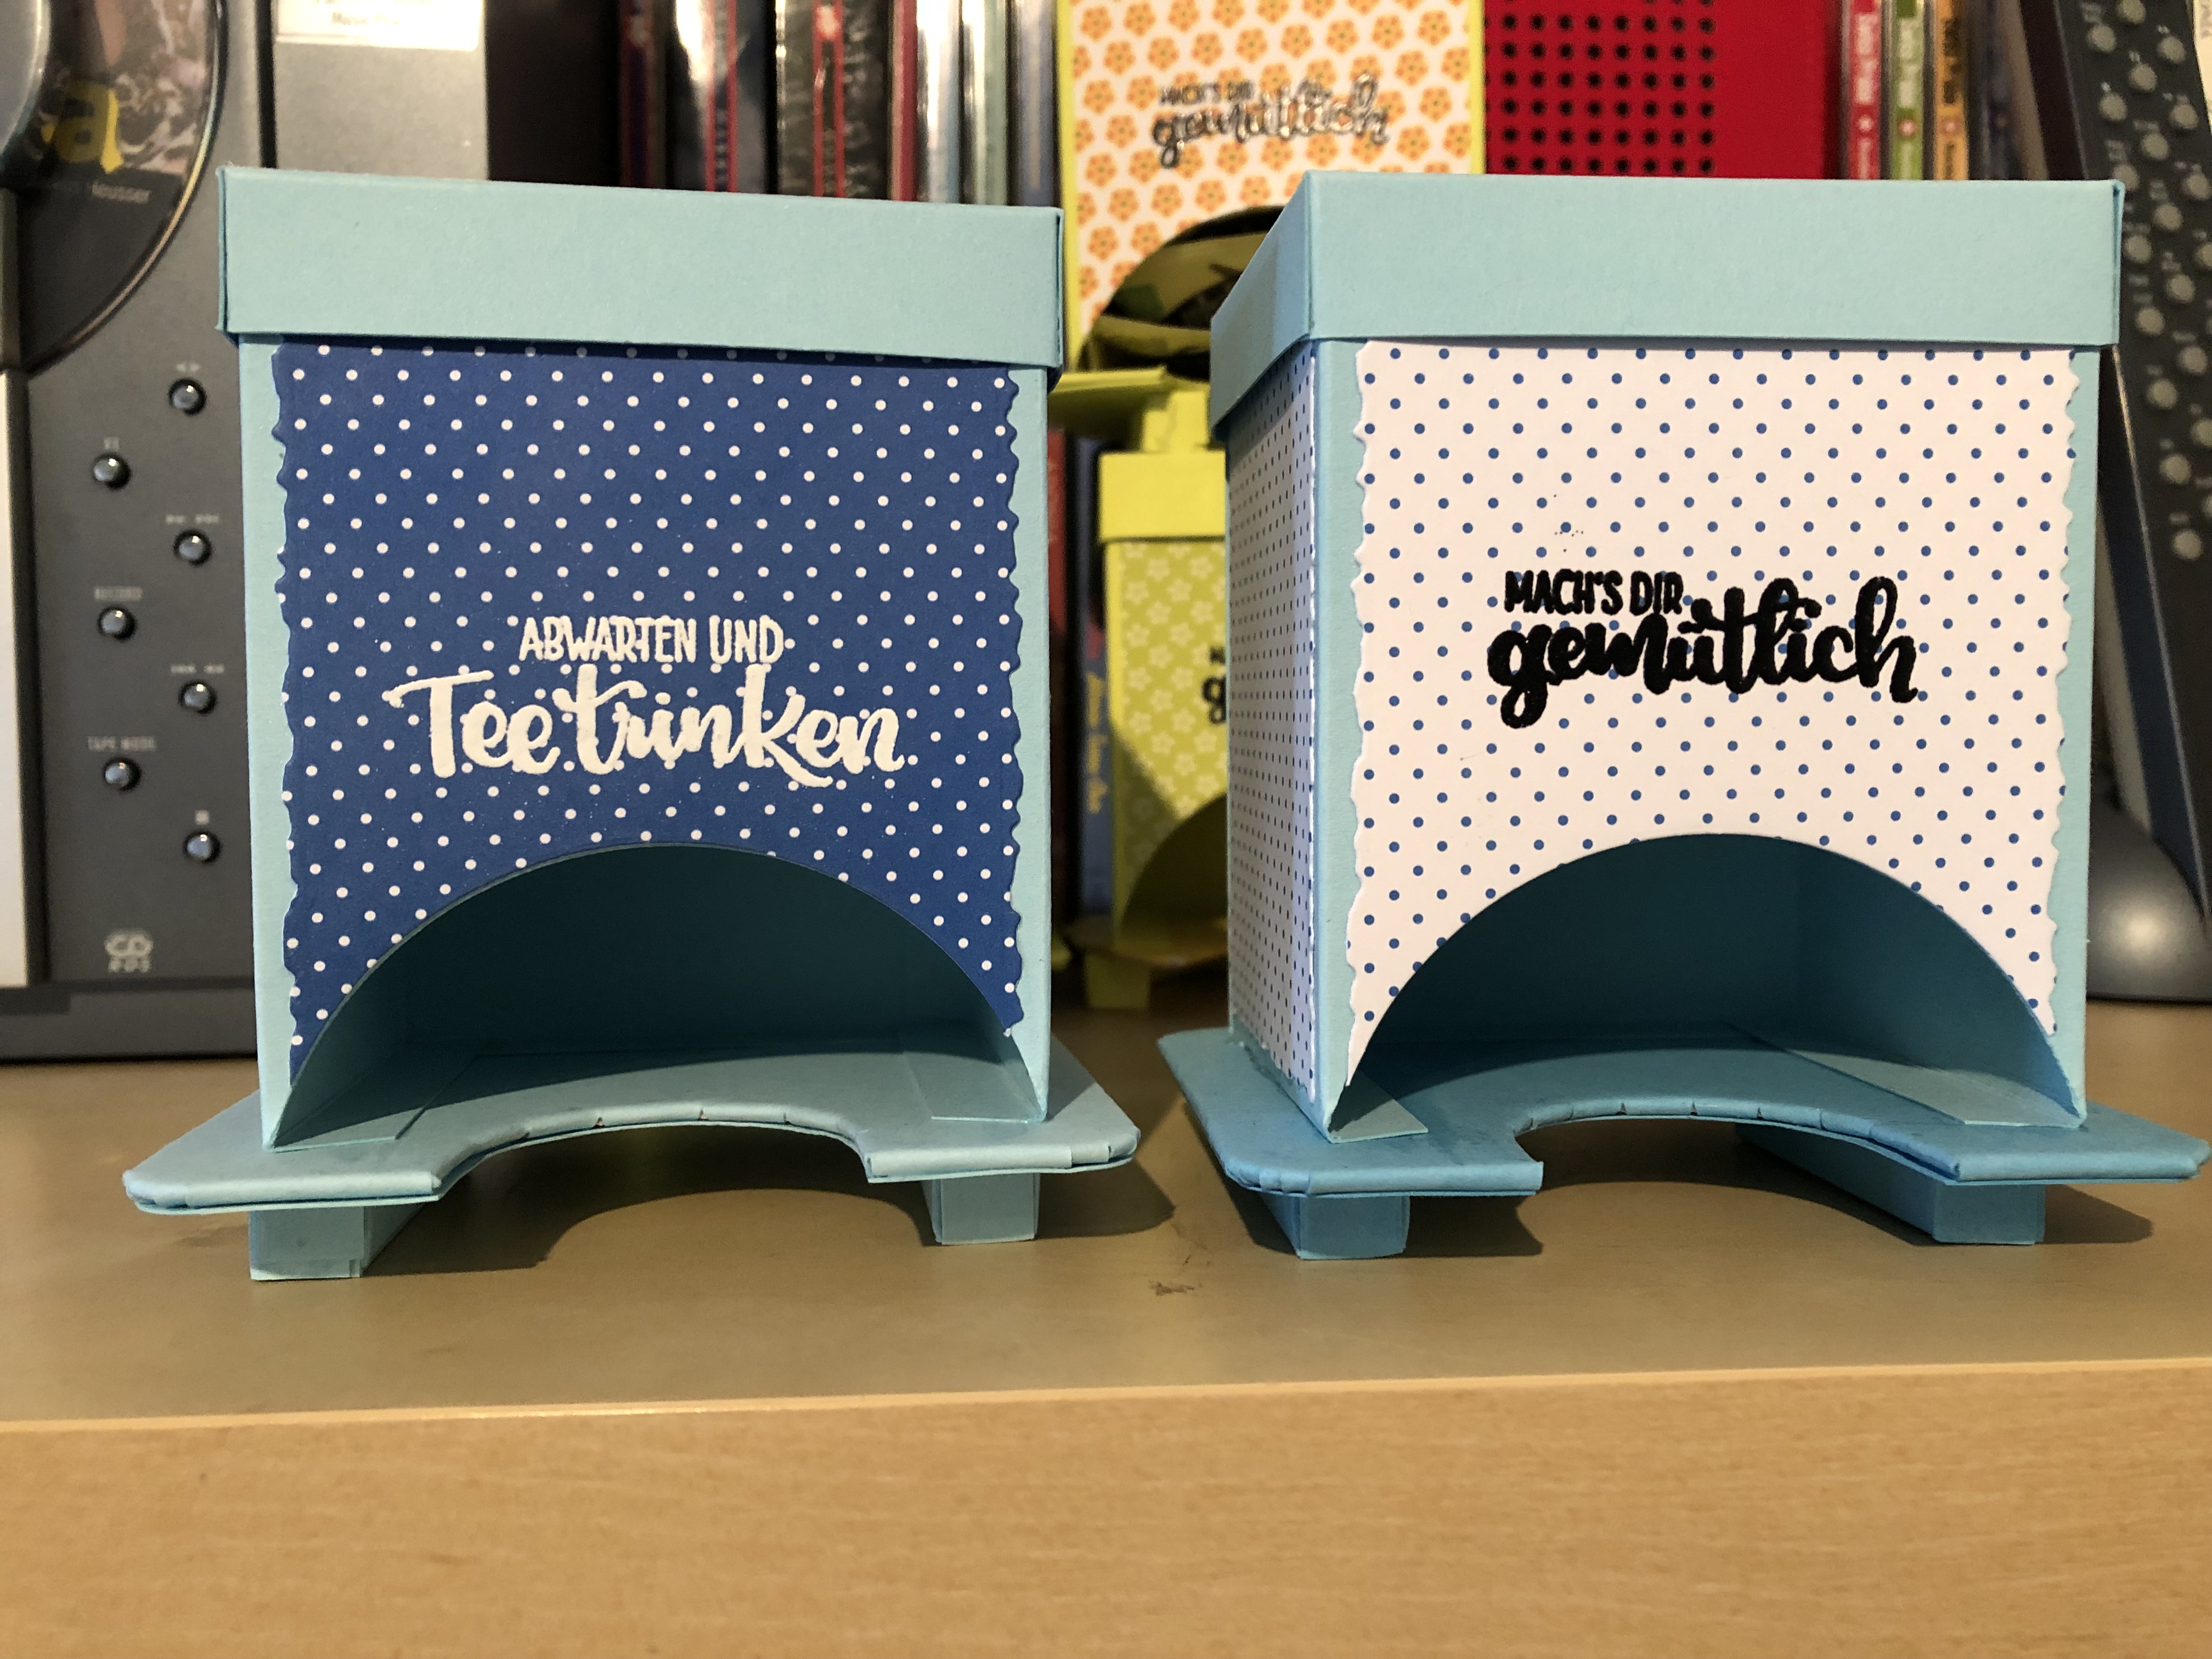
Technische Daten: Die Schachtel wird 9cm hoch und misst in den anderen Dimensionen 6.5 x 7.5 cm. Sie wird etwas knapp für grössere Teebeutel und von der Menge passen 18 Beutel sehr gut hinein.
Hello everybody :)
A little tutorial for you on how to make a Tea Dispenser. It is an ideal gift or little something to give to somebody in the colder seasons. You don't need any die cuts but you can use some if you find any that fit. Something like this would work as you can choose the appropriate size.
You need about 2-3 pages of a thick A4 Paper, ruler, pencil, scissors, scoreboard, ev.beerfelt... and for the decoration I used "patterned paper" because that is a very quick way.
Technical Facts: The box will be 9cm high and the other dimensions are 6.5 x 7.5 cm. It will be a bit snug for bigger teabags and you can easily fit 18 teabags in there.

Aus einem A4 Papier kann man gut zwei Grundkörper des Teespenders herstellen. Dazu auf der kurzen Seite bei: 1, 10, 10.5, 11 und 20cm mit Bleistift eine Marke setzen - auf der langen Seite bei: 1, 7.5, 15, 21,5 und 29cm. Die 10.5 auf der kurzen Seite trennt die beiden Teebeutelspender Grundkörper alle anderen Linie mit einem Falzbrett oder mit einem Lineal und Falzwerkzeug einritzen. Der Streifen nach der 29 auf der rechten Seite hier im Bild ist überflüssig und muss man auch abschneiden.
An A4 paper works well for 2 of the basic box shapes. For that you need to put marks on the short side at: 1, 10, 10.5, 11 - on the long side at:1, 7.5, 15, 21,5 und 29cm. The 10.5 mark divides the two boxes all the other marks are for scoring with a scoreboard or a ruler and a scoring tool. The stripe on the right of the 29 mark is leftover and needs to be cut off.
Ich habe auf der jeweils längeren Seite die Öffnung für die Beutel gemacht, man kann das aber auch auf der schmalen Seite machen, je nachdem wie man die Beutel herausholen möchte zudem habe ich markiert welche Ecken ich noch abschneiden möchte und wo noch eingeschnitten werden muss um die Schachtel schön zusammen kleben zu können. Vorsicht: diese beiden Teile sind spiegelverkehrt, beim oberen muss der rechte Rand noch abgeschnitten werden beim unteren der linke (ausser man macht das vorher und schneidet den gesamten Streifen nach 29cm rechts ab).
I made the opening on the longer side, you could also do that on the shorter side depending on how you would like to take the bags out also I marked the corner where I need to cut them and which parts need to be cut in a little for assembling the box neatly. Attention: the two boxes are mirrored you need to cut the right side of the upper box and the left side on the lower one (unless you have cut off that stripe on the right mark of 29cm).
Für die Öffnung und Dekorationsteile habe ich mir passende Stanzen herausgesucht. Die viereckigen haben nicht ganz gepasst dazu habe ich den oberen Rand einfach abgeschnitten, der verschwindet sowieso unter dem Deckel.
For the opening and the decorative panels I looked through my stash and found some that fit. The square ones were a bit too big but I cut off the top as they will be covered by the lid anyway.
Den Spruch habe ich embosst bevor ich die Schachtel zusammen geklebt habe. Da sich das Papier etwas verformt und so wieder in Form gebracht werden kann.
Das kleine Rändli oben habe ich nach unten geklebt, es ist nicht wirklich nötig diesen Rand zu haben aber ich finde einen Falz angenehmer als angeschnittenes Papier am Rand, zudem hat es mit den Massen vom A4 Papier gepasst. ;) Danach habe ich die Schachtel am Klebestreifen mit Score Tape zusammen geklebt.
Before assembling the box I embossed the sentiment, as the paper bends a bit and like that you get the chance to straighten it out again.
I glued down that very small stripe on top, this is not really necessary but I like it bender to have a fold than a cut line there at the edge also it worked well with the measurements of the A4 paper. ;) After that I adhered the flap with score tape.
Der Deckel misst: 9.7 x 10.7 cm nach dem Zuschneiden mit dem Scoreboard 1.5 cm auf allen Seiten einritzen. Danach die Ecken wie auf der Abbildung rechts vorbereiten:
The lid measures: 9.7 x 10.7 cm after cutting those parts I scored all around at 1.5cm. Then you need to prepare the corners like it is shown in the picture to the right:
Mit den vorbereiteten Ecken den Deckel zusammenfalten und kleben. Davon habe ich nun kein Bild gemacht, ich hoffe Du weisst wie das geht. :)
Then I folded the lid and adhered those prepared corners with glue, I didn't take a picture of that, I hope you know how to do that. :)
Für den Boden habe ich einen Bierfilz genommen, es geht bestimmt auch mit anderem dickem Papier oder mit Karton, und habe diesen wie folgt vorbereitet:
For the base I used a beerfelt but I guess any thicker kind of paper would work as well as cardboard. I prepared it as following:
Danach kann man den Basis Teebeutelspender Körper auf den Boden kleben. Dazu habe ich den Deckel aufgesetzt, damit die Schachtel schön viereckig ist.
After this step you can adhere the boxshape onto the base. For that I did put the lid onto the box so it would be nice in shape (square).
Damit die Teebeutel gut herausgenommen werden können, habe ich das Ganze noch auf Klötzchen gestellt. Dazu einen Papierstreifen in der gewünschten Breite plus zwei cm für die Klebelaschen abkleben (meiner misst 5 + 2cm könnte aber 1-2cm länger sein).Dann alle 1cm einritzen und mit 5 solchen eingeritzten Teilchen ein Klötzchen basteln. Auf den langen Seiten jeweils noch einen cm einritzen für die Klebelaschen.
For easier accessing the teabags I put the whole thingy onto cubes. Just cut a stripe to the measurement you want plus 2 cm for the glueflaps (mine measures 5 + 2cm but could be 1-2cm longer). Score every 1cm and then use 5 of those scored parts to make one cube out of it. For the glueflaps score 1cm on each of the long sides.
Klötzchen unten ankleben et voilà c'est fini!! :)
Adhere the cubes on the bottom and you are finished!! :)
Ich habe mich beim Dekorieren etwas zurück gehalten, natürlich könnte man noch Stempel oder Stanzteile einsetzen um den Teebeutelspender zu dekorieren.
My decoration is very simple but you could also use stamps and die cuts to pretty the teabag dispenser up nicely.
Ich hoffe ihr habt nun Lust bekommen selber einen solchen Teespender nach zu basteln.
Besten Dank für Eure Aufmerksamkeit und bis zum nächsten Mal! :)
Liebi Grüessli
Andrea
I do hope that you got inspired and are trying this too.
Thank you so much for your attention and see you in the next Blog! :)
Hearty Greetings
Andrea