Affichage des articles dont le libellé est floralcard. Afficher tous les articles

mardi 2 juin 2026

Floral Day Dream


Buongiorno creative, 
come state? 
Questo caldo improvviso vi ha travolto? Devo dire che mi ha colto alla sprovvista, e di solito mi viene molta stanchezza quando é così caldo, ma nonostante tutto mi sono sentita super ispirata da questo set di Pinkfresh Studio Floral Day Dream che ho creato in diverse varianti , che vi mostrerò prossimamente su instagram. :D
Per adesso ecco qui la versione Green! Mi son divertita a giocare con diverse tonalità di verde ed ho colpo ispirazione dalle cards fatte dal design team di Pinkfresh.
Ho usato il timbro, stencil e fustella del set Floral day dream.
Ho colorato i fiori con 2 inchiostri verdi di Pinkfresh Studio, evergreen e fresh pear, ed usando pressioni differenti con il blending tool, ho ottenuto sfumature differenti.
Per entrambi gli sfondi delle due cards ho usato i ritagli ottenuti dalla fustella di Spellbinders Infinity Punch&Pierce Plate. La card che vedete a destra invece ho aggiunto in più un cartoncino bianco embossato con un 3d embossing folder di Lisa Horton ed abbellito con il sentiment di Spellbinders Layered Happy Birthday etches dies.
Spero vi piacciano,
vi auguro una splendida giornata


Good morning, crafters, 
how are you? 
Has this sudden heatwave caught you off guard? I have to say it took me by surprise, and I usually get really tired when it’s this hot, but despite everything, I felt super inspired by this Pinkfresh Studio Floral Day Dream set, which I’ve created in several variations—I’ll be showing them to you soon on Instagram. :D
For now, here’s the Green version! I had fun playing with different shades of green and drew inspiration from the cards made by the Pinkfresh design team.
I used the stamp, stencil, and die from the Floral Day Dream set.
I colored the flowers with two green inks from Pinkfresh Studio, Evergreen and Fresh Pear, and by applying different pressures with the blending tool, I achieved various shades.
For the backgrounds of both cards, I used the cutouts from the Spellbinders Infinity Punch & Pierce Plate die. On the card you see on the right, I also added a white cardstock piece embossed with a 3D embossing folder by Lisa Horton and embellished with the sentiment from the Spellbinders Layered Happy Birthday Etches Dies.
I hope you like them,
have a wonderful day


Quyen


lundi 25 mai 2026

Garden Grace Pinkfresh Studio


Buongiorno creative,
come state? eccomi oggi qui sul blog di Scraphouse a mostrarvi questa card usando sempre quei meravigliosi Washi tape di Pinkfresh Studio.
Qui ho usato il set Garden Grace che comprende washi, fustella, timbro e stencil. Trovo che la resa del washi sia magnifica, mi piace davvero tanto, sicuramente proverò a realizzare con anche il timbro e lo stencil per cambiare colori.
Ma ora vi parlerò di come ho strutturato questa card. Ho cominciato fustellando la Cover plate die Stitched diamonds, che poi ho ritagliato a metà.  basandomi sulle misure di questi due rettangoli ho costruito cosi la base del cartoncino a "finestra".

Good morning, crafters,
How are you? I’m here today on the Scraphouse blog to show you this card, once again using those wonderful Washi tapes from Pinkfresh Studio.
Here I used the Garden Grace set, which includes washi tape, a die, a stamp, and a stencil. I think the washi tape looks absolutely stunning—I really love it. I’ll definitely try using the stamp and stencil too to experiment with different colors.
But now I’ll tell you how I put this card together. I started by die-cutting the Stitched Diamonds cover plate, which I then cut in half.  Using the measurements of these two rectangles, I built the base of the “window” card.


Visto che volevo assicurarmi che le due "ante" della mia card rimanessero chiuse, ho fissato una coppia di calamite la cerchio centrale della card (Fancy Circles) che ho fustellato 2 volte per poter poi coprire una delle due calamite, mentre la seconda calamita verra nascosta da uno dei pannelli rettangolari.

Since I wanted to make sure the two “flaps” of my card stayed closed, I attached a pair of magnets to the center circle of the card (Fancy Circles), which I die-cut twice so that I could cover one of the magnets, while the second magnet will be hidden by one of the rectangular panels.


Infine ho decorato con i fiori del Garden grade washi sia all'esterno della card e sia all'interno. Ho aggiunto dei sentiment foilizzati con la hot foil plate perfect sentiment. Cosa ne pensate, vi piace?
Vi auguro un buon inizio settimana
un abbraccio


Finally, I decorated both the outside and inside of the card with flowers made from Garden Grade washi tape. I added some foil-stamped sentiments using the Perfect Sentiment hot foil plate. What do you think? Do you like it?
Have a great start to the week!
Hugs

Quyen


dimanche 10 mai 2026

Whispering Daffodils Washi


Buongiorno anime creative!
come state? Innanzi tutto auguri a tutte le mamme! Dedico a tutte voi questa card floreale in onore di questa festività.
Ho usato la nuova collezione di Pinkfresh Studio Whispering Daffodils. 
Ho usato il Washi tape della collezione e fustellato i fiori con la loro fustella coordinata.
Per la composizione ho pensato che ci poteva stare con una cornice esagonale dorata che ho ricavato usando due fustelle di dimensioni diverse (una grande ed una più piccola ) del set Nested Hexagons. Ho usato ancora la fustella grande per ritagliare un esagono bianco che ho sfumato con il Distress Oxide Tattered rose, per usare come base dove incollare la cornicetta dorata.
Per rendere la card dinamica, ho deciso di usare la fustella Sparkling Diamonds, che gli da qual dettaglio in più alla card ma senza rubare la scena ai fiori. 
Infine ho aggiunto il sentiment che si trovava nel set di timbri coordinato ed ho aggiunto la scritta "mom" usando un timbro alfabeto della Lawnfawn.

Spero vi sia piaciuta, una splendida domenica.


Good morning, creative souls!
How are you all? First of all, happy Mother’s Day to all the moms out there! I’m dedicating this floral card to all of you in honor of this special day.
I used the new Whispering Daffodils collection from Pinkfresh Studio. 
I used the washi tape from the collection and die-cut the flowers with their matching die.
For the layout, I thought a gold hexagonal frame would work well, which I created using two dies of different sizes (one large and one smaller) from the Nested Hexagons set. I used the large die again to cut out a white hexagon that I distressed with Distress Oxide Tattered Rose, to use as a base for gluing the little gold frame onto.
To add some movement to the card, I decided to use the Sparkling Diamonds die, which adds that extra detail to the card without stealing the spotlight from the flowers.
Finally, I added the sentiment from the coordinating stamp set and added the word “mom” using a Lawnfawn alphabet stamp.
I hope you liked it—have a wonderful Sunday!


Go to the collection of Whispering Daffodils:

washi

dies

stamp

stencil


samedi 25 janvier 2025

Busy backgrounds Part I

Hello crafty Friends.

Do you struggle sometimes with busy colorful backgrounds? Well, I really did. I love to create these great colorful backgrounds, but then sometimes didn’t now how to turn them into cards. I did some studies.   Here are some of my favorite ways to put these backgrounds into good use. And this is only part 1, there will be a second part, so stay tuned.


For all my backgrounds I used the Winter Florals Press Plate. You can use it with your
Bettepress Sytem or with the Hot Foil. I decided to Foil the outlines. Then I used the coordinating stencils to color all the flowers. I really like these florals, because they are perfect for Christmas or Winter season. But by changing up the colors you can use them all year around.


On the first cars I did like a frame with a matching cardstock and used the same paper to add my sentiment. I also wanted to stand my sentiment a little bit more out, but didn’t want to cover more of my background. So I added the same element a little bit taller with vellum. So, I didn’t cover up to much from my gorgeous background.


For my next card trimmed away a little bit of the background, so that is slightly smaller. Then I added on a square card. Like that I had space for my sentiment. I used the Merci Die from Lawn Fawn. I also added some matching paper behind my background and faux stitching just to add a little bit more interest.


Thanks for stopping by, and the second Part is coming soon.

 Adriana


Hallo Bastelfreunde.

Habt ihr auch manchmal Probleme mit bunten Hintergründen? Nun, ich habe das wirklich. Ich liebe es, diese farbenfrohen Hintergründe zu gestalten, aber manchmal weiß ich nicht, wie ich sie in Karten verwandeln kann. Ich habe ein paar Studien gemacht. :) Hier sind einige meiner Lieblingsmöglichkeiten, um diese Hintergründe gut zu verwenden. Und das ist nur Teil 1, es wird einen zweiten Teil geben, also bleibt dran.


Für alle meine Hintergründe habe ich die Pressplatte Winterblumen verwendet. Du kannst sie mit deinem Bettepress-System oder mit der Heißfolie verwenden. Ich habe mich dafür entschieden, die Umrisse zu folieren. Dann habe ich mit den passenden Schablonen alle Blumen ausgemalt. Ich mag diese Blumen sehr, weil sie perfekt für die Weihnachts- oder Wintersaison sind. Aber wenn man die Farben ändert, kann man sie das ganze Jahr über verwenden.


Bei den ersten Autos habe ich einen Rahmen aus passendem Cardstock gemacht und das gleiche Papier für meinen Spruch verwendet. Ich wollte meinen Spruch auch ein bisschen mehr hervorheben, aber nicht noch mehr Hintergrund verdecken. Also habe ich das gleiche Element mit Pergament etwas höher angebracht. So verdeckte ich nicht zu viel von meinem herrlichen Hintergrund,


Für meine nächste Karte habe ich ein wenig vom Hintergrund weggeschnitten, so dass sie etwas kleiner ist. Dann habe ich eine quadratische Karte aufgesetzt. So hatte ich Platz für meinen Schriftzug. Ich habe die Stanze Merci von Lawn Fawn verwendet. Ich habe auch etwas passendes Papier hinter dem Hintergrund eingefügt, nur um ein bisschen mehr Interesse zu wecken.


Vielen Dank fürs Vorbeischauen, und der zweite Teil kommt bald.

Adriana


mardi 24 septembre 2024

Poppy Background betterpress and stencil


Buona sera carissime crafter!

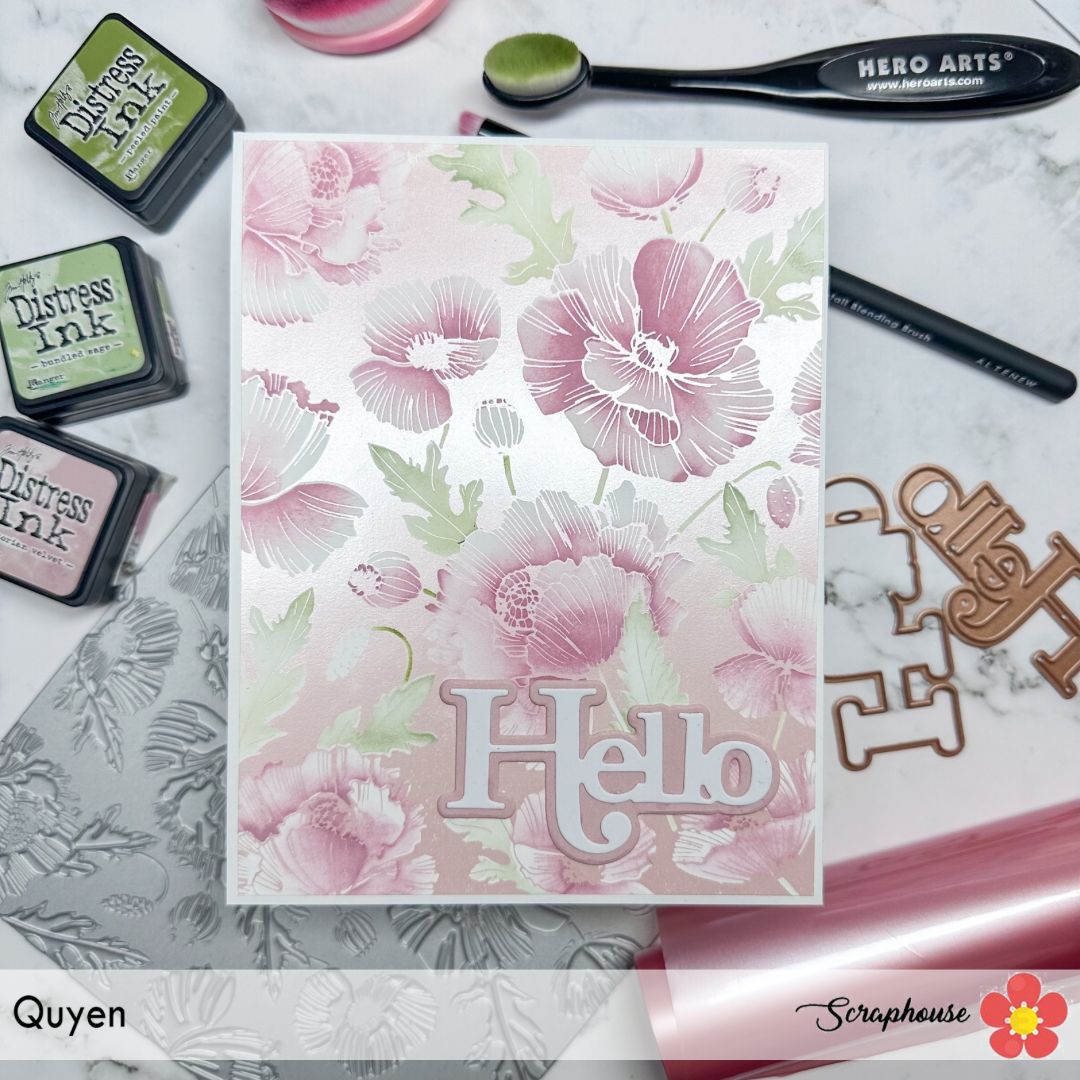
 Come state? spero tutto bene! Sono entusiasta di mostrarvi questa card stasera! La plate Poppy Background mi piaceva da parecchio ed é tornata disponibile nello shop.
Come mio solito ho voluto usare la press plate per foilizzare! Ho fatto svariate prove con differenti colorazioni di foil e alla fine per questo progetto ho optato per la versione in rosa pastello del set  Satin Pastel Pack.
Volevo creare un look tono su tono e quindi con lo stencil annesso, ho usato ho colorato i fiori con il Distress ink Victorian Velvet e le foglie con Bundled sage e Peeled paint. Mi piace moltissimo il contrasto creato dalla colorazione dei distress con lo sfondo lucido del foil! Voi cosa ne pensate?
Per completare la mia cardo ho usato la fustellata Hello dal set Little Hello Clear stamp etched dies.
Spero vi piaccia, vi auguro buona serata

Good evening dear crafters! 

How are you? hope all is well! I am excited to show you this card tonight! I have liked the Poppy Background plate for quite a while and it is back available in the shop.
As my usual I wanted to use the press plate to foil! I did several trials with different colors of foil and finally for this project I opted for the pastel pink version of the Satin Pastel Pack set.
I wanted to create a tone-on-tone look and so with the stencil attached, I used I colored the flowers with Distress ink Victorian Velvet and the leaves with Bundled sage and Peeled paint. I really like the contrast created by the distress coloring with the shiny foil background! What do you guys think?
To complete my thistle I used the Hello die cut from the Little Hello Clear stamp etched dies set.
I hope you enjoy it, have a great evening

Quyen