Affichage des articles dont le libellé est stencil. Afficher tous les articles

mardi 2 juin 2026

Floral Day Dream


Buongiorno creative, 
come state? 
Questo caldo improvviso vi ha travolto? Devo dire che mi ha colto alla sprovvista, e di solito mi viene molta stanchezza quando é così caldo, ma nonostante tutto mi sono sentita super ispirata da questo set di Pinkfresh Studio Floral Day Dream che ho creato in diverse varianti , che vi mostrerò prossimamente su instagram. :D
Per adesso ecco qui la versione Green! Mi son divertita a giocare con diverse tonalità di verde ed ho colpo ispirazione dalle cards fatte dal design team di Pinkfresh.
Ho usato il timbro, stencil e fustella del set Floral day dream.
Ho colorato i fiori con 2 inchiostri verdi di Pinkfresh Studioevergreen e fresh pear, ed usando pressioni differenti con il blending tool, ho ottenuto sfumature differenti.
Per entrambi gli sfondi delle due cards ho usato i ritagli ottenuti dalla fustella di Spellbinders Infinity Punch&Pierce Plate. La card che vedete a destra invece ho aggiunto in più un cartoncino bianco embossato con un 3d embossing folder di Lisa Horton ed abbellito con il sentiment di Spellbinders Layered Happy Birthday etches dies.
Spero vi piacciano,
vi auguro una splendida giornata


Good morning, crafters, 
how are you? 
Has this sudden heatwave caught you off guard? I have to say it took me by surprise, and I usually get really tired when it’s this hot, but despite everything, I felt super inspired by this Pinkfresh Studio Floral Day Dream set, which I’ve created in several variations—I’ll be showing them to you soon on Instagram. :D
For now, here’s the Green version! I had fun playing with different shades of green and drew inspiration from the cards made by the Pinkfresh design team.
I used the stamp, stencil, and die from the Floral Day Dream set.
I colored the flowers with two green inks from Pinkfresh Studio, Evergreen and Fresh Pear, and by applying different pressures with the blending tool, I achieved various shades.
For the backgrounds of both cards, I used the cutouts from the Spellbinders Infinity Punch & Pierce Plate die. On the card you see on the right, I also added a white cardstock piece embossed with a 3D embossing folder by Lisa Horton and embellished with the sentiment from the Spellbinders Layered Happy Birthday Etches Dies.
I hope you like them,
have a wonderful day


Quyen


mardi 28 avril 2026

Spring Flowers Stencil card


Buongiorno cardmaker, 

come state? sono super felice di mostrarvi questa card realizzata con il nuovo stencil Spring Flowers della Lawn fawn! lo trovo carinissimooooooo!!! :D ho realizzato lo sfondo con i seguenti Distress Oxide: Victorian velvet e Shaded lilac per i fiori e per le foglie il Bundled sage. Invece per il pistillo ho usato la Solar paste Golden Hour per dargli quel tocco luccicante in più.


Good morning, cardmakers, 

how are you? I’m so excited to show you this card I made using the new Spring Flowers stencil from Lawn Fawn! I think it’s absolutely adorable!!! :D I created the background using the following Distress Oxide colors: Victorian Velvet and Shaded Lilac for the flowers, and Bundled Sage for the leaves. For the pistil, I used Golden Hour Solar Paste to give it that extra touch of sparkle.


Inoltre ho spalmato la Solar paste su un cartoncino bianco e lasciato da parte ad asciugare. Una volta asciugato bene, ho fustellato il sentiment Scripty thinking of you e poi aggiunto il suo Outline abbinato in rosa, lo stesso che usato anche per la mattatura. Per completare la card ho aggiungo in bannero con la scritta Friend e il topino dal set Mice Flowers.

Spero che lo stencil piacca a voi quanto piace a me!

Buona giornata


I also spread Solar Paste onto a piece of white cardstock and set it aside to dry. Once it was completely dry, I die-cut the “Scripty Thinking of You” sentiment and then added its matching pink outline, the same one I used for the matte finish. To finish the card, I added a banner with the word “Friend” and the little mouse from the Mice Flowers set.
I hope you like the stencil as much as I do!
Have a great day


Quyen


vendredi 27 mars 2026

Tupips and Daffodils Card


 Buongiorno creative, come state? 

Oggi vi mostro questa card usando la nuova collezione disegnata da Yana Smakulaper Spellbinders. Il set che ho usato comprende una press plate e lo stencil coordinato Tulips and Daffodils.


Good morning, crafters! 

How are you? 

Today I’m showing you this card made with the new collection designed by Yana Smakulaper for Spellbinders. The set I used includes a press plate and the matching “Tulips and Daffodils” stencils.


Ho preparato con la hot foil machine 4 stampe , di cui 3 colorate con i Copic markers, mentre quella in basso a destra l'ho colorato con i Distress Oxide aiutandomi son gli stencil del set. Una volta confrontate le varie colorazioni, ho deciso di scegliere l'immagine che più ritenevo idonea con uno sfondo nero. Una volta riagliati i bordi del mazzo di fiori, le parte rimanenti bianche le ho colorate con un marker nero.

I created four foiled card using the hot foil machine, three of which I colored with Copic markers, while I colored the one in the bottom right corner with Distress Oxide ink, using the stencils from the set. After comparing the different color schemes, I decided to choose the image I thought worked best with a black background. After trimming the edges of the bouquet, I colored the remaining white areas with a black marker.


Infine ho usato l'embossing folder Molded frame con un cartoncino nero per creare lo sfondo ed ho fatto degli schizzi dorati con dell'acquarello oro ed aggiunto un sentiment foilizzato dal set  Betterpress foil and die Bouquet of Hugs.

Spero possa esservi di ispirazione, vi auguro una splendida giornata e buon weekend!

Finally, I used the Molded Frame embossing folder with black cardstock to create the background, added some gold splashes using gold watercolor paint, and included a foil-stamped sentiment from the Betterpress Foil and Die Bouquet of Hugs set.

I hope this inspires you. Have a wonderful day and a great weekend!

Quyen


vendredi 27 février 2026

Thinking of you card


Buonasera creative! come state? spero tutto bene!
Eccomi qui oggi fiera di mostrarvi questa card. Nell'ultimo periodo son stata un po' bloccata con la creatività. Dopo tutti questi anni non son ancora riuscita a trovare uno stile che sento mio. Mi trovo attratta da card semplici con pochi elementi e piano piano sto cercando il giusto equilibrio.
Qui ho usato le novità della Lawnfawn. Ho usato la plancia I like big butterflies e la fustella Build a wheelbarrow e le ho colorate con i miei marker ad alcool.

Good evening, crafters! 
How are you? I hope everything is going well!
Here I am today, proud to show you this card. Lately, I've been feeling a bit stuck creatively. After all these years, I still haven't managed to find a style that feels like my own. I find myself drawn to simple cards with few elements, and I'm slowly trying to find the right balance.
Here I used the new Lawnfawn products. I used the I Like Big Butterflies stamp set and the Build a Wheelbarrow die and colored them with my alcohol markers.


Su un foglio d'acquarello ho creato lo sfondo con lo stencil Sunray Background sempre della Lawnfawn sfumando il tampone Oxide Antique Linen .
Infine ho creato una mattatura usando un foglio del Pad Blissful blossoms.
Spero vi piaccia, buona serata e buon weekend!

On a sheet of watercolor paper, I created the background using the Sunray Background stencil, also by Lawnfawn, blending in Oxide Antique Linen ink.
Finally, I created a mat using a sheet from the Blissful Blossoms pad.
I hope you like it. Have a great evening and a wonderful weekend!

Quyen


vendredi 12 décembre 2025

Christmas reindeer


 Buongiorno creative, 

come state? siete alle prese a creare delle vostre ultime card natalizie? Essendo vicini al Natale ho voluto usare le novità di San Valentino della Lawfawn per creare una card natalizia! Cosa ne pensate?

Per lo sfondo ho usato lo stencil Outline Hearts con l'Oxide Lumberjack plaid , tonalità rossa perfetta per le festività, dove di seguito ho incollato un cartoncino rosso luccicante. Son rimasta un po' spiazzata dal sentiment bello grande della Lawnfawn Giant Merry Christmas, dopo diverse prove , ho deciso di fustellarlo con un cartoncino glitterato verde e uno nero per conferirgli un'effetto di ombreggiatura.

Infine il personaggio protagonista della card é quest'adorabile rennina colorata con gli Olo markers presente del set di timbri Critter conversation hearts.

Spero vi piaccia il risultato, ci sentiamo al prossimo blog post,

un abbraccio


Good morning, crafters,

how are you? Are you busy creating your last Christmas cards? With Christmas just around the corner, I wanted to use Lawfawn's new Valentine's Day products to create a Christmas card! What do you think?

For the background, I used the Outline Hearts stencil with Oxide Lumberjack plaid, a red shade perfect for the holidays, and then I glued a shiny red cardstock underneath. I was a little taken aback by the large Lawnfawn Giant Merry Christmas sentiment, but after several attempts, I decided to die cut it with green and black glitter cardstock to give it a shadow effect.

Finally, the star of the card is this adorable reindeer colored with Olo markers from the Critter Conversation Hearts stamp set.

I hope you like the result. See you in the next blog post.

Hugs

Quyen


mercredi 29 octobre 2025

Halloween cutie ghosts


Buonasera creative, eccomi qui con una card di Halloween! 
Personalmente non é una festività che festeggio, ma adoro questi fantasmini, sono cosi carini!!! 
Ho usato la fustella di Hero Arts Boo to you per creare questi fantasmi.
Per lo sfondo ho usato un cartoncino verde acceso dal set Halloween cardstock di Spellbinders , dove ho posizionato lo stencil Shatter per creare un effetto ragnatela ed ho usato gli oxide : rustic wilderness e black sooth. Ho creato anche delle macchiette nere con la boccetta di inchiostro di Spellbinders Raven.
Infine per completare la card ho aggiunto il sentiment Boo, ricavano con ABC's finley di Lawnfawn.
Vi auguro una buona serata

Good evening, crafters! Here I am with a Halloween card! 
Personally, it's not a holiday I celebrate, but I love these little ghosts, they're so cute!!! 
I used the Hero Arts Boo to You die to create these ghosts.
For the background, I used bright green cardstock from the Spellbinders Halloween cardstock set, where I placed the Shatter stencil to create a spider web effect and used rustic wilderness and black sooth oxides. I also created some black spots with Spellbinders Raven ink.
Finally, to complete the card, I added the sentiment Boo, cut out with Lawnfawn's ABC's Finley.
Have a good evening!

Quyen


mardi 4 février 2025

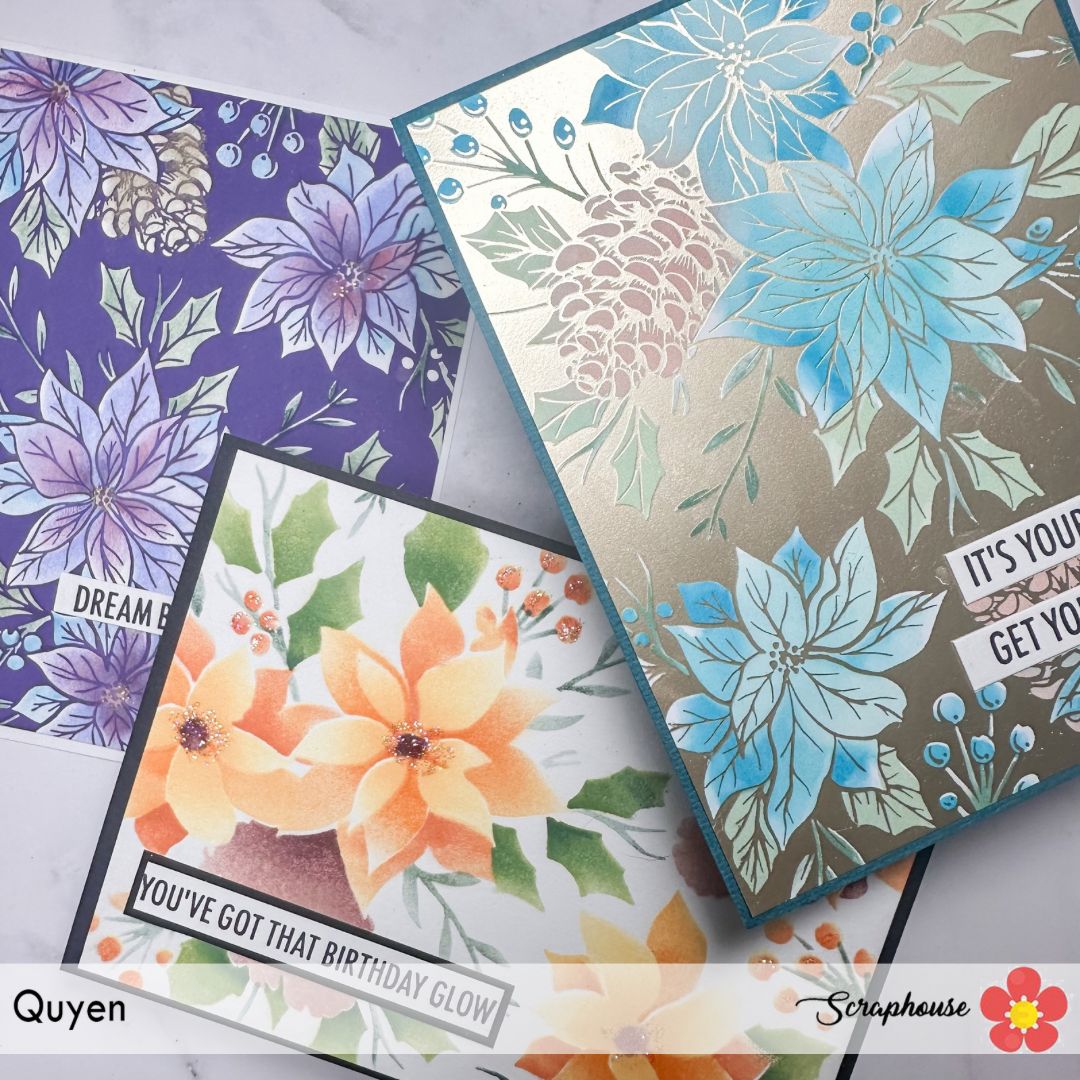
FESTIVE POINSETTIA PLATE : THIS IS NOT A CHRISTMAS CARD!:D


Buongiorno creative! 

spero di trovarvi bene! Eccomi qui oggi ad usare la Festive Poinsettia set per creare delle card NON natalizie! Trovo davvero interessante che usando prodotti prettamente di natale ma abbinandoli a colori differenti da quelli che si userebbero per Natale, si possa ottenere delle card per tutte le stagioni.

Ho voluto usare differente tecniche. Ho cominciando a creare il primo sfondo usando la betterpress con il distress Oxide Villainous potion.


Good morning creative! 

I hope to find you well! Here I am today using the Festive Poinsettia set to create NOT Christmas cards! I find it really interesting that by using purely Christmas products but combining them with different colors than you would use for Christmas, you can get cards for all seasons.

I wanted to use different techniques. I started by creating the first background using betterpress with Distress Oxide Villainous potion.


mentre il secondo sfondo l'ho ottenuto usando la Glimmer machine con un foil dorato e l'ultimo ho solo usato gli stencil.
Ho usato lo stencil abbinato con gli inchiostri di Altenew fresh dye ink cube bundle . 
Ecco qui i risultati:


while the second background I got using the Glimmer machine with a gold foil and the last one I just used the stencils.
I used the stencil combined with Altenew fresh dye ink cube bundle inks
Here are the results:


Infine li ho incollato le basi su delle mattature colorate e abbellito con i sentiment di Spellbinders Shine bright strips.

Finally I glued the bases onto colored mattes and embellished them with sentiments from
s.


Quale versione preferite?
grazie per esser passate qui dal blog, vi auguro una splendida giornata


Which version do you prefer?
thanks for stopping by the blog, have a wonderful day

Quyen


samedi 14 décembre 2024

Panda's love is in the air


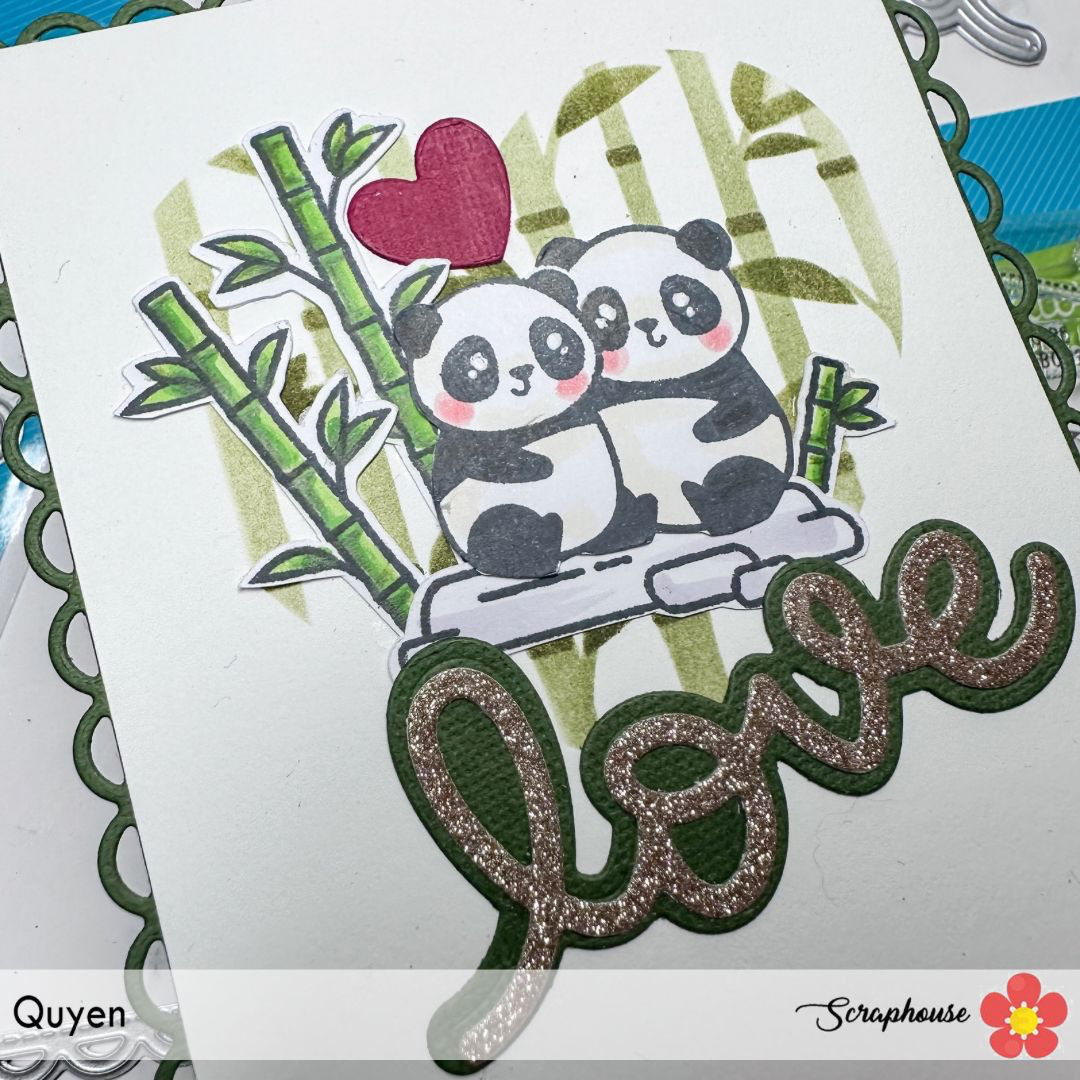
Buongiorno creative! come state? avete avuto modo di vedere la nuova mini release di San Valentino della Lawnfawn? questa volta trovo che questi panda siano bellissimi e versatili, da poter usare in tutte le occasioni e non unicamente per San Valentino.

Ho voluto creare qualcosa di divertente. Con la fustella Stitched happy heart ho ritagliato un cartoncino di scarto da creare uno stencil.

Good morning creatives! how are you? did you get a chance to see the new Valentine's Day mini release from Lawnfawn? this time I find these pandas to be beautiful and versatile, that can be used for all occasions and not solely for Valentine's Day.

I wanted to create something fun. Using the Stitched happy heart die I cut out a scrap cardstock to create a stencil.


Per poter posizionare correttamente lo stencil cuore che ho creato, ho appoggiato la fustella cuore sul mio cartoncino base dove avrei voluto appoggiare il mio stencil come se fosse una dima. Una volta rimosso la fustella e fissato lo stencil in carta , ho usato gli stencils Bamboo.

In order to properly position the heart stencil I created, I placed the heart die on my base card where I wanted to place my stencil as if it were a template. Once I removed the die and secured the paper stencil , I used Bamboo stencils.


Ho colorato i velocemente i miei soggetti della plancia I heart pandas ( siii i panda son bianchi e neri quindi é stato molto semplice) e decorato con il sentiment della fustella Scripty love e Scripty love outlined. Infine il mio cartoncino l'ho incollato ad una cornicetta ottenuta dalla nuova fustella Lacy Rectangle stackable. 
Spero vi sia piaciuta la card ,
buona giornata

I colored the quickly my subjects  from the I heart pandas stamp set( yes the pandas are black and white so it was very easy) and decorated with the sentiment from the Scripty love die and Scripty love outlined. Finally my card I glued it to a frame obtained from the new Lacy Rectangle stackable die cut. 
I hope you enjoyed the card ,
have a nice day

Quyen


vendredi 27 septembre 2024

Winter Rose Betterpress and Stencil Set


Buongiorno Creative, come state?
Eccomi di nuovo qui con una card creata con la combo Betterpress plate e stencil coordinato. Solitamente quando ho usato questi set mi era sempre più piaciuta la resa ottenuta con i Marker che con gli stencil, ma queste ultime volte mi son ricreduta! Adoro l'effetto con lo stencil! Voi cosa preferite?
Qui ho usato il set Winter Rose Background di Spellbinders che ho foilizzato in oro.

Good Moring crafters , how are you?
Here I am again with a card created with the Betterpress plate and matching stencil combo. Usually when I've used these sets I've always liked the rendering achieved with the Markers better than with the stencils, but these last few times I've come around! I love the effect with the stencil! What do you guys prefer? Here I used the Winter Rose Background set from Spellbinders that I foil stamped in gold.


In seguito ho usato gli stencil coordinati alla pressplate e con i distress ink Barn door e Aged Mahogany ho colorato i fiori, mentre per le foglie ho usato Peeled paint e Forest moss. Infine ho colorato con Olo markers YG8.7 gli spazi bianchi rimasti dopo la colorazione con gli stencil.
In seguito ho preso 2 fustelle del set Notched corner frames etched dies e le ho attaccate allo sfondo che ho colorato e l'ho fatta passare attraverso la mia Bigshot.

Next I used the stencils that coordinated with the pressplate and with the distress inks Barn door and Aged Mahogany I colored the flowers, while for the leaves I used Peeled paint and Forest moss. Finally I colored with Olo markers YG8.7 the white spaces left after coloring with the stencils.
Next I took 2 dies from the Notched corner frames etched dies set and attached them to the background I colored and ran it through my Bigshot machine.


Ricavando una cornice, che ho rifilato con la taglierina.

I carved out a frame, which I trimmed with the cutter.

 
Ho incollato tutti i miei pezzi su un cartoncino dorato ed abbellito con un sentiment di Hello bluebird.
Spero vi piaccia, via auguro uno splendido weekend creativo
un abbraccio 

I glued all my pieces on a gold card and embellished with a Hello bluebird sentiment.
I hope you like it, away I wish you a wonderful creative weekend
a hug 

Quyen


dimanche 14 janvier 2024

love you lots!

 Buon domenica card makers!
oggi vi presento questa tag che ho realizzato con alcune novità Lawn Fawn.


Happy Sunday card makers!
Today I present this tag I made with some Lawn Fawn new arrival.


Ho cominciato a creare la tag partendo da un cartoncino Kraft e la fustella di Mama Elephant Tags a lot. Successivamente ho messo la tag ricavata nella placca da embossing folder della Taylored expressions dotted lattice perché volevo dare un effetto tramato alla base. In seguito ho colorato le parti in rilievo della tag con il distress ink Walnut stain e per dare un po di luccichio, ho usato anche la WOW embossing glitter powder Pearl gold sparkle.

I started creating the tag from Kraft cardstock and Mama Elephant Tags a lot die cut. Next, I placed the made tag in the embossing folder plate from Taylored expressions dotted lattice because I wanted to give a textured effect to the base. Next, I colored the embossed parts of the tag with Distress Ink Walnut stain and to give some shimmer, I also used WOW embossing glitter powder Pearl gold sparkle.


I protagonisti della tag son il la coroncina a forma di cuore ed il topolino con il palloncino. Partiano dalla coroncina: ho usato lo stencil Heart wreath stencil della Lawn fawn con i distress ink Peeled pain, Tattered rose, Picked raspberry e Seedless preserves e poi ho ritagliato i contorni con le forbici.

The stars of the tag are the heart wreath and the mice with the balloon . 
Starting with the wreath: I used the Heart wreath stencil from Lawn fawn with the distress inks Peeled pain, Tattered rose, Picked raspberry and Seedless preserves and then cut out the outlines with scissors.


Ho colorato il topino dal set All my heart con i pennarelli Copic mentre il sentiment della tag viene dal set Magic heart messages.
Una volta attaccato tutti gli elementi alla card ho aggiunto un paio di Color essentials sequins latte smoothie disc di Spellbinders. 
Spero vi piaccia, buona giornata

I colored the mouse from the All my heart set with Copic markers while the tag sentiment is from the Magic heart messages set.
Once I attached all the elements to the card I added a couple of Color essentials sequins milk smoothie disc from Spellbinders. 
Hope you like it, have a nice day

Quyen


jeudi 24 août 2023

Lawfawn's winter 2023 release

 Buona sera creative!

siete felici che oggi sia uscita la nuova release della Lawnfawn? Per l'occasione ho creato questa card usando la fustella Spooky forest Backdrop ed un cartoncino di carta d'acquarello ed ho colorato gli alberi con il distress ink vintage photo, cercando di lasciare un po' di bianco sui rami per creare l'effetto neve. Inoltre con la fustella Slimline stitched hillside borders ho creato delle collinette di neve dietro allo scenario. Per lo sfondo ho sfumato i distress ink mermaid lagoon, chipped sapphire e black soot e usato lo Snow Flurries Background Stencil con la pasta stencil paste white. Per incorniciare la card ho usato un cartoncino nero e la fustella Stitched Rectangle Frames.

Good evening creative!

Are you happy that the new Lawnfawn release is out today? For the occasion, I created this card using the Spooky forest Backdrop die and a watercolor paper cardstock and colored the trees with Distress Ink vintage photo, trying to leave some white on the branches to create the snow effect. Also with the Slimline die cut stitched hillside borders I created snow hillocks behind the scenery. For the background I blended the distress inks mermaid lagoon, chipped sapphire and black soot and used the Snow Flurries Background Stencil with stencil paste white. To frame the card I used black cardstock and the Stitched Rectangle Frames die cut.


Passiamo alla colorazione con i Copic, per questa scena ho voluto che i protagonisti fossero i due topini che si baciano sotto al vischio(Christmas before and afters) mentre l'altro trio di topolini son nascosti a  spiarli (Hay there hayrides mice add on).

Per completare la card ho aggiunto il sentiment let it snow dalla foil plate  Winter Big Scripty Words ed il sentiment "meet me under the mistletoe" incluso nella plancia Christmas before 'n afters.

Spero che vi piaccia e vi auguro di creare tante nelle card con queste novità!

Buona serata !


Let's move on to coloring with Copics, for this scene I wanted the main characters to be the two mice kissing under the mistletoe(Christmas before and afters) while the other trio of mice are hiding spying on them(Hay there hayrides mice add on).

To complete the card I added the let it snow sentiment from the Winter Big Scripty Words foil plate and the "meet me under the mistletoe" sentiment included in the Christmas before 'n afters stamp set.

I hope you enjoy it and wish you many in the cards with these new release!


Good evening !

Quyen


lundi 26 juin 2023

Make a Wish

Buona sera amiche creative!

Vi é piaciuta la nuova release della Lawn fawn? Oggi vi mostro cosa ho fatto con le novità:D 


Good evening creative friends!

Did you enjoy the new Lawn fawn release? Today I show you what I did with the new features:D


Mi sono subito innamorata della fustella Make A Wish, forse perché da qualche parte mi piace sognare ed esprimere desideri!;)
Ho cominciato a creare l'erba con il nuovo stencil Slimline Grassy con i distress ink Moved Lawn e Twisted citron. Poi come coperto l 'erba con lo stesso stencil ed ho colorato il cielo con Tumbled glass e Mermaid lagoon.
Poi ho colorato i personaggi con i copic usando i set Yappy Birthday  e Yappy Birthday add-on. Per la base ho usato un cartoncino nero, poi ho incollato lo sfondo erba-cielo, la scritta make a wish ricavata da un cartoncino oleografio ed infine i cagnolini e i palloncini. 
Buona serata a tutti 

I immediately fell in love with the Make A Wish die, maybe because somewhere I like to dream and make wishes!;)
I started creating the grass with the new Slimline Grassy stencil with Moved Lawn and Twisted citron distress inks. Then i masked the grass with the same stencil, and then I colored the sky with Tumbled glass and Mermaid lagoon.
Then I colored the characters with Copics using Yappy Birthday and Yappy Birthday add-on sets. For the base I used a black cardstock, then I glued the grass-sky background, the make a wish sign made from an oleographic cardstock and finally the little dogs and balloons. 
Have a nice evening everyone

Quyen


mercredi 8 mars 2023

Tulips hot foil

 Ciaooo a tutti, 

come state? eccomi qui con un nuovo post usando la glimmer hot foil machine! A mio parere il foil da quella bella luce alle card e gli conferisce un tocco magico ed elegante. Se siete interessate, potete dare un'occhiata nello shop sotto la sezione Hot foil per vedere tutti i prodotti disponibili, cliccando qui.

Oggi ho voluto giocare un po'con i nuovi prodotti di Spellbinders Wonderful tulips hot foil plate and die e lo stencil coordinato Layered stencil , dato che era la prima volta che usavo insieme al foil anche lo stencil, perciò ho deciso di foilizzare 4 volte il tulipano con foil di diversi colori dei set Spellbound e Satin Pastel in modo da fare diversi test!

Ho usato 3 tamponi di color rosa da un set di altenew, per colorare i tulipani, ma alla fine il risultato ottenuto non mi convinceva tantissimo, mi sembravano troppo approssimativi.


Hello everyone, 

how are you? here I am with a new post using the glimmer hot foil machine! In my opinion the foil gives that beautiful glimmer to the cards and gives them a magical and elegant touch. If you are interested, you can take a look in the shop under the hot foil section to see all the products available by clicking here.

Today I wanted to play a little bit with the new Spellbinders Wonderful tulips hot foil plate and die products and the coordinating Layered stencil , since it was the first time I was using along with the foil also the stencil, so I decided to foil 4 times the tulip with foils of different colors from the Spellbound and Satin Pastel sets so I could do different tests!

I used 3 pink-colored pads from an Altenew set, to color the tulips, but in the end I wasn't so sure about the result, they looked too sloppy.


Per cui mi sono lanciata a colorarli con i Copic ed il risultato ottenuto mi é piaciuto molto di più...

So I tried into coloring them with Copics and I liked the result more ....


Il sentiment "have a wonderful day" era già compreso nel set dei tulipano, quindi il ho incollati su un cartoncino effetto tela e incollato qualche abbellimento dorato Gold smooth sequins discs .
Qual'é la vostra card preferita?

Buona giornata 

The sentiment "have a wonderful day" was already included in the tulip set, so the I glued it on a canvas effect card and glued some gold embellishment Gold smooth sequins discs.
Which is your favorite card?

Have a great day


Quyen