Affichage des articles dont le libellé est baby card. Afficher tous les articles

lundi 24 mars 2025

Welcome baby

Bonjour à tous!

J'espère que vous allez bien avec ce petit aperçu de printemps. Cela fait du bien au moral.

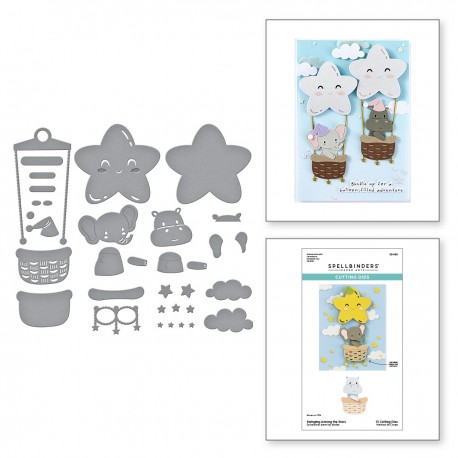
Je vous présente une carte pour la naissance d'un bébé. Adorable, non?

Il s'agit d'un ensemble de dies Spellbinders. Allez vite voir en boutique, il y a plein de nouveautés Spellbinders, des dies mais aussi d'adorables tampons House Mouse.

Pour ma carte, j'ai décidé de faire une slimline pour que les dies aient bien de la place. J'ai découpé toutes mes pièces avec différentes couleurs de cardstock puis j'ai collé le tout en ajoutant de 3D foam pads pour mettre du volume, mais aussi pour activer le mécanisme de balance de la nacelle. Elle bouge de gauche à droite et de droite à gauche. C'est super mignon je trouve! Pas de colorisation cette fois, rien que du cardstock!

J'espère vous avoir inspiré et donné quelques idées pour ce printemps!


Hall zäme

Ich hoffe, es geht Ihnen gut mit diesem kleinen Vorgeschmack auf den Frühling. Das ist gut für die Stimmung.

Ich zeige Ihnen eine Karte zur Geburt eines Babys. Ist das nicht süß?

Es handelt sich um ein Set von Spellbinders Dies. Schauen Sie schnell im Shop vorbei, dort gibt es viele neue Spellbinders Dies und auch die niedlichen House Mouse Stempel.

Für meine Karte entschied ich mich, eine Slimline zu machen, damit die Dies viel Platz haben. Ich habe alle meine Teile mit verschiedenen Farben von Cardstock ausgeschnitten und dann alles zusammengeklebt, wobei ich 3D Foam Pads hinzugefügt habe, um Volumen zu schaffen, aber auch um den Balancemechanismus der Gondel zu aktivieren. Sie bewegt sich von links nach rechts und von rechts nach links. Das ist supersüß, finde ich! Dieses Mal habe ich nicht koloriert, sondern nur Cardstock verwendet!

Ich hoffe, ich konnte Sie inspirieren und Ihnen ein paar Ideen für den Frühling geben!


Hello everyone!

I hope you're well with this little glimpse of spring. It's good for the morale.

Here's a card to celebrate the birth of a baby. Adorable, isn't it?

It's a set of Spellbinders dies. Check out the shop, there are lots of new Spellbinders dies and also some adorable House Mouse stamps.

For my card, I decided to make a slimline so that the dies would have plenty of room. I cut out all my pieces using different colours of cardstock and then glued them all together, adding 3D foam pads to add volume and also to activate the balance mechanism on the pod. It moves from left to right and right to left. I think it's really cute! No colouring this time, just cardstock!

I hope I've inspired you and given you some ideas for this spring!


Merci de votre passage!


Valérie


mardi 28 février 2023

Baby Card with Isha

 Hello everyone! Long time, sorry I had some personal things going on. Anyhoo, I made this cute baby girl card using some of the new Lawn Fawn products. Did you check them in the shop yet? There are still some in the shop so check it out :)

I love this new die "Moon and Stars Mobile" and the rainbow stencil "Corner Rainbow stencil". I also used the Stitched Rectangle die, Clouds Border die and the Quinn's ABCs dies.


I started by sponging some Ranger distress oxide inks through the stencil onto white cardstock. Die-cut using the stitched rectangle die. Die-cut the mobile using a glitter card. Die-cut the small elements from white card and color using copic markers. Add some shine using clear glitter pen.


Die-cut the cloud border, adhere to the bottom of the mat layer. Die-cut the alphabets for "baby" in white and black. Adhere the black behind the white slightly off set. Adhere everything to a pink cardbase.

If you don't have the exact products, you sure will find substitute from other companies in the shop.

Thank you for dropping by and have a nice day!

samedi 25 février 2023

Hello Baby

 Ciao a tutti, 

spero che stiate bene! Sono felice che stasera finalmente ho trovato tempo di giocare con i nuovi prodotti della release di Lawnfawn! Questa volta mi son dovuta trattenere a non comprare tutto, ma nonostante ciò adoro tutti i prodotti!


Hi everyone, 

I hope you are all doing well! I'm glad that tonight I finally found time to play with the new products from the Lawnfawn release! This time I had to restrain myself from buying everything, but nevertheless I love all the products!


Ho usato la fustella Dotted Moon and stars backdrop , ricavando questo sfondo bellissimo con le stelline e le piccole lune. Dato che volevo ricreare il cielo, grazie alla fustella Cloud Borders ho ricavato una nuvola per ricoprire la parte in basso della mia card. Mi piaceva anche l'idea di incorniciare la scena della card e quindi ho usato la fustella della misura più grande del set Stiched rectangle frames con la carta glitter argento ed il rettangolo avanzato dal taglio, ho ricoperto il retro dello sfondo.
Ho colorato i timbri del set Fligh High, ed anche la scritta Baby con i Copic.
Ho timbrato la scritta "Hello" con la nuova plancia Henry jr.'s ABCs


I used the Dotted Moon and stars backdrop die cut , making this beautiful background with the little stars and moons. Since I wanted to recreate the sky, thanks to the Cloud Borders die cut I obtained a cloud to cover the bottom part of my card. I also liked the idea of framing the card scene, so I used the largest size die cut from the Stiched rectangle frames set with silver glitter paper and the leftover rectangle from cutting, I covered the back of my card.
I colored the stamps from the Fligh High set, and also the "Baby" lettering with Copics.
I stamped the "Hello" inscription with the new Henry Jr.'s ABCs stamp set.


Infine ho aggiunto della pailletes argento per decorare la card. Spero vi piaccia il risultato!
Vi auguro buon weekend, 
un abbraccio 

Finally, I added silver sequins to decorate the card. I hope you like the result!
Have a great weekend, 
a hug Quyen


mardi 7 février 2023

Peek-a-Boo Welcome Baby Card

 Peek-a-Boo Welcome Baby Card

Peek-a-Boo Willkommen Baby Karte


Scroll to the end of the post to see the card in action. 😊

Scrolle ans Ende des Posts um die Karte in Bewegung zu sehen. 😊

You need 3 Panels
You can make them with different measurements, place the window somewhere else and make it open sideways. Just try out where the window can be placed once you understand the mechanism of the card. (It is easier to show in a video than describe it 😉)

Du brauchst 3 Lagen (ich weiss das deutsche Wort nicht für Panel.🤓)
Du kannst unterschiedliche Masse benutzen, das Fenster irgendwo anders platzieren oder die Karte seitwärts drehen. Experimentiere mit dieser Kartenform sobald Du die Mechanik davon verstanden hast. (Es wäre einfacher die Kniffe in einem Video zu zeigen als hier zu beschreiben 😉)

        Front View:                                                            Backview:
        Von Vorne:                                                             Von Hinten:
When you place the bottom lines of the front and the middle panel flush the windows should be identical. Also when you fold the middle part the windows need to be at the same spot. So when you put them all together you would have a neat Peek-a-Boo window.

Wenn Du die Titelseite und den Mittelteil unten bündig hinlegst müssen die Fenster auf derselben Höhe sein. Die mittlere Lage gefaltet hat die Fenster auch auf derselben Höhe somit entsteht ein sauberes Peek-a-Boo Fenster wenn alle Lagen übereinander gefaltet werden. 

From left to right:
Front Panel: 10.5cm x 20cm score at 5.5 cm
On the back of the flap add the sentiment or image you want to appear when you open the card. Make sure to face it in the right direction. Use the other panel to line it up as shown further down.

Von Links nach Rechts:
Titelseite: 10.5cm x 20cm falzen bei 5.5cm
Der Spruch oder das Bildchen auf der Rückseite der Klappe erscheint wenn man die Karte öffnet. Pass auf, dass sie in die richtige Richtung zeigen. Benutze die mittlere Lage um den Stempel oder das Bildchen zu platzieren, ich zeige dies ein bisschen weiter unten.


Middle Panel: 10.5cm x 21cm score at 10.5
I added some nice frames on this panel, it is the same one I adhered on the front of the frontpanel. In order to still see them once it is all adhered you need to fold those frames to the inside.

Mittlere Lage: 10.5cm x 21cm score at 10.5
Ich habe ein paar hübsche Rahmen auf der mittleren Lage sowie auf der Titelseite befestigt. Diese Rahmen sollten am Schluss noch zu sehen sein. Das heisst diese Lage wird mit den Rahmen nach innen gefaltet.


Backpanel: 10.5cm x 14.5cm
This contains the sentiment or image you see when the card is closed.
Add some score tape at the bottom edge.

Rückseite: 10.5cm x 14.5cm
Dies beinhaltet Bild oder er Spruch, den Du siehst, wenn die Karte noch verschlossen ist.
Füge etwas Score Tape an die untere Kante.


I did all the stamping and adhering of patterned paper before the assembling. Just pay attention when you stamp on the backside of the frontpanel to line them up correctly:
As we are holding the panels upside down, you need to line them up on top. Take the middle panel and put it over the top panel, line up one of the windows and use the other window as a guide for the stamp alignment.

Ich habe alles stempeln und verzieren vor dem Zusammenbau der Karte erledigt. Aufpassen muss man nur, dass man an die richtige Stelle stempelt. Dazu musst Du die Titelseite und die mittlere Lage korrekt ausrichten. Wir halten die Kartenteile hier auf dem Kopf also müssen die oberen Kanten hier bündig sein. Oder Du bündelst die Öffnungen und kannst dann das untere Fenster als Stempelhilfe benutzen. 


Then glue on the middle panel to the front panel so that the openings are overlaping and the frames are still visible.

Danach leimt man das mittlere Teil mit der Titelseite zusammen. Rahmen nach innen geklappt und die Unterseiten bündig.


Take the lining of the score tape and adhere the backpanel flush to the middle panel.

Klebe nun noch die Rückseite bündig mit der mittleren Lage zusammen.


Fold the card correctly and you are done! 😃

Falte die Karte korrekt und schon bist Du fertig! 😃


I hope you can follow my explanations!
Thank you so much for stepping by.
Have a lovely Day!
Andrea

Ich hoffe Du kannst meinen Ausführungen folgen!
Herzlichen Dank fürs Vorbeischauen.
Ich wünsche Dir einen gemütlichen Tag!
Andrea


And here it is in motion:
Und hier die Karte in Bewegung: