Affichage des articles dont le libellé est embossing powder. Afficher tous les articles

dimanche 14 janvier 2024

love you lots!

 Buon domenica card makers!
oggi vi presento questa tag che ho realizzato con alcune novità Lawn Fawn.


Happy Sunday card makers!
Today I present this tag I made with some Lawn Fawn new arrival.


Ho cominciato a creare la tag partendo da un cartoncino Kraft e la fustella di Mama Elephant Tags a lot. Successivamente ho messo la tag ricavata nella placca da embossing folder della Taylored expressions dotted lattice perché volevo dare un effetto tramato alla base. In seguito ho colorato le parti in rilievo della tag con il distress ink Walnut stain e per dare un po di luccichio, ho usato anche la WOW embossing glitter powder Pearl gold sparkle.

I started creating the tag from Kraft cardstock and Mama Elephant Tags a lot die cut. Next, I placed the made tag in the embossing folder plate from Taylored expressions dotted lattice because I wanted to give a textured effect to the base. Next, I colored the embossed parts of the tag with Distress Ink Walnut stain and to give some shimmer, I also used WOW embossing glitter powder Pearl gold sparkle.


I protagonisti della tag son il la coroncina a forma di cuore ed il topolino con il palloncino. Partiano dalla coroncina: ho usato lo stencil Heart wreath stencil della Lawn fawn con i distress ink Peeled pain, Tattered rose, Picked raspberry e Seedless preserves e poi ho ritagliato i contorni con le forbici.

The stars of the tag are the heart wreath and the mice with the balloon . 
Starting with the wreath: I used the Heart wreath stencil from Lawn fawn with the distress inks Peeled pain, Tattered rose, Picked raspberry and Seedless preserves and then cut out the outlines with scissors.


Ho colorato il topino dal set All my heart con i pennarelli Copic mentre il sentiment della tag viene dal set Magic heart messages.
Una volta attaccato tutti gli elementi alla card ho aggiunto un paio di Color essentials sequins latte smoothie disc di Spellbinders. 
Spero vi piaccia, buona giornata

I colored the mouse from the All my heart set with Copic markers while the tag sentiment is from the Magic heart messages set.
Once I attached all the elements to the card I added a couple of Color essentials sequins milk smoothie disc from Spellbinders. 
Hope you like it, have a nice day

Quyen


mercredi 2 août 2023

3D Embossing folder

 Salve carissime,

oggi vi mostro una card semplice semplice ma di grande effetto!
materiale necessario:
- embossing folder 3d ( io ho usato Beautiful butterflies 3d embossing folder di Spellbinders)
-carta acquarello ( ho usato quella della Florence)
- distress ink reinkers ( ho usato scattered straw, picked raspberry, mermaid lagoon)
- embossing powders + ink for embossing powders ( ho usato wow Metallic gold sparkle)
- gold ink pad ( ho usato versa color gold)
- pennarello nero

Hello darlings,

today I show you a simple simple but impressive card!
materials needed:
- 3d embossing folder ( I used Beautiful butterflies 3d embossing folder from Spellbinders)
-watercolor paper ( i used the one from Florence)
- distress ink reinkers ( I used scattered straw, picked raspberry, mermaid lagoon)
- embossing powders + ink for embossing powders ( I used wow Metallic gold sparkle)
- gold ink pads ( I used versa color gold)
- black pen


Ho cominciato colorando la carta con i miei 3 inchiostri, mettendo il colore a casaccio e sfumandoli tra di loro. Una volta che lo sfondo era asciutto, l'ho embossato con la placca della Spellbinders. 
Ho passato sulla parte in rilievo il tampone dorato, aspettato che l'inchiostro fosse asciutto e poi ho passato il tampone versamark per le polveri da embossing e poi buttato la polvere della WOW. Ho rimosso con un pennellino d'acquarello pulito ogni eccesso di povere nei punti dove non volevo che ci fosse. 
Per creare lo sfondo nero invece ho colorato con un semplice pennarellino nero tutte le parti che non erano in rilievo.
Spero che vi piaccia, buona serata

I started by coloring the paper with my 3 inks, putting color randomly and blending them together. Once the background was dry, I embossed it with the Spellbinders plate. 
I swabbed the embossed part with the gold pad, waited until the ink was dry, and then swabbed the versamark pad for the embossing powders and then tossed in the WOW powder. I removed with a clean watercolor brush any excess powder in places where I didn't want it to be. 
To create the black background instead, I colored with a simple black marker all the parts that were not embossed.
I hope you like it, have a good evening

Quyen


mercredi 21 juin 2023

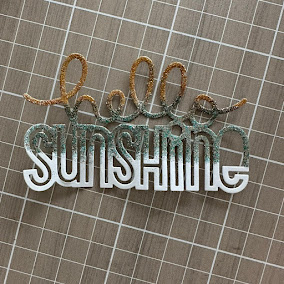
Hello Sunshine


 Buona sera care creative,

stasera vi presento una nuova card! come sapete adoro usare la glimmer hot foil e quindi stavolta ho voluto combinare diverse tecniche! 


Good evening dear creatives,

tonight I want to show you a new card! As you know I love to use glimmer hot foil so this time I wanted to combine different techniques!


Ho voluto creare uno sfondo dai bei riflessi del foil Rainbow di Spellbinders insieme al hot foil plate di Lawnfawn Stitched trails . Ho fissato sia il foil al cartoncino bianco e le sagome della hot foil plate al foil con del washitape e passato per la Hot foil machine e poi attraverso alla mia big shot. Dopo di che ho colorato i 4 lati del cartoncino con il distress ink Picked Raspberry.


 I wanted to create a background from the beautiful shades of the Rainbow foil from Spellbinders along with the hot foil plate from Lawnfawn Stitched trails . I attached both the foil to white cardstock and the hot foil plate to the foil with washitape and passed through the hot foil machine and then through to my big shot. After that I colored the 4 sides of the cardstock with Picked Raspberry distress ink.


Poi ho usato la fustella Giant Hello Sunshine e l'ho embossata con le polveri della Wow embossing in 3 tappe, il primo terzo della scritta con la polvere Mai tai, il centro con Mojito e per ultimo Strawberry daiquiri.

Then I used the Giant Hello Sunshine die cut and embossed it with Wow embossing powders in 3 stages, the first third of the lettering with  Mai tai, the center with Mojito and lastly Strawberry daiquiri.


Ho incollato tutti gli elementi insieme ed ho aggiunto i soggetti del Just Plane Awesome colorati con i copic! Spero vi piaccia il risultato!
Buona serata 

I glued all the elements together and added the Just Plane Awesome subjects colored with copics! I hope you like the result!
Have a nice evening

Quyen


samedi 12 novembre 2022

GIVEAWAY Lumberjack Plaid Distress Oxide

 Ciao care creative!

Spero che stiate tutte bene! 

Oggi vi mostro questa card dove ho usato il nuovo colore di Tim Holtz che trovo perfetto per Natale, é un rosso magnifico! Avrete la chance di vincere 2 distress oxide partecipando al giveway o su facebook o su Instagram! Andate a cercare il mi profilo shiny_scrap per avere maggiore info sul giveaway.


 Hello dear creative ones!

I hope you are all doing well! 

Today I'm showing you this card where I used the new Tim Holtz color that I find perfect for Christmas, it's a gorgeous red! You will have a chance to win 2 distress oxide by participating in the giveway either on facebook or on Instagram! Go find my profile shiny_scrap for more info on the giveaway.


Su un ritaglio di carta da acquarello ho sfumato i seguenti distress oxide: Barn Door, Lumberjack Plaid, Aged Mahogany. Ho aspettato che fosse asciutto il cartoncino e prima di timbrare lo sfondo, ho passato la polvere antistatica. Ho timbrato il nuovo sfondo di MFT Snowflake Flurry Background con il Versamark ed embossato con la polvere embossing glaze Lumberjack Plaid.
Ho fustellato  la stella di Crealies VARIA 06 CURLY STAR SNOWFLAKE con la carta dorata del pad Studio Light Vintage Christmas Glitter Pad e con il Vellum. Ho usato il sentiment strips di Modascrap. Infine ho incollato tutto su un cartoncino Ephemeria cardstock Kraft Brun.

Spero che vi piaccia!


On a watercolor paper cutout I shaded the following distress oxides: Barn Door, Lumberjack Plaid, Aged Mahogany. I waited until the cardstock was dry, and before stamping the background, I dusted it with anti-static powder. I stamped the new MFT Snowflake Flurry Background with Versamark and embossed with Lumberjack Plaid glaze embossing powder.
I die-cut the Crealies VARIA 06 CURLY STAR SNOWFLAKE star with Studio Light Vintage Christmas Glitter Pad gold paper and Vellum. I used the sentiment strips from Modascrap. Finally, I glued everything onto an Ephemeria Kraft Brun cardstock.

I hope you all enjoy it!


hugs
Quyen


lundi 29 août 2022

Light It Up

Buongiorno care creative!
spero che stiate tutti bene e che abbiate trascorso delle belle vacanze! Oggi in Ticino ricominciano le scuole e ormai l'estate sembra un ricordo lontano e come ad ogni anno mi ritrovo sempre all'ultimo a fare le card natalizie!
Ieri mi son messa alla mia scrivania ed ho pensato di colorare questi gatti della All&Create Light it up. Dopo averli colorati con la classica timbrata in nero con il Memento Tuxedo black, ho voluto provare la colorazione no line su carta Kraft.


Good morning dear creative ladies!
I hope you are all well and had a great vacation! Today in Ticino school starts again and now summer seems like a distant memory and as with every year I always find myself at the last minute making Christmas cards!
Yesterday I got to my desk and thought of coloring these cats from All&Create Light it up. After coloring them with classic black stamping with Memento Tuxedo black, I wanted to try no line coloring on Kraft paper.


Su un normale Bazzil Kraft ho timbrato il micio usando il tampone Versamark perché volevo fare una colorazione no line, poi ho colorato con i Copic Markers e accentuato le ombre con le matite colorate. Mi piace un sacco l'effetto di questa colorazione!

On a regular Bazzil Kraft I stamped the kitty using Versamark pad because I wanted to do a no line coloring, then colored with Copic Markers and accentuated the shadows with colored pencils. I really like the effect of this coloring!


Le seguenti colorazioni sono state fatte sempre con i Copic ma con la timbrata classica nera.
Per lo sfondo di queste due cars ho usato il timbro di MFT Christmas background che ho timbrato con due marroni differenti per dare un po' di interesse allo sfondo. Ho poi ritagliato il cartoncino timbrato a metà in modo di poterci creare due sfondi per due cards ed ho usato la fustella Stitched hillside borders della Lawn Fawn.

The following coloring was done again with Copics but with the classic black stamping.
For the background of these two cars I used the MFT Christmas background stamp which I stamped with two different browns to give the background some interest. I then cut the stamped cardstock in half so that I could create two backgrounds for two cards and used the Stitched hillside borders die from Lawn Fawn.


Per lo sfondo di questa card ho tamponato con il Versamark lo stencil di MFT Sunrise radiating rays, ed embossato con una polvere glitter della WOW embossing powder.

For the background of this card, I dabbed MFT's Sunrise radiating rays stencil with Versamark, and embossed with a glitter powder from WOW embossing powder.


Lo sfondo di questa card é stata realizzata con lo stencil della Lawnfawn Snowflakes background con gli Oxide Stormy sky e Speckled egg. In un secondo momento ho voluto aggiungere un po' di luccichio ed ho embossato con una polvere color platino.

The background of this card was made with the Lawnfawn Snowflakes background stencil with the Oxide Stormy sky and Speckled egg. At a later date I wanted to add some shimmer and embossed with a platinum colored powder.


Infine mi avanzavano questi due gatti ed ho voluto fare due mini cards, usando il nuovo paper pad della Lawnfawn Knit picky winter che penso che si abbinino benissimo a questi gattini che bevono la cioccolata calda! 

Finally, I had these two cats leftover and wanted to make two mini cards, using Lawnfawn's new Knit picky winter paper pad that I think would go great with these kittens drinking hot chocolate! 


È la prima volta che da un set di timbri creo così tante cards. Sono felice di aver ottimizzato i tempi! Spero vi siano piaciute!  
A presto 

This is the first time I have created so many cards from one set of stamps. I'm glad I was able to optimize the time! I hope you enjoyed them!  
See you soon 

Quyen aka @shiny_scrap


jeudi 21 juillet 2022

Lavinia stamps and stencils


Buongiorno anime creative!
come state? avete visto che fino a questa settimana ci son offerte sui prodotti di Lavinia stamps
Io son rimasta subito affascinata dagli stencils che tra l'altro sono giganteschi!!! Se si calcolano bene le misure si possono creare almeno 2 card con uno sfondo fatto con questi stencils.
Vi spiegherò in breve come ho creato queste 2 card... 


Good morning creative soul!
how are you? did you see that until this week there are offers on Lavinia stamps products? 
I was immediately fascinated by the stencils which by the way are gigantic!!! If you calculate the measurements right you can create at least 2 cards with a background made with these stencils.
I will briefly explain how I created these 2 cards.... 


Per la card più piccola ho usato lo stencil Dynamic, dove ho sfumato il bellissimo nuovo colore di Tim Holtz Uncharted Mariner  e Chipped Sapphire Oxide inks. Lasciando sempre lo stencil attaccato al cartoncino, ho fatto degli schizzi con un acquarello argentato per dare un po' di effetto magico allo sfondo.
Inseguito ho timbrato con lo StazOn la fatina Freya sempre di Lavinia stamps su un vellum perlato della Lawn Fawn, e dopo aver ritagliato i contorni l'ho incollata allo sfondo ed ho aggiunto sulle ali un po' di Crystal Stickles. Il sentiment che ho usato é Fairy happy birthday che ho embossato con una polvere argento.

For the smaller card I used the Dynamic stencil, where I blended Tim Holtz's beautiful new color Uncharted Mariner and Chipped Sapphire Oxide inks. Always leaving the stencil attached to the card, I made some splashes with a silver watercolor to give some magical effect to the background.
Next I stamped the fairy stamps Freya , also from Lavinia stamps, on the pearlescent vellum from Lawn Fawn with StazOn ink, and after cutting out the outlines I glued it to the background and added some Crystal Stickles on the wings. The sentiment I used is Fairy happy birthday which I embossed with a silver powder.


Per la seconda card, la slimline, ho usato lo stencil Resplenish  con i seguenti Oxide inks: Tumbled Glass, Rustic WildernessBlack Sooth. Ho di nuovo timbrato la fatina dal set Fairytale sul vellum perlato. Le ali della fatina ho effettuato una seconda timbrata con il Versamark ed embossato con una polvere dorata glitterata. Infine ho aggiunto il sentiment Make a wish e di Modascrap.
Spero vi piaccia, a presto Quyen.

For the second card, the slimline, I used the Resplenish stencil with the following Oxide inks: Tumbled Glass, Rustic Wilderness, Black Sooth. I again stamped the fairy from the Fairytale set on the pearl vellum. The fairy's wings I did a second stamping with Versamark and embossed with a gold glitter powder. Finally I added the Make a wish sentiment and Modascrap sentiment.
Hope you like it, see you soon Quyen.


jeudi 23 juin 2022

Best Day Ever

Buongiorno creative!

come state? avete progettato le vostre vacanze? Mio marito ed io andremo in vacanza settimana prossima ma prima di partire, volevo approfittare a fare un paio di card! Il biglietto che ho preparato oggi é per il compleanno di una delle mie migliori amiche che compirà 40 anni! Ho voluto fare una card un po'diversa dalle classiche card per i compleanni con cifre tonde, perciò ho optato per usare la sua iniziale!:D


Good morning creative!

how are you? have you planned your vacations? My husband and I are going on vacation next week but before we leave, I wanted to make a couple of cards! The card I made today is for the birthday of one of my best friends who will be turning 40! I wanted to make a card a little different from the classic birthday cards using numbers, so I used her initial!:D


Per lo sfondo della card ho usato il nuovo paper pad di Florileges Les papiers effet Toile della nuova collezione De fil en Aiguille. Adoro questo effetto jeans ma anche l'altro pad effetto tela!
Ho timbrato le rose Fleurs Effet Brodé in due maniere diverse, la prima su un cartoncino bianco ed embossato con della polvere nera, mentre la seconda su del vellum usando tre inchiostri di colori differenti ( VersaMagic Azur d'Egée e Profondeurs de l'océan e Memento Noir Tuxedo )


For the background of the card I used the new paper pad by Florileges Les papiers effet Toile from the new collection De fil en Aiguille. I love this denim effect but also the other canvas effect pad!
I stamped the Fleurs Effet Brodé roses in two different manners, the first on a white card and embossed with black powder, and the second on vellum using three different color inks ( VersaMagic Azur d'Egée and Profondeurs de l'océan and Memento Noir Tuxedo )


In seguito ho usato la fustella di Sokai Les couronnes che ho embossato in argento insieme al timbro L del set Lettre L di Florileges, che ho infine colorato con i Copic.
Ho assemblato insieme tutti gli elementi ed aggiunto delle mezze perle di Modascrap.
Spero vi piaccia il risultato finale!
Buona giornata di sole a tutti,

Next, I used the Sokai Les couronnes die that I embossed in silver along with the stamp L from the set Lettre L from Florileges, which I finally colored with Copics.
I assembled all the elements together and added half beads from Modascrap.
I hope you like the final result!
Have a great sunny day everyone,


Quyen Rabet