Affichage des articles dont le libellé est hotfoil. Afficher tous les articles

vendredi 2 mai 2025

Japanese Cherry Blossom


Buongiorno creative, come state? 
oggi vi mostro queste due card fatte con le novità di Spellbinders che potete trovare sul sito di Scraphouse!
Non son stupendi questi fiori di ciliegio? Li adoro! Ho usato la press plate Cherry blossoms spring in Kyoto per foilizzare in oro ed in nero. Una volta ritagliato i fiori con la loro apposita fustella, li ho colorati con dei marker ad alcohol, in questo caso gli OLO.

Good morning creatives, how are you? 
Today I show you these two cards made with new Spellbinders that you can find on the Scraphouse website!
Aren't these cherry blossoms gorgeous? I love them! I used the Cherry blossoms spring press plate in Kyoto to foil in gold and black. Once I cut out the flowers with their appropriate die cut, I colored them with alcohol markers, in this case OLOs.


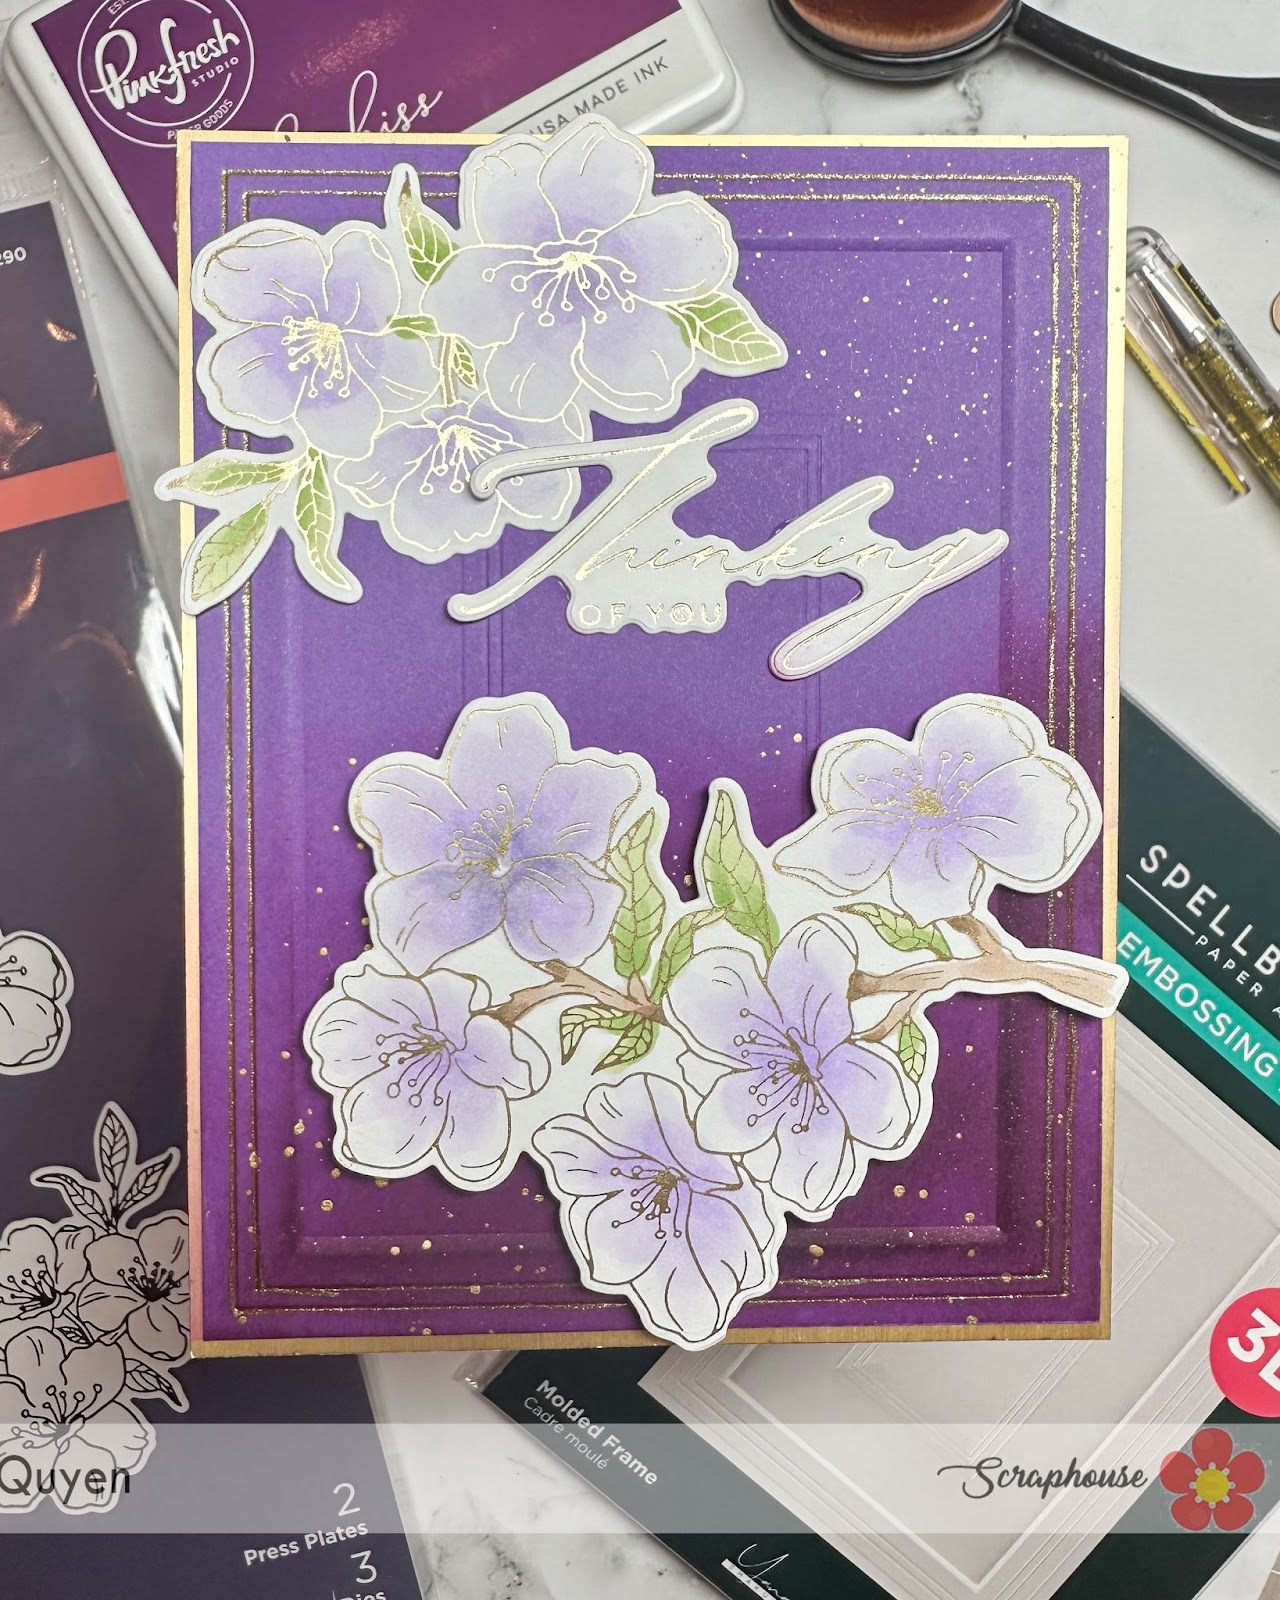
Per questa prima card preso un cartoncino viola ed embossato con il 3D embossing folder Molded frame , nella parte inferiore ho sfumato l'inchiostro Regal kiss di Pinkfresh studio, creato delle macchie dorate con un'acquarello oro e marcato i bordi del frame con una gel pen dorata.

For this first card I took a purple cardstock and embossed it with the 3D embossing folder Molded frame , at the bottom I blended Regal kiss ink from Pinkfresh studio, created gold flecks with a gold watercolor and marked the edges of the frame with a gold gel pen.


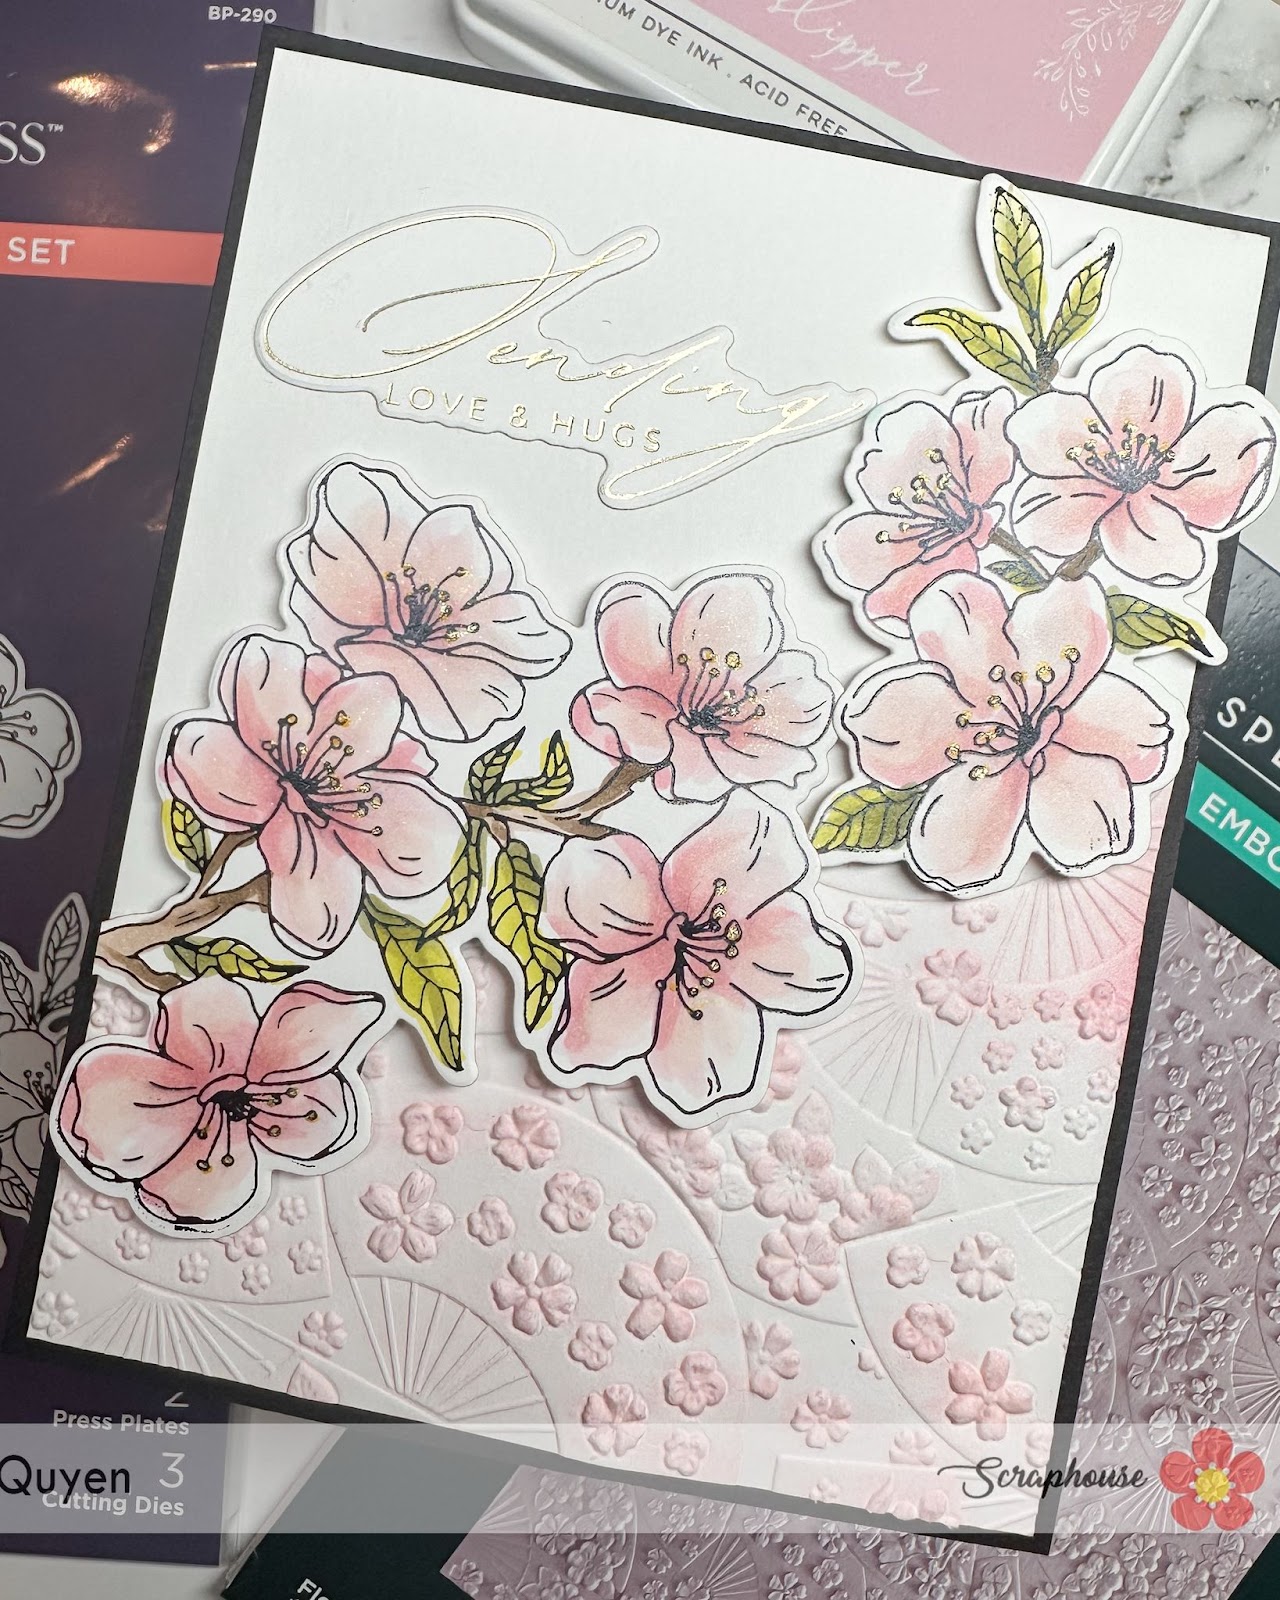
invece per questa seconda card , ho usato un embossing folder differente, Floral fans spring in Kyoto , e passato sulla parte in rilievo l'inchiostro Ballet slippers di Pinkfresh Studio. come puoi notare dall' immagine sottostante, ho embossato solo un angolo del mio cartoncino.

instead for this second card , I used a different embossing folder, Floral fans spring in Kyoto , and passed on the embossed part the Ballet slippers ink from Pinkfresh Studio. as you can see from the 'image below, I embossed only one corner of my card.


Entrambe le card le ho abbellite con dei sentiment della Betterpress plate Crafty hugs.
Spero di avervi ispirato con queste card,
buon Venerdì,

Both cards I embellished with sentiments from Betterpress plate Crafty hugs.
I hope I have inspired you with these cards,
happy Friday,

Quyen


mardi 24 septembre 2024

Poppy Background betterpress and stencil


Buona sera carissime crafter!

 Come state? spero tutto bene! Sono entusiasta di mostrarvi questa card stasera! La plate Poppy Background mi piaceva da parecchio ed é tornata disponibile nello shop.
Come mio solito ho voluto usare la press plate per foilizzare! Ho fatto svariate prove con differenti colorazioni di foil e alla fine per questo progetto ho optato per la versione in rosa pastello del set  Satin Pastel Pack.
Volevo creare un look tono su tono e quindi con lo stencil annesso, ho usato ho colorato i fiori con il Distress ink Victorian Velvet e le foglie con Bundled sage e Peeled paint. Mi piace moltissimo il contrasto creato dalla colorazione dei distress con lo sfondo lucido del foil! Voi cosa ne pensate?
Per completare la mia cardo ho usato la fustellata Hello dal set Little Hello Clear stamp etched dies.
Spero vi piaccia, vi auguro buona serata

Good evening dear crafters! 

How are you? hope all is well! I am excited to show you this card tonight! I have liked the Poppy Background plate for quite a while and it is back available in the shop.
As my usual I wanted to use the press plate to foil! I did several trials with different colors of foil and finally for this project I opted for the pastel pink version of the Satin Pastel Pack set.
I wanted to create a tone-on-tone look and so with the stencil attached, I used I colored the flowers with Distress ink Victorian Velvet and the leaves with Bundled sage and Peeled paint. I really like the contrast created by the distress coloring with the shiny foil background! What do you guys think?
To complete my thistle I used the Hello die cut from the Little Hello Clear stamp etched dies set.
I hope you enjoy it, have a great evening

Quyen


lundi 26 août 2024

It's my birthday! Let's celebrate :D

Buongiorno creative!

Spero di trovarvi bene!  

Oggi in occasione del mio compleanno voglio brindare con voi con questa card!:D ormai l'anno scorso ho compiuto 40 anni e da quest'anno non ho voglia di fare grandi celebrazioni...


Good morning crafters!

I hope to find you well!  

Today on the occasion of my birthday I want to toast with you with this card!:D now last year I turned 40 and since this year I don't feel like making big celebrations...


Per questa card ho usato 3 nuovi prodotti di Spellbinders: Olive Martinis etched dies, Christmas cocktail etched dies and Betterpress cheer sentiments.

Per questa card ho usato 3 nuovi prodotti di Spellbinders: Olive Martinis, Christmas cocktail e Betterpress cheer sentiments.

Le fustellate che trovate in rosa le ho ricavate da un foglio del pad di Studio light Shades of pink dove ho spruzzato il Distress Spritz Worn Lipstick per ottenere un effetto cangiante. Bello l'effetto, non trovate anche voi?

The die cuts you find in pink I made from a sheet of the Studio light Shades of pink pad where I sprayed Distress Spritz Worn Lipstick for an iridescent effect. Nice effect, don't you think so too?


Invece per lo sfondo ho usato la mia Glimmer machine, con la hot foil plate Monoline stars con il foil satinato rosa dal hot foil Roll satin pastel pack.


Vi piace il risultato? Trovo che questo set di fustelle di spellbinders sia molto versatile... ci sono tantissime occasioni per brindare e celebrare, quindi la si può usare per tutte le festività! cosa ne pensate?

Grazie di cuore per esser passate qui a leggere il blog,

vi auguro una giornata radiosa!

un abbraccio


Instead for the background I used my Glimmer machine, with the hot foil plate Monoline stars with the pink satin foil from the hot foil Roll satin pastel pack.

Do you like the result? I find this spellbinders die set very versatile...there are so many occasions to toast and celebrate, so you can use it for all holidays! what do you think?

Thank you so much for stopping by and reading the blog,

wishing you a radiant day!

a hug

Quyen


dimanche 17 mars 2024

2 different ways to use Pinkfresh Studio Press plate


Buona sera care creative,

son cosi felice che son arrivate le novità di Pinkfresh Studio sullo shop di Scraphouse! che emozione!!! Per intanto stasera vi mostro questa card, dove ho usato la Floral Octagon Frame press plate in due modi differenti.


Good evening dear creatives,

I am so happy that  Pinkfresh Studio's new items  have arrived on the Scraphouse shop!!! What a thrill!!! In the meantime tonight I'll show you this card, where I used the Floral Octagon Frame press plate in two different ways.


Dapprima ho posizionato la mia press plate sulla BetterPress ed ho "embossato" sul cartoncino di acquarello della Betterpress. Mi piace molto l'effetto delicato che riusciamo ad ottenere con questa tecnica.

In seguito ho usato la press plate per foilizzarla in argento con la Hot foil machine. I fiori e le foglie le ho colorate con i seguenti copic markers: B0000, BG10, BG72, BG75, BG90. 

Ho aggiunto un sentiment sempre foilizzato d'argento dalla press plate Always and forever sentiment strips di Spellbinders su un cartoncino del paper pad di Studio Light Winter Sky che ho usato anche per lo sfondo della card.

Spero vi piaccia questa card, 

buona notte


First, I placed my press plate on the BetterPress and "embossed" on the Betterpress watercolor board. I really like the delicate effect we can achieve with this technique.

Later I used the press plate to foil it in silver with the Hot foil machine. I colored the flowers and leaves with the following copic markers: B0000, BG10, BG72, BG75, BG90. 

I added a silver foil always sentiment from the press plate Always and forever sentiment strips from Spellbinders on a paper pad card from Studio Light Winter Sky that I also used for the background of the card.

I hope you enjoy this card, 

good night


Quyen


jeudi 12 octobre 2023

Merry Christmas


Buongiorno creative! 
eccomi dopo le vacanze al mare a condividere questa nuova card dal tema natalizio. 
Trovo che questo piccolo set Pawsitive Christmas della Lawfawn sia davvero carino e facile da usare per creare card veloci. Ho colorato questo bassotto e gattino nelle calze di natale con degli alcool markers e ritagliato a mano.
In seguito ho embossato su un cartoncino la polvere verde della Wow embossing Verdant e poi fustellato il sentiment Merry Christmas border della Lawnfawn  ed i rametti del set Build-aWreath etched dies di Spellbinders
Infine per lo sfondo ho usato la glimmer machine con la hot foil Monoline stars.
Spero vi piaccia,
buona giornata

Good morning crafters! 
Here I am after the beach vacation to share this new card with a Christmas theme. 
I find this little Pawsitive Christmas set from Lawfawn really cute and easy to use for creating quick cards. I colored this dachshund and kitten into Christmas stockings with alcohol markers and cut out by hand.
Next I embossed on cardstock the green powder from Wow embossing Verdant and then die cut the Merry Christmas border sentiment from Lawnfawn and the sprigs from the Build-aWreath set etched dies from Spellbinders
Finally for the background I used the glimmer machine with hot foil Monoline stars.
I hope you will like it,
have a nice day

Quyen


jeudi 24 août 2023

Lawfawn's winter 2023 release

 Buona sera creative!

siete felici che oggi sia uscita la nuova release della Lawnfawn? Per l'occasione ho creato questa card usando la fustella Spooky forest Backdrop ed un cartoncino di carta d'acquarello ed ho colorato gli alberi con il distress ink vintage photo, cercando di lasciare un po' di bianco sui rami per creare l'effetto neve. Inoltre con la fustella Slimline stitched hillside borders ho creato delle collinette di neve dietro allo scenario. Per lo sfondo ho sfumato i distress ink mermaid lagoon, chipped sapphire e black soot e usato lo Snow Flurries Background Stencil con la pasta stencil paste white. Per incorniciare la card ho usato un cartoncino nero e la fustella Stitched Rectangle Frames.

Good evening creative!

Are you happy that the new Lawnfawn release is out today? For the occasion, I created this card using the Spooky forest Backdrop die and a watercolor paper cardstock and colored the trees with Distress Ink vintage photo, trying to leave some white on the branches to create the snow effect. Also with the Slimline die cut stitched hillside borders I created snow hillocks behind the scenery. For the background I blended the distress inks mermaid lagoon, chipped sapphire and black soot and used the Snow Flurries Background Stencil with stencil paste white. To frame the card I used black cardstock and the Stitched Rectangle Frames die cut.


Passiamo alla colorazione con i Copic, per questa scena ho voluto che i protagonisti fossero i due topini che si baciano sotto al vischio(Christmas before and afters) mentre l'altro trio di topolini son nascosti a  spiarli (Hay there hayrides mice add on).

Per completare la card ho aggiunto il sentiment let it snow dalla foil plate  Winter Big Scripty Words ed il sentiment "meet me under the mistletoe" incluso nella plancia Christmas before 'n afters.

Spero che vi piaccia e vi auguro di creare tante nelle card con queste novità!

Buona serata !


Let's move on to coloring with Copics, for this scene I wanted the main characters to be the two mice kissing under the mistletoe(Christmas before and afters) while the other trio of mice are hiding spying on them(Hay there hayrides mice add on).

To complete the card I added the let it snow sentiment from the Winter Big Scripty Words foil plate and the "meet me under the mistletoe" sentiment included in the Christmas before 'n afters stamp set.

I hope you enjoy it and wish you many in the cards with these new release!


Good evening !

Quyen


mercredi 23 août 2023

Christmas foiling

 Buongiorno creative!

Con queste giornate caldissime, il Natale sembra un pensiero lontano! Oggi mi son divertita a giocare con la nuova hot foil plate di Spellbinders Holly Background. Mi piace molto come un bello sfondo si possa creare differenti card in maniera veloce. Parto mostrandovi il risultato finale per poi spiegarvi come le ho realizzate.

Good morning creative!

With these hot days, Christmas seems like a distant thought! Today I had fun playing with the new hot foil plate from Spellbinders Holly Background. I really like how a beautiful background can be created different cards quickly. I'll start by showing you the end result and then explain how I made them.


Ho cominciato ad usare la Holly background hot foil plate con diversi colori di foil su cartoncini di colori differenti. Dove ho foilizzato su carta bianca, ho colorato l'agrifoglio con i Copic, mentre su cartoncino colorato, in questo caso nero, l'ho lasciato "nature".

I started using the Holly background hot foil plate with different colors of foil on different colored cardstock. Where I foiled on white paper, I colored the holly with Copics, while on colored cardstock, in this case black, I left it "nature."


In seguito ho voluto usare anche la solid plate per poter usare i foil avanzati dalle precedenti sfondi , ottenendo un risultato differente.

In seguito ho voluto usare anche la solid plate per poter usare i foil avanzati dalle precedenti sfondi , ottenendo un risultato differente.


Infine ho abbellito questi sfondi con delle mattature rosse e/o verdi e aggiungendo dei sentimenti delle plate di Lawn fawn e di Pinkfresh studio.

Finally, I embellished these backgrounds with red and/or green matting and adding sentiments from Lawn fawn plates and Pinkfresh studio.


Cosa ne pensate? Spero vi siano piaciute queste cards!
Ci sentiamo al prossimo post!
Gioiosa giornata a tutte

What do you think? I hope you enjoyed these cards!
Talk to you in the next post!
Joyful day to all

Quyen


dimanche 16 avril 2023

From Me to You


Buonasera creative! 
Come state? Spero tutto bene! Stasera vi mostro un'altra card "firmata" Spellbiders! Devo confessare che per pigrizia ci ho messo un po' ad usare la hot foil plate Magnolia Bouquet che foilizza e taglia queste mini Magnolie, perché mi sembrava un po' impegnativo rispetto alla plate della Magnolia grande. Pensavo anche che fossero troppo piccoline, invece devo dire che molto belle da usare.
 Per realizzare questa card ho cominciato a foilizzare Magnolia Bouquet glimmer hot foil plate con un foil rosa su un cartoncino bianco ed ho scelto 2 tonalità di rosa delle Prismacolor ed ho colorato il fiore.

Good evening crafty friends! 
How are you? Hope all is well! Tonight I show you another "signed" Spellbiders card! I must confess that out of laziness it took me a while to use the Magnolia Bouquet hot foil plate that foils and cuts these mini Magnolias, because it seemed a bit challenging compared to the large Magnolia plate. I also thought they were too small, instead I must say very nice to use.
 To make this card I started foil Magnolia Bouquet glimmer hot foil plate with a pink foil on a white cardstock and chose 2 shades of pink from Prismacolor and colored the flower.


In seguito ho timbrato Elegant Diamonds clear stamps ed embossato con una polvere nera ed il sentiment "from me to you" al centro della card. Per dare maggior risalto alla card ho sfumato gli angoli con il Distress Oxide Victorian Velvet.
Prima di incollare gli elementi alla card, li ho posizionati finchè non ero soddisfatta del risultato. Le foglie le ho incollate con la colla, mentre i fiori per dare un po' di dimensione, ho usato del biadesivo spessorato e aggiunto dei drop di Pinfreshstudio per abbellire. 

Next I stamped Elegant Diamonds clear stamps  and embossed with a black powder and the sentiment "from me to you" in the center of the card. To give the card stand out more I shaded the corners with Distress Oxide Victorian Velvet.

Before gluing the elements to the card, I positioned them until I was satisfied with the result. The leaves I glued on with glue, while the flowers to give some dimension, I used thick double-sided tape and added Pinfreshstudio drops to embellish.


Mi piace molto come sia uscita la card! Voi cosa ne pensate? 
Buona serata 

I really like the way the card came out! What do you guys think of it? 
Have a great evening 

Quyen


lundi 6 mars 2023

Lawn Fawn Elephant Parade, Hotfoil stamp and Cloud Stencil

 Hello Everybody :)
Another few cards with the new Lawn Fawn release. This time also featuring the Hotfoil stamp and the cloud stencil. The cards are pretty simple but I think they turned out quite cute.

Hallo zusammen :)
Hier noch ein paar Karten mit dem neuen Lawn Fawn Release. Dieses Mal habe ich noch den Hotfoil Stempel und die Schablone mit den Wolken benutzt. Die Karten sind ziemlich einfach aber ich finde sie sind ziemlich herzig geworden.

First I colored the two small elephants and mice from the "Elephant Parade" stampset as well as the elefant and some of those little windmills from the "Elephant Parade add-on" set.
Then I took the hotfoil stamp, heated up my glimmer system and used a pretty blue foil to hotfoil it on my cardstock. Then I used the biggest stitched rectangle from the stackables and cut out my panel. I also cut out some green paper with the rectangle and right away again with the grassy borders. I added some ink blending in "Lucky Clover" Distress Ink on the hills and adhered them on the card. then I mounted the elephant with the flag on some foam pads and adhered that too.

Zuerst habe ich die zwei kleineren Elefanten und Mäuse vom Stempelset "Elephant Parade" sowie der Elefant und ein paar der kleinen Windräder vom Set "Elephant Parade add-on" koloriert.
Danach habe ich den Hotfoil Stempel vorbereitet, mit dem Glimmer System aufgeheizt und dann mit einer schönen blauen Folie auf das Papier gehotfoilt. Danach habe ich die grösste Stanze aus dem Set "Stitched Rectangle Stackables" genommen  und damit meinen Hintergrund zugeschnitten. Desweiteren habe ich grünes Papier mit derselben Stanze zugeschnitten und gleich noch mit den "Grassy Borders" weiter bearbeitet. Die grassigen Hügel habe ich mit "Lucky Clover" Distress Ink etwas eingefärbt. Danach habe ich sie auf den Hintergrund geklebt und den Elefant mit der kleinen Flagge auf 3D Pads ebenfalls auf der Karte festgemacht.
After cutting the cardbase I folded the leftover pieces and thought that I could use those as cardbase for two smaller cards. So, I took the cloud stencil and Yeti white ink from Lawn Fawn and with the help of a toothbrush added those clouds onto my cardbase. Then I cut some more grass borders, ink blended them a bit and adhered them to the card. Then I added the windmills, mice and elephants. I only mounted the elefants on 3d foam pads, the rest I glued directly on with some wet glue.
And finished! :)

I am wishing you a lovely day and thank you so much for stepping by and as you are already here, you could also visit the store. ;)
Hugsy
Andrea

Nachdem ich die Kartenbasis zugeschnitten hatte, habe ich die übrigen Teile des Papiers in der Hälfte gefaltet und gedacht, dass ich daraus noch zwei kleinere Karten machen könnte. Also habe ich die Wolken Schablone sowie das Yeti weisse Stempelkissen hervor geholt und mit einer Zahnbürste die Wolken aufgetragen. Dann habe ich noch weitere "Grassy Borders" zugeschnitten mit etwas Tinte bearbeitet und danach auf der Karte befestigt. Dann habe ich die kleinen Windräder, Mäuse und Elefanten aufgeklebt. Die 3D Abstandspads habe ich hierbei nur für die Elefanten verwendet und das andere mit normalem Flüssigleim aufgeklebt.
Et Voilà schon fertig! :)

Ich wünsche euch einen schönen Tag und bedanke mich fürs Vorbeischauen und wenn ihr schon hier seit, besucht doch den Shop gleich auch  noch. ;)
Liebi Grüessli
Andrea

vendredi 13 janvier 2023

Long Time no Tea (Card with Lawn Fawn Cutting Dies)


Hello Everybody and Happy New Year!

I hope you arrived well in the New Year and am wishing you all the best.

Scraphouse is having a huge sale and the die cuts I am using for this card are also 25% reduced at the moment!! If I were you, I would check it out.

Today I am going to show you a rather simple card with a little fancy touch on the frame. I used the Teacup Diecuts as well as a sentiment from the stampset Tea-rrific and the "Woodgrain" Hotfoil stamp from Lawn Fawn.


Hallo zusammen und Frohes Neues Jahr!

Ich hoffe ihr seid gut im neuen Jahr angekommen und wünsche euch nur das Beste.

Im Moment ist bei Scraphouse eine grosse Aktion im Gange und die Stanzen, die ich für diese Karte benutzt habe, sind momentan auch um 25% reduziert!! Es lohnt sich vorbei zu schauen!

Heute zeige ich euch eine ziemlich einfache Karte mit einem Hauch mehr Extravaganz auf dem Rahmen. Dafür habe ich die Teetassen Stanze, einen Spruch vom Stempelset Tea-rrific, sowie den "Holzmaserung" Hotfoil Stempel von Lawn Fawn benutzt.


I started with cutting out the teacups with a thick paper and also a patterned paper to glue on top. The patterned paper I turned for one diecut so I could have the cups face eacht other. After adhering the two cup layers I die cut the cute little face and added some black paper behind the eyes and mouth as well as colored paper for "black tea with milk" and "greentea".
Then I put those aside and started with ink oxide blending my background with "Squeezed Lemonade", "Mustard Seed" and "Carved Pumpkin".


Zuerst habe ich die Teetassen aus dickem und aus dünnerem Design Papier ausgestanzt. Das Designpapier habe ich einmal von der Rückseite her gestanzt, damit die Teetassen einander anschauen können. Nach dem Zusammenkleben der Papierschichten habe ich das kleine, süsse Gesicht noch ausgestanzt. Danach habe ich schwarzes Papier hinter den Mund und die Augen geklebt sowie ein farbiges Papier für "schwarzen Tee mit Milch" und "Grüntee".
Dann habe ich die Tassen zur Seite gelegt und mit dem Inkblenden des Hintergrunds begonnen. Dazu habe ich Distress Oxide in den Farben "Squeezed Lemonade", "Mustard Seed" und "Carved Pumpkin" benutzt.


After the Inkblending I took out my Watercolors and some Sparkly color to speckle the background. Then I embossed the sentiment with Versamark Ink and black embossing powder.


Nach dem Inkblending habe ich meine Wasserfarben sowie eine glitzrige Farbe hervorgeholt um den Hintergrund zu besprenkeln. Danach habe ich den Spruch mit Versamark Tinte und schwarzem Embossing Puder embossed.


Then I got out my Spellbinder Hotfoil System and heated up the Woodgrain Stamp from Lawn Fawn,
attached it with washi tape over some yellow hotfoil to a brown paper and ran it through the die cut machine. After that I cut out the frame I wanted around my little scene.


Danach habe ich mein Spellbinder Hotfoil System hervorgeholt und den Holzmasserungs Stempel von Lawn Fawn aufgeheizt. mit Washi Tape über die gelbe Folie auf einem braunen Papier befestigt. Nachdem ich dies durch die Stanzmaschine gekurbelt hatte habe ich den Rahmen, den ich um meine kleine Szene möchte, aus dem Papier gestanzt.


Then I adhered everything on my Background. the cups with some smalle foamdots behind and the frame with a white shadow layer (which was not on purpose). 
And just like that the card is finished! It is quite simple except for the Hotfoiling on the frame.

Thank you so much for stepping by and I am wishing you a lovely Day!
Andrea


Danach habe ich alles auf dem Hintergrund befestigt, die Teetassen mit kleinen Abstandshaltern und den Rahmen mit einem weissen Schatten dahinter (war keine Absicht).
Et voilà schon ist die Karte fertig! Sie ist ziemlich einfach ausser das Hotfoilen auf dem Rahmen.

Vielen Dank fürs Vorbeischauen und ich wünsche Dir einen schönen Tag!
Liebi Grüessli
Andrea