Affichage des articles dont le libellé est spellbinders. Afficher tous les articles

jeudi 31 juillet 2025

Just for You Hydrangea card


Buongiorno creative, 
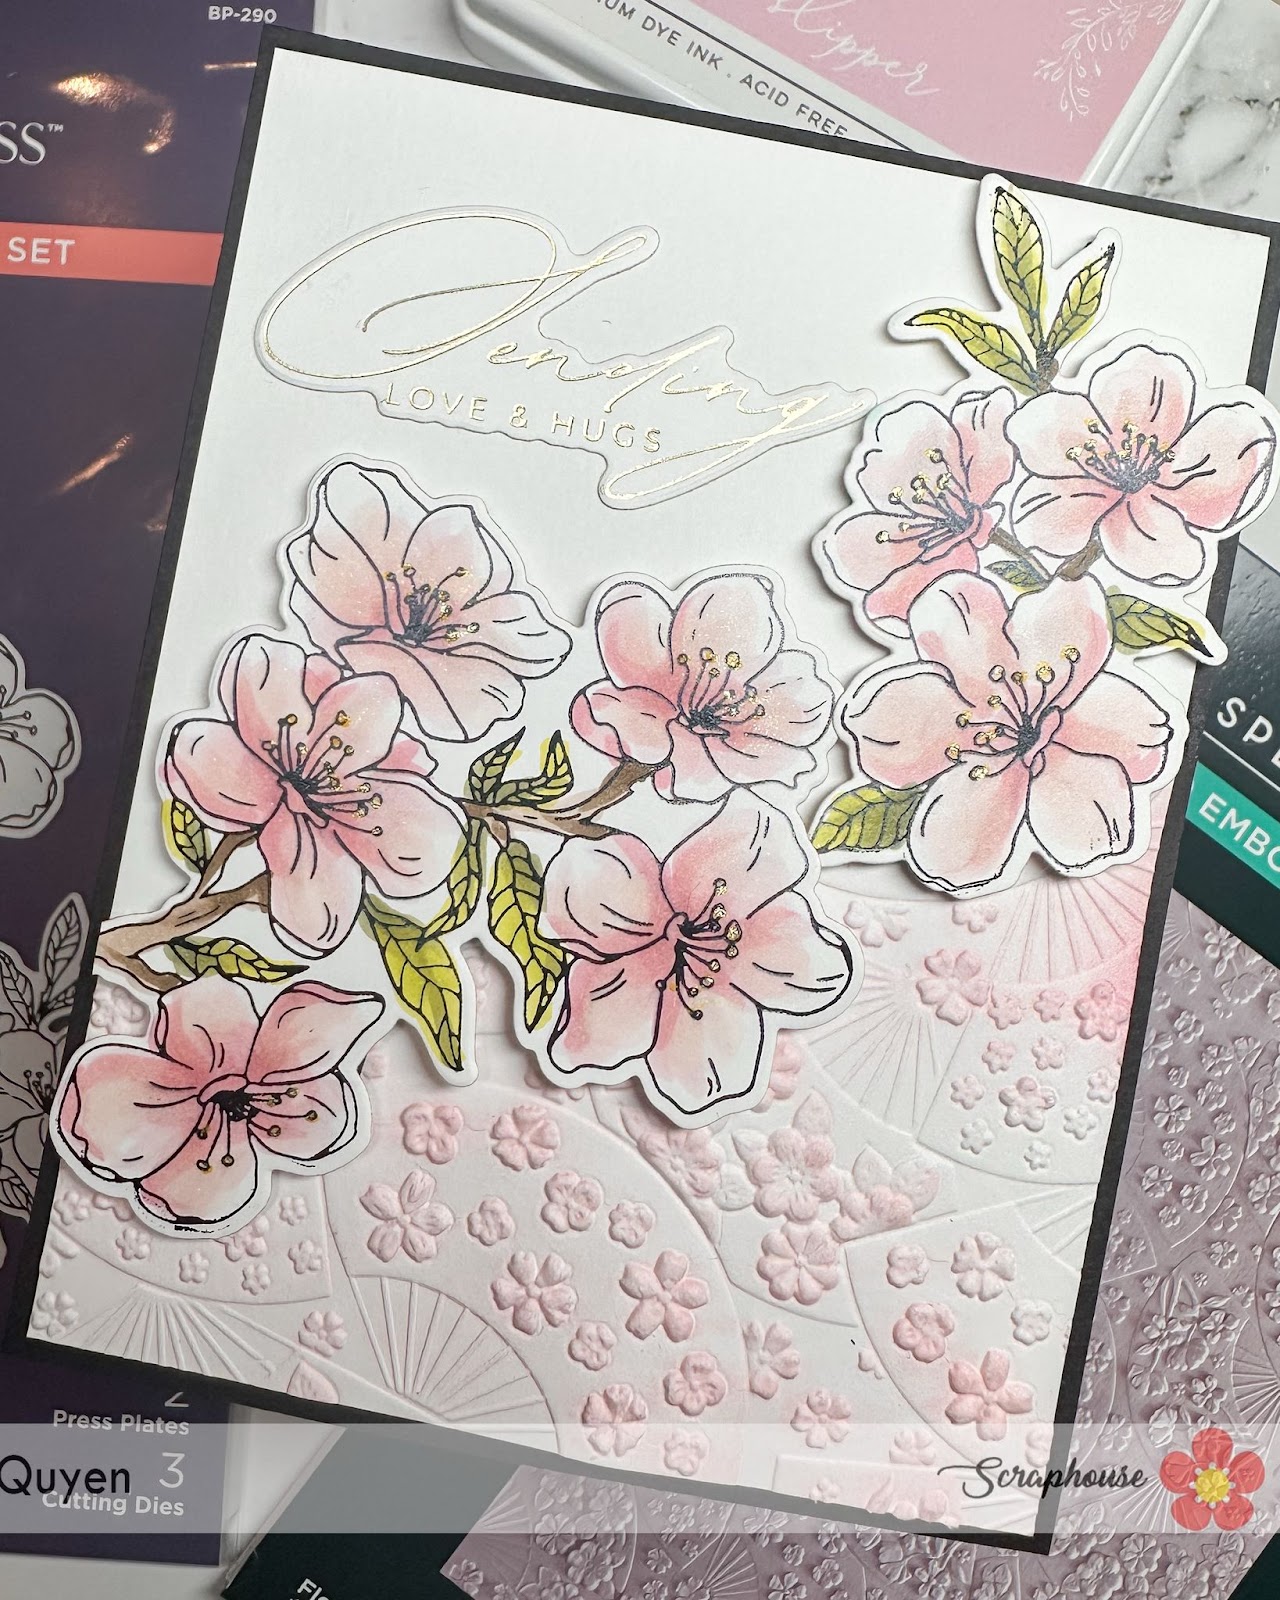
come state? eccomi qui con questa card usando alcune novità nello shop di Scraphouse.Adoro le piante d'ortensie, mi mettono sempre di buon umore, quindi ho adorato creare questa card. Ho usato la fustella di Hero Arts Layered Hydrangea etched dies con le carte Colorwheel di Spellbiders  , ed ho fatto un po' di schizzi perlati con Sparkle splatter effects.
L'ultimo strato di fiorellini li ho ricavati da del vellum perlato della Tonic studio.

Good morning, creative folks, 
how are you? Here I am with this card using some new items from the Scraphouse shop. I love hydrangeas, they always put me in a good mood, so I loved creating this card. I used the Hero Arts Layered Hydrangea etched dies with Spellbinders Colorwheel papers, and I made some pearlescent splatters with Sparkle splatter effects.
The last layer of flowers was made from pearlescent vellum by Tonic Studio.


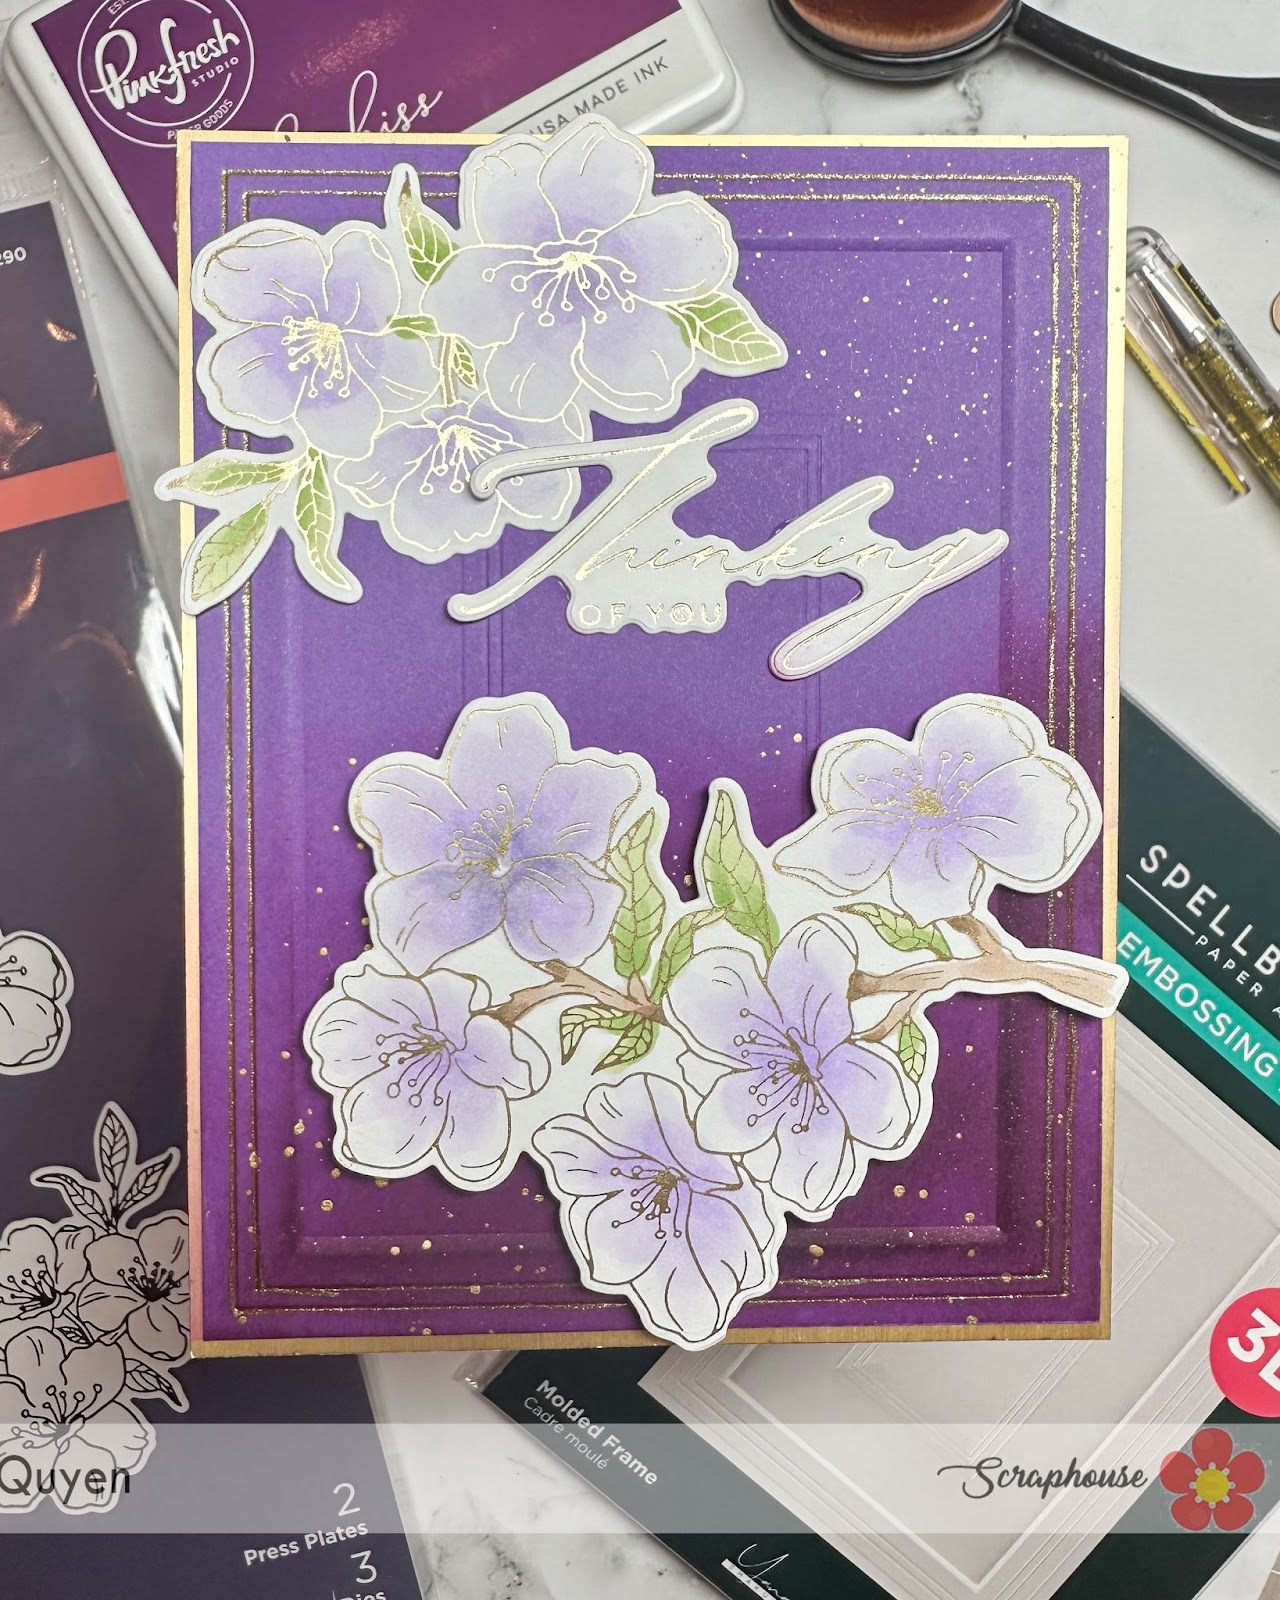
Per lo sfondo della mia card ho usato la press plate Sweeping script sentiments e creato altri schizzi ma stavolta con il nero Raven splatter effects
Spero vi piaccia questa card , io l'adoro!
Buona giornata

For the background of my card, I used the Sweeping Script Sentiments press plate and created other splatters, but this time with Raven black splatter effects
I hope you like this card, I love it!
Have a nice day!

Quyen


mercredi 7 mai 2025

Cute Kokeshi Dolls


Buongiorno creative, 
come state? 
oggi vi mostro cards con queste adorabili Kokeshi di Spellbinders. Sono delle placche per la betterpress chiamate Kokeshi dolls spring in Kyoto.
Solitamente mi piace usare le press plate con la glimmer machine per foilizzare, ma questa volta ho voluto usare la Betterpress. Le bamboline le ho colorate con gli Zig clean color real brush.

Per la prima card ho usare la better press Cherry blossoms spring in Kyoto   per creare uno sfondo con i fiori di ciliegio. Dato che mi sembrava un po' troppo nero, ho aggiunto un pezzo di vellum perlato argento per rendere lo sfondo più delicato.

Good morning crafters,
 how are you? 
today I show you cards with these adorable Kokeshi from Spellbinders. They are betterpress plates called Kokeshi dolls spring in Kyoto.
I usually like to use press plates with the glimmer machine to foil, but this time I wanted to use the Betterpress. I colored the dolls with the Zig clean color real brush.

For the first card I used Betterpress Cherry blossoms spring in Kyoto to create a background with cherry blossoms. Since it seemed a little too black, I added a piece of silver pearl vellum to make the background more delicate.


Mentre per la seconda card ho sfumato dell'inchiostro rosa la parte superiore del cartoncino e poi disegnato sempre con gli zig dei rami ci ciliegio.
Spero vi piacciano , vi auguro un meraviglioso mercoledì,


While for the second card I shaded some pink ink the top of the card and then drew always with zigs some branches there cherry tree.
I hope you like them , have a wonderful Wednesday,

Quyen


vendredi 2 mai 2025

Japanese Cherry Blossom


Buongiorno creative, come state? 
oggi vi mostro queste due card fatte con le novità di Spellbinders che potete trovare sul sito di Scraphouse!
Non son stupendi questi fiori di ciliegio? Li adoro! Ho usato la press plate Cherry blossoms spring in Kyoto per foilizzare in oro ed in nero. Una volta ritagliato i fiori con la loro apposita fustella, li ho colorati con dei marker ad alcohol, in questo caso gli OLO.

Good morning creatives, how are you? 
Today I show you these two cards made with new Spellbinders that you can find on the Scraphouse website!
Aren't these cherry blossoms gorgeous? I love them! I used the Cherry blossoms spring press plate in Kyoto to foil in gold and black. Once I cut out the flowers with their appropriate die cut, I colored them with alcohol markers, in this case OLOs.


Per questa prima card preso un cartoncino viola ed embossato con il 3D embossing folder Molded frame , nella parte inferiore ho sfumato l'inchiostro Regal kiss di Pinkfresh studio, creato delle macchie dorate con un'acquarello oro e marcato i bordi del frame con una gel pen dorata.

For this first card I took a purple cardstock and embossed it with the 3D embossing folder Molded frame , at the bottom I blended Regal kiss ink from Pinkfresh studio, created gold flecks with a gold watercolor and marked the edges of the frame with a gold gel pen.


invece per questa seconda card , ho usato un embossing folder differente, Floral fans spring in Kyoto , e passato sulla parte in rilievo l'inchiostro Ballet slippers di Pinkfresh Studio. come puoi notare dall' immagine sottostante, ho embossato solo un angolo del mio cartoncino.

instead for this second card , I used a different embossing folder, Floral fans spring in Kyoto , and passed on the embossed part the Ballet slippers ink from Pinkfresh Studio. as you can see from the 'image below, I embossed only one corner of my card.


Entrambe le card le ho abbellite con dei sentiment della Betterpress plate Crafty hugs.
Spero di avervi ispirato con queste card,
buon Venerdì,

Both cards I embellished with sentiments from Betterpress plate Crafty hugs.
I hope I have inspired you with these cards,
happy Friday,

Quyen


samedi 12 avril 2025

Quick Cards using Betterpress Florals Through the Year Bundle


Buongiorno care creative, 

sono qui oggi per mostrarvi queste 3 card usando le press plate Florals Through the Year Bundle. Trovo che questi fiori siano proprio carini e delicati e si posson creare card semplici e veloci, e non solo per il creare le pagine del calendario annuale.


Good morning crafty friends, 

I am here today to show you these 3 cards using the Florals Through the Year Bundle press plates. I find that these flowers are just so pretty and delicate and you can make quick and easy cards, and not just for creating the annual calendar pages.


Questa prima card ho usato un washi tape finissimo per contortare i bordi che volevo restassero bianchi ed in un secondo momento ho colorato lo sfondo con i distress inks : Spun sugar, Shaded lilac e Cracked pistachio. Poi con un pennello d'acquarello ho spruzzato delle macchie d'acqua per dare allo sfondo un po' di interesse. Con un fineliner nero ho contornato il fiore e il rettangolo bianco ed ho completato con un sentiment in italiano della Press plate Italian sentiments.

This first card I used a very fine washi tape to contort the edges that I wanted to remain white and in a second step I colored the background with distress inks : Spun sugar, Shaded lilac and Cracked pistachio. Then with a watercolor brush I sprayed water spots to give the background some interest. With a black fineliner I outlined the flower and the white rectangle and completed with a Press plate Italian sentiment.


Questa seconda card ho creato uno sfondo arcobaleno acquarellato con i Karin markers e aggiunto dei puntini dorati sui fiori con un fineliner dorato.

This second card I created a watercolor rainbow background with Karin markers and added gold dots on the flowers with a gold fineliner.


Infine la mia terza card ho aquarellato dei cerchi viola e rosa e sprayato con il Distress Spritz Worn Lipstick .
Cosa ne pensate? Spero vi piacciano! Vi auguro uno splendido weekend,


Finally my third card I aquarelled purple and pink circles and sprayed with Distress Spritz Worn Lipstick .
What do you think of them? I hope you enjoy them! Have a wonderful weekend,


Quyen


jeudi 3 avril 2025

Flower cart etched dies


Buongiorno creative,

spero che stiate bene! Oggi voglio parlarvi delle difficoltà che ho avuto a creare queste 3 card. Appena ho visto questa fustella di Spellbinders Flower cart etched dies son rimasta ammaliata e non vedevo l'ora di poterla usare. Una volta visto il numero delle fustelle son andata un po' in confusione senza sapere che colori abbinare insieme. Così ho cercato su google una foto di riferimento per aiutarmi al progetto. Ecco qui la foto che alla quale mi son ispirata. Una volta ritagliato i pezzi ed assemblato il carretto, mi son accorta che facevo fatica a bilanciare gli elementi neri e bianchi e che per avere un bel risultato bisogna davvero fare attenzione che nessuno dei due colori predomini sul progetto.


Good morning creative,

I hope you are doing well! Today I want to tell you about the difficulties I had in creating these 3 cards. As soon as I saw this Spellbinders Flower cart die etched dies I was hooked and couldn't wait to be able to use it. Once I saw the number of dies I got a little confused not knowing what colors to match together. So I googled for a reference photo to help me with the project. Here is the photo I was inspired by. Once I cut out the pieces and assembled the cart, I realized that I was having a hard time balancing the black and white elements and that to get a nice result you really have to be careful that neither color predominates on the project.


Ecco qui la mia prima versione e dove ho realizzato che non era così semplice equilibrare il nero e bianco. Per lo sfondo ho usato la Press plate Floral celebration senza inchiostro e ritagliato con la fustella Notched corner frames etched dies.

Here is my first version and where I realized it was not so easy to balance the black and white. For the background I used Press plate Floral celebration without ink and cut out with Notched corner frames etched dies.


La seconda versione e la terza ero più cosciente e sono riuscita a trovare la soluzione molto poi in fretta.

The second version and the third version I was more conscious and was able to find the solution very then quickly.


Spero vi piacciano i risultati che ho ottenuto, grazie per esser passate qui, 

buona giornata


I hope you like the results I got, thank you for stopping by, 

have a nice day

Quyen


lundi 31 mars 2025

Welcome Baby 2

Bonjour à tous!

Quoi de plus réjouissant que la naissance d'un enfant? Je connais quelqu'un qui a accouché récemment d'une petite fille, alors je lui ai préparé une carte pour les félicitations d'usage et je pense que cela lui fera plaisir.

Il s'agit d'un set de dies de Spellbinders appelé Bundle of Joy que vous trouverez en boutique. Je trouve la cigogne avec le petit bébé adorable.

Je n'ai travaillé qu'avec les dies et du cardstock de couleurs, pas de colorisation de motifs.

Hallo zäme

Was gibt es Schöneres als die Geburt eines Kindes? Ich kenne jemanden, die vor kurzem ein kleines Mädchen zur Welt gebracht hat, also habe ich eine Karte mit den üblichen Glückwünschen vorbereitet, und ich denke, sie wird sich darüber freuen.

Es handelt sich um ein Dies-Set von Spellbinders namens Bundle of Joy, dass man im Laden kaufen kann. Ich finde den Storch mit dem kleinen Baby einfach zuckersüss.

Ich habe nur mit den Dies und farbigem Cardstock gearbeitet, keine Motive koloriert.

Hello everyone!

What could be happier than the birth of a child? I know someone who recently gave birth to a little girl, so I've prepared a card to congratulate her and I think she'll be pleased.

It's a set of dies from Spellbinders called Bundle of Joy which you can find in the shop. I think the stork with the little baby is adorable.

I only worked with the dies and coloured cardstock, no colouring.


Merci de votre passage! 

Bonne journée et bon scrap!

Valérie


lundi 24 mars 2025

Welcome baby

Bonjour à tous!

J'espère que vous allez bien avec ce petit aperçu de printemps. Cela fait du bien au moral.

Je vous présente une carte pour la naissance d'un bébé. Adorable, non?

Il s'agit d'un ensemble de dies Spellbinders. Allez vite voir en boutique, il y a plein de nouveautés Spellbinders, des dies mais aussi d'adorables tampons House Mouse.

Pour ma carte, j'ai décidé de faire une slimline pour que les dies aient bien de la place. J'ai découpé toutes mes pièces avec différentes couleurs de cardstock puis j'ai collé le tout en ajoutant de 3D foam pads pour mettre du volume, mais aussi pour activer le mécanisme de balance de la nacelle. Elle bouge de gauche à droite et de droite à gauche. C'est super mignon je trouve! Pas de colorisation cette fois, rien que du cardstock!

J'espère vous avoir inspiré et donné quelques idées pour ce printemps!


Hall zäme

Ich hoffe, es geht Ihnen gut mit diesem kleinen Vorgeschmack auf den Frühling. Das ist gut für die Stimmung.

Ich zeige Ihnen eine Karte zur Geburt eines Babys. Ist das nicht süß?

Es handelt sich um ein Set von Spellbinders Dies. Schauen Sie schnell im Shop vorbei, dort gibt es viele neue Spellbinders Dies und auch die niedlichen House Mouse Stempel.

Für meine Karte entschied ich mich, eine Slimline zu machen, damit die Dies viel Platz haben. Ich habe alle meine Teile mit verschiedenen Farben von Cardstock ausgeschnitten und dann alles zusammengeklebt, wobei ich 3D Foam Pads hinzugefügt habe, um Volumen zu schaffen, aber auch um den Balancemechanismus der Gondel zu aktivieren. Sie bewegt sich von links nach rechts und von rechts nach links. Das ist supersüß, finde ich! Dieses Mal habe ich nicht koloriert, sondern nur Cardstock verwendet!

Ich hoffe, ich konnte Sie inspirieren und Ihnen ein paar Ideen für den Frühling geben!


Hello everyone!

I hope you're well with this little glimpse of spring. It's good for the morale.

Here's a card to celebrate the birth of a baby. Adorable, isn't it?

It's a set of Spellbinders dies. Check out the shop, there are lots of new Spellbinders dies and also some adorable House Mouse stamps.

For my card, I decided to make a slimline so that the dies would have plenty of room. I cut out all my pieces using different colours of cardstock and then glued them all together, adding 3D foam pads to add volume and also to activate the balance mechanism on the pod. It moves from left to right and right to left. I think it's really cute! No colouring this time, just cardstock!

I hope I've inspired you and given you some ideas for this spring!


Merci de votre passage!


Valérie


vendredi 21 février 2025

Playing with distress reinkers


Buongiorno creative,

anche stavolta vi mostro una card usando l'embossing folder Blooming butterfly di Spellbinders, ma utilizzando la parte floreale. Ho usato un pezzo di vellum ed una volta embossato ho colorato con l'inchiostro rose gold di altenew e uno nero le parti in rilievo.


Good morning creative,

once again I show you a card using the


from Spellbinders, but using the floral part. I used a piece of vellum and once embossed I colored the embossed parts with altenew's rose gold ink and a black one.


In seguito usando un cartoncino d'acquarello, con un pennello ho bagnato la carta e poi lasciato scivolare una goccia di colore del Distress ink reinker in modo da far colare il colore per tutto il cartoncino. Ho ripetuto questo passaggio con i colori: dried marigold ,  squeezed lemonade, shabby shutters, peacock feathers, wilted violet, seedless preserves and picked raspberry.

Next using a watercolor card, I wet the paper with a brush and then let a drop of color from the Distress ink reinker slide in so that the color ran all over the card. I repeated this step with the colors: dried marigold , squeezed lemonade, shabby shutters, peacock feathers, wilted violet, seedless preserves and picked raspberry.


Per completare la mia card ho incollato il vellum , timbrato un sentiment dal set Crafty life stamp di Altenew ed incollato una farfalla di Spellbinders.
Spero vi piaccia, vi auguro una splendida giornata.

o complete my card I glued the vellum , stamped a sentiment from Altenew's Crafty life stamp set and glued a butterfly from Spellbinders.
I hope you like it, have a wonderful day.

Quyen


mercredi 12 février 2025

3D bufferlies


 Buongiorno creative!

oggi sono qui a mostrarvi questa card con le farfalle! Rimango sempre affascinata dai 3D embossing folder che hanno compreso la fustella per tagliarne le sagome , e voi? In questo caso ho usato l'embossing folder Blooming butterflies di Spellbinders. Una volta ottenuto le sagome delle farfalle da un cartoncino per acquarello, le ho colorate con i distress reinkers : picked raspberry, wilted violet, scattered straw e peacock feathers. In seguito con un tampone nero le ho colorato le superficie in rilievo delle farfalle e passato i bordi ed il corpo con l'acquarello oro.


 Good morning crafters!

I am here today to show you this card with butterflies! I am always fascinated by the 3D embossing folders that have included the die cut to cut out the shapes , how about you? In this case I used the Blooming butterflies embossing folder from Spellbinders. Once I got the butterfly shapes from a watercolor cardstock, I colored them with distress reinkers : picked raspberry, wilted violet, scattered straw and peacock feathers. Later with a black pad I colored the raised surfaces of the butterflies and went over the edges and body with gold watercolor.


Per lo sfondo ho usato un cartoncino per la betterpress cotton card panels color Pebble sulla quale ho impresso la scritta For you dal set Sweeping script sentiments.

For the background I used a betterpress cotton card panels Pebble color on which I embossed the words For you from the set Sweeping script sentiments.


In seguito per dare maggiore interesse allo sfondo ho usato il timbro Linen texture cercando di lasciare pulito il sentiment , coprendolo con un pezzo di carta durante la timbratura.

Later to give more interest to the background I used the Linen texture stamp trying to leave the sentiment clean, covering it with a piece of paper while stamping.


ecco qui il risultato finale una volta incollate anche le farfalle! cosa ne pensate? vi piace? grazie per esser qui sul blog oggi, vi auguro buona giornata,

here is the final result once the butterflies were also glued! what do you think? do you like it? thanks for being here on the blog today, have a nice day,

Quyen


mardi 4 février 2025

FESTIVE POINSETTIA PLATE : THIS IS NOT A CHRISTMAS CARD!:D


Buongiorno creative! 

spero di trovarvi bene! Eccomi qui oggi ad usare la Festive Poinsettia set per creare delle card NON natalizie! Trovo davvero interessante che usando prodotti prettamente di natale ma abbinandoli a colori differenti da quelli che si userebbero per Natale, si possa ottenere delle card per tutte le stagioni.

Ho voluto usare differente tecniche. Ho cominciando a creare il primo sfondo usando la betterpress con il distress Oxide Villainous potion.


Good morning creative! 

I hope to find you well! Here I am today using the Festive Poinsettia set to create NOT Christmas cards! I find it really interesting that by using purely Christmas products but combining them with different colors than you would use for Christmas, you can get cards for all seasons.

I wanted to use different techniques. I started by creating the first background using betterpress with Distress Oxide Villainous potion.


mentre il secondo sfondo l'ho ottenuto usando la Glimmer machine con un foil dorato e l'ultimo ho solo usato gli stencil.
Ho usato lo stencil abbinato con gli inchiostri di Altenew fresh dye ink cube bundle . 
Ecco qui i risultati:


while the second background I got using the Glimmer machine with a gold foil and the last one I just used the stencils.
I used the stencil combined with Altenew fresh dye ink cube bundle inks
Here are the results:


Infine li ho incollato le basi su delle mattature colorate e abbellito con i sentiment di Spellbinders Shine bright strips.

Finally I glued the bases onto colored mattes and embellished them with sentiments from
s.


Quale versione preferite?
grazie per esser passate qui dal blog, vi auguro una splendida giornata


Which version do you prefer?
thanks for stopping by the blog, have a wonderful day

Quyen