Affichage des articles dont le libellé est New Release. Afficher tous les articles

samedi 14 décembre 2024

Panda's love is in the air


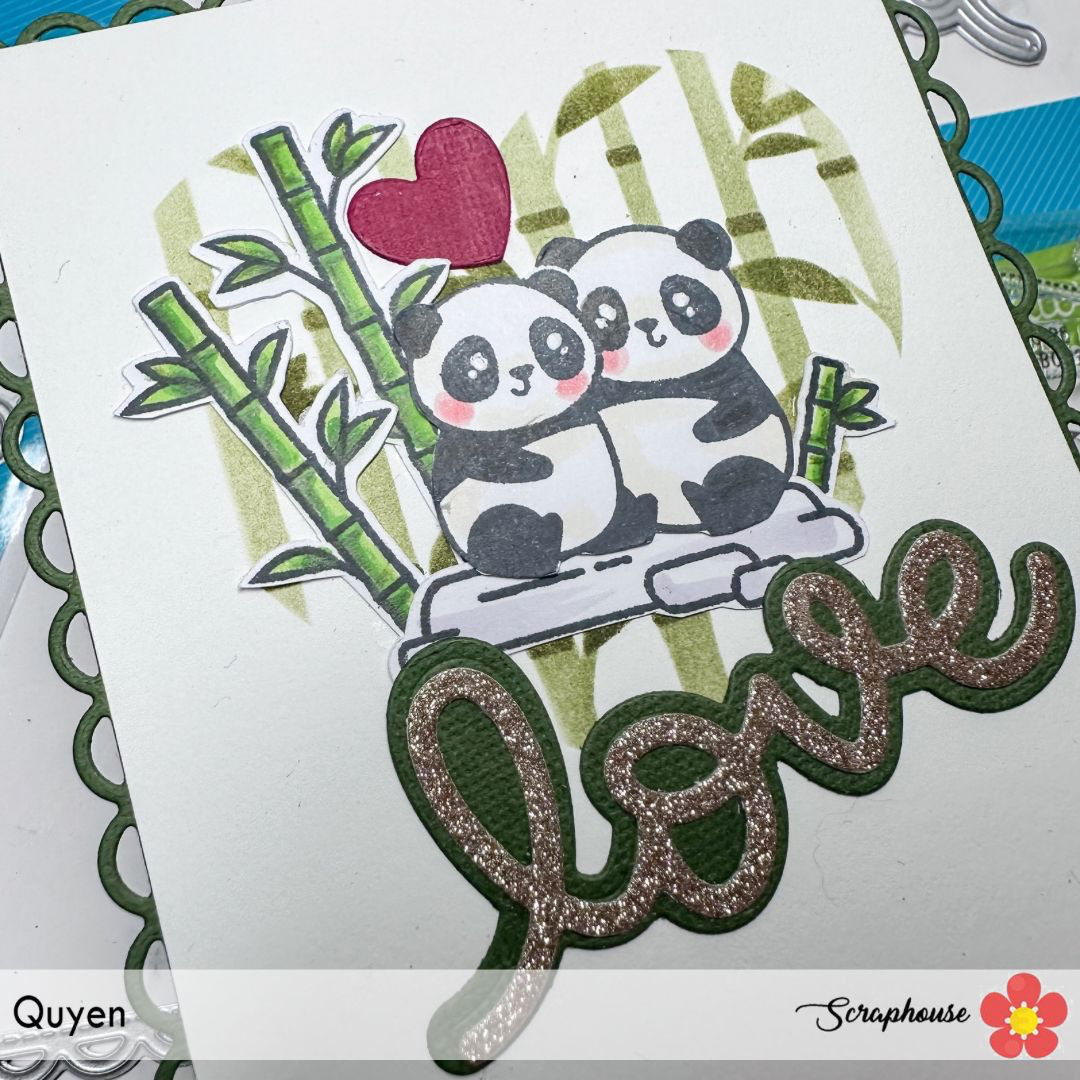
Buongiorno creative! come state? avete avuto modo di vedere la nuova mini release di San Valentino della Lawnfawn? questa volta trovo che questi panda siano bellissimi e versatili, da poter usare in tutte le occasioni e non unicamente per San Valentino.

Ho voluto creare qualcosa di divertente. Con la fustella Stitched happy heart ho ritagliato un cartoncino di scarto da creare uno stencil.

Good morning creatives! how are you? did you get a chance to see the new Valentine's Day mini release from Lawnfawn? this time I find these pandas to be beautiful and versatile, that can be used for all occasions and not solely for Valentine's Day.

I wanted to create something fun. Using the Stitched happy heart die I cut out a scrap cardstock to create a stencil.


Per poter posizionare correttamente lo stencil cuore che ho creato, ho appoggiato la fustella cuore sul mio cartoncino base dove avrei voluto appoggiare il mio stencil come se fosse una dima. Una volta rimosso la fustella e fissato lo stencil in carta , ho usato gli stencils Bamboo.

In order to properly position the heart stencil I created, I placed the heart die on my base card where I wanted to place my stencil as if it were a template. Once I removed the die and secured the paper stencil , I used Bamboo stencils.


Ho colorato i velocemente i miei soggetti della plancia I heart pandas ( siii i panda son bianchi e neri quindi é stato molto semplice) e decorato con il sentiment della fustella Scripty love e Scripty love outlined. Infine il mio cartoncino l'ho incollato ad una cornicetta ottenuta dalla nuova fustella Lacy Rectangle stackable. 
Spero vi sia piaciuta la card ,
buona giornata

I colored the quickly my subjects  from the I heart pandas stamp set( yes the pandas are black and white so it was very easy) and decorated with the sentiment from the Scripty love die and Scripty love outlined. Finally my card I glued it to a frame obtained from the new Lacy Rectangle stackable die cut. 
I hope you enjoyed the card ,
have a nice day

Quyen


jeudi 30 mai 2024

Ice cream makes everthing better!


 Buongiorno creative!
come ogni mio post son felicissima di presentarvi questa nuova card! Mi ci son voluti 3 giorni per decidere che tipologia di card volevo creare per valorizzare al meglio questa nuova release della Lawnfawn. Mi son goduta il processo di costruzione di questo biglietto e devo dire che dopo tanti mesi dove non son stata bene di salute, ho apprezzato tantissimo questi attimi di creatività e divertimento!
..ma ora basta parlare di me e torniamo alla card!

 Good morning dear crafty friends!
as with each of my posts I am so happy to introduce you to this new card! It took me 3 days to decide what kind of card I wanted to create to make the most of this new release from Lawnfawn. I enjoyed the process of building this card and I have to say that after so many months where I have not been well with my health, I so appreciated these moments of creativity and fun!
..But enough about me and back to the card!


Ho tagliato da un Bazzill bianco una striscia larga 15 cm x 30 cm ed ho cordonato a 10 e 20 cm.

I cut from a white Bazzill a strip 15 cm x 30 cm wide and scored at 10 and 20 cm.      


bon la fustella Ta-da!Diorama shop add on dies ho ricavato una finestrella come da foto.

With the Ta-da!Diorama shop add on dies I cut out a small window as pictured.


Con del washi tape ho fissato il brick stencil al cartoncino e creato uno sfondo che ricordasse appunto un muro. Ho colorato prima con il Distress Oxide lost shadow e poi per dare un po' di dimensione ho usato un grigio più scuro il Weathered wood.

With washi tape I attached the brick stencil to the cardstock and created a background that would precisely resemble a wall. I colored first with Distress Oxide lost shadow and then to give it some dimension I used a darker gray Weathered wood.


Ho incollato alla finestrella un pezzo di acetato per ricreare l'effetto finestra/vetrina e poi mattato con un cartoncino con la stessa trama a mattoni.

I glued a piece of acetate to the small window to recreate the window/window effect and then matted it with cardboard with the same brick texture.


Ho colorato la tendina ed il cespuglio ( ricavato con la fustella Cloud borders ) con i Copic. 

I colored the curtain and the bush ( made with the Cloud borders die cut ) with Copics. 


Ho voluto creare l'interno della gelateria creando il bancone gelati. Ho tagliato un cartoncino bianco da cui creato un' aletta da attaccare alla base della card e colorato con i copic per ricordare una texture di marmo ed abbellito con gli elementi del set Treat cart stamps.

I wanted to create the interior of the ice cream shop by creating the ice cream counter. I cut a white card and cut out a flap to attach to the base of the card and colored with copics to resemble a marble texture and embellished with elements from the Treat cart stamps set.

...e voila questo è il risultato finale, fronte e retro, spero vi sia piaciuto!
Grazie per esser passate da qui e vi auguro una splendida giornata!

...And voila this is the final result, front and back. I hope you enjoyed it!
Thanks for stopping by and have a wonderful day!

Quyen


dimanche 14 janvier 2024

love you lots!

 Buon domenica card makers!
oggi vi presento questa tag che ho realizzato con alcune novità Lawn Fawn.


Happy Sunday card makers!
Today I present this tag I made with some Lawn Fawn new arrival.


Ho cominciato a creare la tag partendo da un cartoncino Kraft e la fustella di Mama Elephant Tags a lot. Successivamente ho messo la tag ricavata nella placca da embossing folder della Taylored expressions dotted lattice perché volevo dare un effetto tramato alla base. In seguito ho colorato le parti in rilievo della tag con il distress ink Walnut stain e per dare un po di luccichio, ho usato anche la WOW embossing glitter powder Pearl gold sparkle.

I started creating the tag from Kraft cardstock and Mama Elephant Tags a lot die cut. Next, I placed the made tag in the embossing folder plate from Taylored expressions dotted lattice because I wanted to give a textured effect to the base. Next, I colored the embossed parts of the tag with Distress Ink Walnut stain and to give some shimmer, I also used WOW embossing glitter powder Pearl gold sparkle.


I protagonisti della tag son il la coroncina a forma di cuore ed il topolino con il palloncino. Partiano dalla coroncina: ho usato lo stencil Heart wreath stencil della Lawn fawn con i distress ink Peeled pain, Tattered rose, Picked raspberry e Seedless preserves e poi ho ritagliato i contorni con le forbici.

The stars of the tag are the heart wreath and the mice with the balloon . 
Starting with the wreath: I used the Heart wreath stencil from Lawn fawn with the distress inks Peeled pain, Tattered rose, Picked raspberry and Seedless preserves and then cut out the outlines with scissors.


Ho colorato il topino dal set All my heart con i pennarelli Copic mentre il sentiment della tag viene dal set Magic heart messages.
Una volta attaccato tutti gli elementi alla card ho aggiunto un paio di Color essentials sequins latte smoothie disc di Spellbinders. 
Spero vi piaccia, buona giornata

I colored the mouse from the All my heart set with Copic markers while the tag sentiment is from the Magic heart messages set.
Once I attached all the elements to the card I added a couple of Color essentials sequins milk smoothie disc from Spellbinders. 
Hope you like it, have a nice day

Quyen


jeudi 24 août 2023

Lawfawn's winter 2023 release

 Buona sera creative!

siete felici che oggi sia uscita la nuova release della Lawnfawn? Per l'occasione ho creato questa card usando la fustella Spooky forest Backdrop ed un cartoncino di carta d'acquarello ed ho colorato gli alberi con il distress ink vintage photo, cercando di lasciare un po' di bianco sui rami per creare l'effetto neve. Inoltre con la fustella Slimline stitched hillside borders ho creato delle collinette di neve dietro allo scenario. Per lo sfondo ho sfumato i distress ink mermaid lagoon, chipped sapphire e black soot e usato lo Snow Flurries Background Stencil con la pasta stencil paste white. Per incorniciare la card ho usato un cartoncino nero e la fustella Stitched Rectangle Frames.

Good evening creative!

Are you happy that the new Lawnfawn release is out today? For the occasion, I created this card using the Spooky forest Backdrop die and a watercolor paper cardstock and colored the trees with Distress Ink vintage photo, trying to leave some white on the branches to create the snow effect. Also with the Slimline die cut stitched hillside borders I created snow hillocks behind the scenery. For the background I blended the distress inks mermaid lagoon, chipped sapphire and black soot and used the Snow Flurries Background Stencil with stencil paste white. To frame the card I used black cardstock and the Stitched Rectangle Frames die cut.


Passiamo alla colorazione con i Copic, per questa scena ho voluto che i protagonisti fossero i due topini che si baciano sotto al vischio(Christmas before and afters) mentre l'altro trio di topolini son nascosti a  spiarli (Hay there hayrides mice add on).

Per completare la card ho aggiunto il sentiment let it snow dalla foil plate  Winter Big Scripty Words ed il sentiment "meet me under the mistletoe" incluso nella plancia Christmas before 'n afters.

Spero che vi piaccia e vi auguro di creare tante nelle card con queste novità!

Buona serata !


Let's move on to coloring with Copics, for this scene I wanted the main characters to be the two mice kissing under the mistletoe(Christmas before and afters) while the other trio of mice are hiding spying on them(Hay there hayrides mice add on).

To complete the card I added the let it snow sentiment from the Winter Big Scripty Words foil plate and the "meet me under the mistletoe" sentiment included in the Christmas before 'n afters stamp set.

I hope you enjoy it and wish you many in the cards with these new release!


Good evening !

Quyen


lundi 26 juin 2023

Make a Wish

Buona sera amiche creative!

Vi é piaciuta la nuova release della Lawn fawn? Oggi vi mostro cosa ho fatto con le novità:D 


Good evening creative friends!

Did you enjoy the new Lawn fawn release? Today I show you what I did with the new features:D


Mi sono subito innamorata della fustella Make A Wish, forse perché da qualche parte mi piace sognare ed esprimere desideri!;)
Ho cominciato a creare l'erba con il nuovo stencil Slimline Grassy con i distress ink Moved Lawn e Twisted citron. Poi come coperto l 'erba con lo stesso stencil ed ho colorato il cielo con Tumbled glass e Mermaid lagoon.
Poi ho colorato i personaggi con i copic usando i set Yappy Birthday  e Yappy Birthday add-on. Per la base ho usato un cartoncino nero, poi ho incollato lo sfondo erba-cielo, la scritta make a wish ricavata da un cartoncino oleografio ed infine i cagnolini e i palloncini. 
Buona serata a tutti 

I immediately fell in love with the Make A Wish die, maybe because somewhere I like to dream and make wishes!;)
I started creating the grass with the new Slimline Grassy stencil with Moved Lawn and Twisted citron distress inks. Then i masked the grass with the same stencil, and then I colored the sky with Tumbled glass and Mermaid lagoon.
Then I colored the characters with Copics using Yappy Birthday and Yappy Birthday add-on sets. For the base I used a black cardstock, then I glued the grass-sky background, the make a wish sign made from an oleographic cardstock and finally the little dogs and balloons. 
Have a nice evening everyone

Quyen


mercredi 1 mars 2023

Easel Card

Buongiorno creative,
eccomi qui di nuovo con una card nascita! Quando ho visto la Giant dies outlined Hello Baby della Lawnfawn l'ho voluta avere assolutamente per creare card nascita semplici e veloci per quando mi sarebbe mancato il tempo per colorare. 


Good morning creative,
here I am again with a birth card! When I saw the Giant dies outlined Hello Baby from Lawnfawn I absolutely wanted to have it to create quick and easy birth cards for when I would run out of time to color.


Cominciamo dalla facciata della card, ho fustellato il Giant dies due volte, una con la carta verde tiffany e un'altra con la carta bianca. Ho tenuto le lettere che compongono la scritta hello baby con la carta bianca e le ho colorate usando la spugnetta da dito con Distress ink hickory smoke e l'oxide lost shadow.

Starting with the front of the card, I die-cut the Giant dies twice, once with tiffany green paper and once with white paper. I kept the letters that make up the word hello baby with white paper and colored them using the finger sponge with Distress ink hickory smoke and lost shadow oxide.


Ho incollato tutti i pezzi su un foglio a righe dal nuovo pad Stripes 'n sprinkles petite paper pack. COn i copic poi ho colorato l'elefantino e il topino dal set Flight high 

Una volta finito la copertina della mia card son passata a creare la struttura della Easel card con le misure standard. Ho tagliato un foglio bianco a 4 1/4 inches  ed a 11 inches. Poi ho cordonato a 5 1/2 ed a 2 3/4 inches. Ho incollato la mia card al pezzoo che misura 2 3/4.


I glued all the pieces onto a striped sheet from the new Stripes 'n sprinkles petite paper pack pad. With Copics I then colored the little elephant and mouse from the Flight high set

Once I finished my card cover I moved on to creating the easel card structure with the standard measurements. I cut a blank sheet to 4 1/4 inches and 11 inches. Then I scored at 5 1/2 and at 2 3/4 inches. I glued my card to the piece that measuring 2 3/4.


Come saprete l'easel card ha bisogno di uno stopper e quindi no colorato la coppia di elefanti dal set Elephant parade  e l'ho incollato all'interno della card.
As you know the easel card needs a stopper and so no colored the pair of elephants from the Elephant parade set and I glued it inside the card.


Spero via sia piaciuta, alla prossima,

I hope you liked it, see you soon,

Quyen

samedi 25 février 2023

Hello Baby

 Ciao a tutti, 

spero che stiate bene! Sono felice che stasera finalmente ho trovato tempo di giocare con i nuovi prodotti della release di Lawnfawn! Questa volta mi son dovuta trattenere a non comprare tutto, ma nonostante ciò adoro tutti i prodotti!


Hi everyone, 

I hope you are all doing well! I'm glad that tonight I finally found time to play with the new products from the Lawnfawn release! This time I had to restrain myself from buying everything, but nevertheless I love all the products!


Ho usato la fustella Dotted Moon and stars backdrop , ricavando questo sfondo bellissimo con le stelline e le piccole lune. Dato che volevo ricreare il cielo, grazie alla fustella Cloud Borders ho ricavato una nuvola per ricoprire la parte in basso della mia card. Mi piaceva anche l'idea di incorniciare la scena della card e quindi ho usato la fustella della misura più grande del set Stiched rectangle frames con la carta glitter argento ed il rettangolo avanzato dal taglio, ho ricoperto il retro dello sfondo.
Ho colorato i timbri del set Fligh High, ed anche la scritta Baby con i Copic.
Ho timbrato la scritta "Hello" con la nuova plancia Henry jr.'s ABCs


I used the Dotted Moon and stars backdrop die cut , making this beautiful background with the little stars and moons. Since I wanted to recreate the sky, thanks to the Cloud Borders die cut I obtained a cloud to cover the bottom part of my card. I also liked the idea of framing the card scene, so I used the largest size die cut from the Stiched rectangle frames set with silver glitter paper and the leftover rectangle from cutting, I covered the back of my card.
I colored the stamps from the Fligh High set, and also the "Baby" lettering with Copics.
I stamped the "Hello" inscription with the new Henry Jr.'s ABCs stamp set.


Infine ho aggiunto della pailletes argento per decorare la card. Spero vi piaccia il risultato!
Vi auguro buon weekend, 
un abbraccio 

Finally, I added silver sequins to decorate the card. I hope you like the result!
Have a great weekend, 
a hug Quyen


dimanche 4 septembre 2022

Christmas Tags

 Buongiorno a tutti! 
oggi vi voglio mostrare quanto sono adorabili questi piccoli personaggi del set Say what? holiday critters della Lawnfawn. Sono davvero veloci da colorare e perfetti per abbellire una card con un grande sentiment oppure delle tags!

Good morning everyone! 
Today I want to show you how adorable these little characters from the Say what? holiday critters set from Lawnfawn are. They are really quick to color and perfect for embellishing a card with a great sentiment or tags!


Ho timbrato e colorato i miei soggetti con i Copics e li ho ritagliati con la Scan and Cut! Se ancora non l'avete ve la consiglio vivamente perché é comodissima. Il modello che acquistato é un po' vecchiotto, ma a me quello che più interessava era solo l'opzione di scansire il disegno e poi ritagliarne i contorni.

In seguito ho usato la fustella della Lawnfawn Stitched Ornaments, ho scelto la dimensione della fustella più grande ed ho ricavato 3 bocce di natale con il nuovo paper pad Let it shine starry skies. Da un cartoncino glitter oro ho tagliato la chiusura della boccia ed il fondo.
Ho assemblato tutti i pezzi e voilà, ho ricavato 3 tags semplici e veloci.


I stamped and colored my subjects with Copics and cut them out with the Scan and Cut! If you don't have it yet I highly recommend it because it is so convenient. The plotter I purchased is a little old, but cheaper, what I was most interested in was just the option to scan the design and then cut out the outlines.

Next, I used the Lawnfawn Stitched Ornaments die cut, chose the largest die size and cut out 3 Christmas bowls with the new paper pad Let it shine starry skies. From gold glitter cardstock I cut the bowl closure and the bottom.
I assembled all the pieces and voila, I made 3 quick and easy tags.


Io le trovo adorabili, spero che piacciano anche a voi!
Buona Domenica!


I find them adorable, hope you like them too!
Have a great Sunday

Quyen

dimanche 28 août 2022

New Lawn Fawn Release: Fangtastic Friends


Hello Everybody 😊

I hope you are doing well! Finally the new Lawn Fawn Release is available and I am very excited to experiment with it. The super cute bats from the set „Fangtastic Friends“ were perfect for a reveal wheel which I had messed up a bit in my preparations. I had stamped the words upside down on the wheel and thought I would have to turn the card around and create something this way…but with the bats… upside down works! 😃

Hallo mitenand 😊

Ich hoffe euch geht es gut! Endlich ist das neue Lawn Fawn Release erhältlich und ich freue mich sehr damit zu experimentieren. Die super süssen Fledermäuse vom Set "Fangtastic Friends" waren perfekt für ein Reveal Wheel welches ich bei den Vorbereitungen etwas versaut hatte. Ich hatte die Wörter kopfüber gestempelt und dachte ich müsste nun die Karte um 180° drehen und etwas so herum kreieren... aber mit den Fledermäusen... Kopfüber passt! 😃


First I cut out a panel with the reveal wheel speech bubble add on and the frame. The spinning reveal wheel was a leftover one from another cardmaking session. Also I prepared the stamps which I might use. In the end I didn‘t use the ones from „Fangtastic Friends Add-on“.

Als erstes stanzte ich das Reveal Wheel Haupt Panel mit dem Sprech Blasen Add-on, sowie dem Rahmen dazu, aus. Das drehende Rad war ein Übrigbleibsel von einer anderen Kartenbastelaktion. Dann habe ich noch die Stempel hervorgesucht welche ich gebrauchen könnte. Am Ende habe ich diejenigen aus dem Set "Fangtastic Friends Add-on" doch nicht benutzt.


Then I got out my Distress Oxides in the colors: salty ocean, blueprint sketch, chipped sapphire and black soot and started ink blending my main panel. I splattered some white watercolor speckles on it as well as Gansai Tambi's Opal Colors.

Danach habe ich meine Distress Oxide hervorgeholt und zwar in den Farben Salty Ocean, Blueprint Sketch, Chipped Sapphire und Black Soot und habe begonnen meine Vorderseite zu kolorieren. Abschliessend habe ich weisse Wasserfarben Tröpfchen sowie Gansai Tambis Opal Colors darüber gesprenkelt.


After that I stamped out my images on notecards from Coop. They work very well with copics and are easy to fuzzycut (if you don‘t have the customized dies). Then I colored the images with Copic alcohol markers. For the treebranch and leaves I used: E44 / E47 / E49 // G17 /G29
For the Bats I used those very dark blue-violets (BV): 23 / 25 /29 / 31 / 00

Als nächstes habe ich die Fledermäuse auf Notizkarten von Coop gestempelt. Diese eignen sich gut für das Anmalen mit Alcohol inks und sind leicht auszuschneiden (falls man die passenden Stanzen nicht hat). Dann habe ich die Bildchen mit Copic Alcohol Marker ausgemalt. Für den Ast mit den Blättern habe ich E44 / E47 / E49 // G17 /G29  und für die Fledermäuse die sehr dunklen blau-violett Töne BV23 / 25 /29 / 31 / 00 benutzt.


After running them through my die cut machine I had to arrange them on my panel and adhere them with glue and foam pads. I thought it could use another image so I cut some holographic cardstock into a square and wrapped twine around it, making it looke like a parcel.

Nach dem Ausstanzen arrangierte ich meine kleine Szene und befestigte alles mit Leim und 3-D Abstandspads. Da ich dachte es könnte noch ein weiteres Sujet gebrauchen schnitt ich ein Viereck aus holographischem Papier aus und wickelte einen Faden rund herum um es wie ein kleines Geschenk aussehen zu lassen.


The last step to finish the interactive part was to prepare my panel with foam pads all around the reveal wheel but being carefull not to touch it. I used a lot of foam squares - I am rather safe than sorry - as my experience has shown me sometimes more is better. 😉😃

Der letzte Schritt zur Fertigstellung des interaktiven Teils war die Vorbereitung mit 3D-Klebestreifen rund ums Rad herum ohne es zu berühren. Dafür habe ich ne Menge 3D Klebe Vierecke benutzt - ich bin lieber auf der sicheren Seite - da ich aus Erfahrung weiss mehr ist manchmal besser. 😉😃


As my bat on top was looking over the panel, otherwise I couldn‘t make it work with the speech bubble, I had to prepare an individuel cardbase which is quite tall. I chose black as I thought that was fitting but then I realised it would be hard to write womething on the inside if one wouldn‘t have a white gel pen. So I took another Coop card, rounded the corners and adhered it in there.
And with that I was finished!

Da die Fledermaus ganz oben über das Panel hinaus schaute, damit das mit der Sprechblase funktionierte, musste ich eine Kartenbasis individuell zuschneiden, die sehr hoch war. Ich wählte schwarz, da dies sehr passend zur Szene war, bemerkte dann aber, das es schwierig wäre, in der Karte etwas zu schreiben wenn man keinen weissen Gel Pen hätte. Daher nahm ich eine weitere Notizkarte von Coop, rundete die Ecken ab und klebte diese in die Karte. Somit war diese Karte fertig!


What do you think? Can you read the upside down words?
Hope you enjoyed the process of this card. Thank you for stepping by and have a lovely day! 😘
Andrea

Was denkt ihr? Könnt ihr die kopfüber Wörter lesen?
Ich hoffe euch hat dieser Kartenprozess gefallen.
Merci vielmol fürs verbii luegä und hebed än schönä Tag! 😘
Andrea