jeudi 22 août 2024

Poppy`s for Christmas

Hello

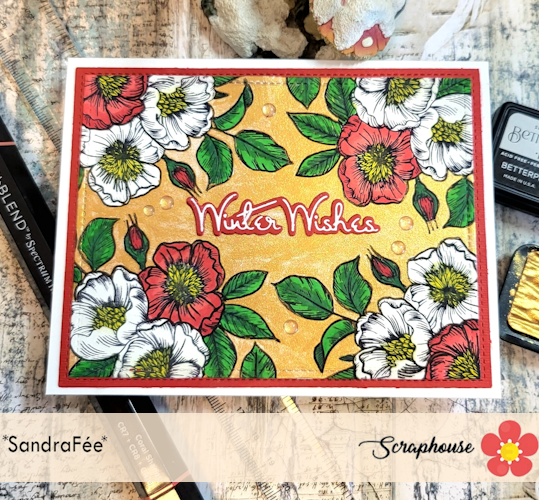
So here is my fist Christmas card for this season. I had this gorgeous Glitter Paper from Studio Light which is fantastic! I love the different shades and the best part, the glitter doesn’t rub off. I want it to combine with the Yana’s Poppy Dies. So, I decided to create something like an ice flowers on a snowy galaxy background. I mean, why not.😏 


I cut the outline from the poppies from silver glitter paper and the inlay from white cardstock. Then I colored the inlay with alcohol markers in blue. I also added some strokes with a blue pencil to give it more contrast.


For my background I took a dark blue cardstock and added even darker inks around the edges. In the middle I added white pigment ink with a blending tool. Then I added some silver splatters. 


Hope you like the card. Have great day.


Adriana


Hallo

hier ist also meine erste Weihnachtskarte für diese Saison. Ich hatte dieses wunderbare Glitzerpapier von Studio Light, das einfach fantastisch ist! Ich liebe die verschiedenen Schattierungen und das Beste daran ist, dass der Glitter nicht abfärbt. Ich wollte es mit den Yana's Poppy Dies kombinieren. Also beschloss ich, so etwas wie Eisblumen auf einem verschneiten Galaxienhintergrund zu gestalten. Ich meine, warum nicht. 😏


Ich habe die Umrisse der Mohnblumen aus silbernem
Glitzerpapier und die Blume aus weissem Papier geschnitten. Dann habe ich das weisse Papier mit Alkoholmarkern in Blau bemalt. Ausserdem habe ich mit einem blauen Farbstift ein paar Striche gesetzt, um den Kontrast zu verstärken.


Für den Hintergrund nahm ich einen dunkelblauen Papier und fügte an den Rändern noch dunklere Farben hinzu. In der Mitte habe ich weiße Pigmenttinte mit einem Blending Tool hinzugefügt. Dann habe ich einige silberne Spritzer hinzugefügt. 


Ich hoffe, die Karte gefällt euch. Habt einen schönen Tag.


Adriana


jeudi 15 août 2024

One design - two cards

Hello everyone!

I don’t know about you but I really love to play with colors. This just makes me happy and I like how you can create different feels. I created these two cards and started with the same base. I used the Flowers Stems press plate to create my image.


Then I colored them with my inks. I really like to watercolor with die ink. I tried to color one flower with more happy and vibrant colors. I also added a little bit of Astro Paste for that amazing glitter effect. 


For my other card I used more muted colors. But I still like to have color on sympathy cards.

I think you can really see the different feel, just by changing the colors.


I added two sentiments from the My Favourite Things Something for everyone stamp set. I really like the stile and the size of it.


Have a nice day.

Adriana


Hallo zusammen!

Ich weiß nicht, wie es euch geht, aber ich liebe es wirklich, mit Farben zu spielen. Das macht mich einfach glücklich und ich mag es, wie man verschiedene Stimmungen erzeugen kann. Ich habe diese beiden Karten gestaltet und mit der gleichen Basis begonnen. Ich habe die Pressplate Flowers Stems verwendet, um mein Bild zu erstellen. 


Dann habe ich sie mit meiner Stempelfarbe koloriert. Ich mag es sehr, mit Stempeltinte zu aquarellieren. Ich habe versucht, eine Blume mit fröhlicheren und lebhafteren Farben zu malen. Ich habe auch ein wenig

Astro Paste für den tollen Glitzereffekt hinzugefügt. 

Für meine andere Karte habe ich gedecktere Farben verwendet. Aber ich mag es trotzdem, wenn die Trauerkarten Farbe haben.


Ich finde, man kann den Unterschied sehr gut erkennen, wenn man die Farben ändert.


Ich habe zwei verschiedene Sentiments gewählt, beide von My Favourite Things Something for everyone stamp set - mit gefällt ihr Stil und sie sind einfach für alles zu gebrauchen.


Ich wünsche euch einen schönen Tag

Adriana


lundi 12 août 2024

Cloud 9 dye pigment ink

Buona sera creative! 

Come state? questi giorni di canicola mi hanno ispirato a creare questa card tropicale!

Good evening creative! 

How are you? these hot days have inspired me to create this tropical card!


Per lo sfondo ho usato i nuovissimi inchiostri Cloud 9 che hanno una resa fantastica ed adoro che siano perlati. Su una carta d'acquarello ho mischiato a caso questi 3 colori: Lemon candy, Summer Garden e Mermaid Lagoon.

For the background I used the brand new Cloud 9 inks which have fantastic rendering and I love that they are pearlescent. On a watercolor paper I randomly mixed these 3 colors: Lemon candy, Summer Garden and Mermaid Lagoon.


In seguito ho inchiostrato l'embossing folder Lush Leaves di Spellbinders con dell'inchiostro nero , messo il mio cartoncino colorato e passato nella Platinum 6.

Next I inked Spellbinders' Lush Leaves embossing folder with black ink , put on my colored cardstock and ran it through my Platinum 6.


Ho ritagliato una parte del cartoncino per creare un apertura dove posizionare il mio tucano ottenuto con la fustella Tropical dream di Modascrap ed i Paper pad di Studiolight: Shades of green e Shades of pink.
Ho colorato due cartoncini sempre con i tamponi Cloud 9 che ho poi fustellato sentiment Hello dal set Hello smile etched dies


I cut out part of the cardstock to create an opening where I could place my toucan obtained with Modascrap's Tropical dream die cut and Studiolight's Paper pads: Shades of green and Shades of pink.
I ink blended two small piece of watercolor paper also with Cloud 9 pads, then I die-cut the sentiment Hello from the Hello smile etched dies set. 


Spero vi sia piaciuta, 
Buona serata 

I hope you enjoyed it, 
Have a nice evening 

Quyen


vendredi 2 août 2024

Combining Products

Hi everyone

I don’t know about you, but when I get new things, I mostly use them as they are intended to be. This also helps me when I’m not feeling very creative but still wants to craft. 


But now I wanted to try how I can combine different products together, and I’m quite happy how it turned out. I used the Autumn Sprigs from Spellbinders and the Floral Whimsy Dynamic Duo from Altenew and was really surprised how good they work together. I did some red and pinks over the Stencil and then added stamping with an even darker red.

I die cut everything with the matching die.

The stems and the lavender I cut from white cardstock and colored them as well with ink and with markers.


For a sentiment I used the Lawn Fawn Giant Outlined Merci. I wanted the flowers to be behind my sentiment. So I used a little trick to get the right placement. I glued the shadow from my sentiment down first, added the flowers and finally added another shadow with the sentiment, so I could arrange them easily.


 For the background I used an embossing folder just to give a little bit more texture and interest.


So hopefully this inspires you to look different on your products, combine them creatively and get a completely different look.


Have a fabulous day

Adriana


Hallo zusammen

ich weiß nicht, wie es euch geht, aber wenn ich neue Sachen bekomme, benutze ich sie meistens so, wie sie gedacht sind. Das hilft mir auch, wenn ich mal nicht so kreativ bin, aber trotzdem basteln möchte. 


Aber jetzt wollte ich mal ausprobieren, wie ich verschiedene Produkte miteinander kombinieren kann, und ich bin ganz zufrieden damit, wie es geworden ist. Ich habe die Autumn Sprigs von Spellbinders und das Floral Whimsy Dynamic Duo von Altenew verwendet und war wirklich überrascht, wie gut sie zusammen funktionieren. Ich habe etwas Rot und Rosa über die Schablone gelegt und dann mit einem noch dunkleren Rot gestempelt.

Ich habe alles mit der passenden Stanze ausgestanzt.

Die Stängel und den Lavendel habe ich aus weissem Papier geschnitten und ebenfalls mit Tinte und Markern ausgemalt.


Für den Spruch habe ich das Lawn Fawn Giant Outlined Merci verwendet. Ich wollte, dass die Blumen hinter meinem Spruch stehen. Also habe ich einen kleinen Trick angewandt, um die richtige Platzierung zu erreichen. Ich klebte zuerst den Schatten meines Spruches auf, fügte die Blumen hinzu und fügte schließlich einen weiteren Schatten mit dem Spruch hinzu, so dass ich sie leicht anordnen konnte.


Für den Hintergrund habe ich einen Prägefolder verwendet, um etwas mehr Struktur und Interesse zu erzeugen.


Ich hoffe, das inspiriert dich dazu, deine Produkte anders zu gestalten, sie kreativ zu kombinieren und einen ganz anderen Look zu erzielen.


Habt einen fabelhaften Tag

Adriana


mardi 30 juillet 2024

Last July Christmas card

Buona giorno care creative! come state ?

Oggi vi voglio mostrare la mia ultima card per questo Christmas in July!  

Good day dear creatives !!! how are you ?
Today I want to show you my last card for this Christmas in July !  


Ho usato la betterpress con l'inchiostro distress ink Waltnut Stain con la press plate Buffalo Plaid usando come base un cartoncino Kraft.

I used betterpress with Waltnut Stain distress ink with Buffalo Plaid press plate using Kraft cardstock as a base.


In seguito ho usato la press plate Merriest Christmas  con un cartonino d'acquarello che ho ritagliato con la fustella Notched corner frames etched dies, e poi acquarellato lo sfondo con i distress ink reinker Bundled Sage e Rustic Wilderness.


Next, I used the Merriest Christmas press plate with a watercolor card that I cut out with Notched corner frames etched dies, and then watercolored the background with Bundled Sage and Rustic Wilderness distress ink reinkers.


Ho voluto incorniciare questa scritta con una cornice dorata  che ho ottenuto fustellando insieme due fustelle del set Notched corner frames etched dies , uno della stessa dimensione del mio cartoncino ed una più grande, con un cartoncino dal set  Gold treasured cardostock.

Infine l'ultimo tocco son state le stelle di natale che ho creato con il set Delivering Joy etched dies.

Spero vi piaccia il risultato, vi ringrazio di cuore di esser passate di qui a leggere il blog, 
Vi auguro una splendida giornata!


I wanted to frame this inscription with a gold frame that I made by die-cutting together two dies from the Notched corner frames etched dies set , one the same size as my cardstock and one larger, with a cardstock from the Gold treasured cardostock set.

Finally the last touch were the poinsettias I created with the Delivering Joy etched dies set.

I hope you like the result, thank you very much for stopping by and reading the blog, 
Have a wonderful day!

Quyen


vendredi 26 juillet 2024

Christmas in July...

ou idée pour utiliser le même pressplate pour différentes occasions.
J'utilise ici la plaque qui est comprise dans le pack de la BetterPress pour en faire une version pour Noël.
J'ai disposé les fleurs de façon a occuper les coins et bords de la carte, puis j'ai coloré avec mes feutres SpectrumNoir pour les pétales et les feuilles et un crayon jaune pour le coeur.
J'ai utilisé un or de ma palette aquarelle FineTec pearlescent colors ( mais le papier n'est pas top et on voit les traces 😟) pour remplir tout le fond.
Le sentiment vient d'un ancien SpellbindersClubKits de 2022, il a été fait avec la Glimmer Hot Foil System et le rouleau Blanc Opaque sur cardstock rouge de mon stock mais vous pouvez utiliser celui-ci et pour mettre le sentiment le plus droit possible je me sers du T Square/Ruler et quelques embellissements transparents.

Douce soirée et éclatez vous en créant !

*SandraFée*


or idea to use the same pressplate for different occasions.
Here I use the plate that is included in the BetterPress pack to make a Christmas version.
I arranged the flowers to occupy the corners and edges of the card, then I colored with my SpectrumNoir markers for the petals and leaves and an yellow pencil for the heart.
I used a gold from my FineTec pearlescent colors watercolor palette (but the paper is not great and you can see the marks 😟) to fill the entire background.
The sentiment comes from an old SpellbindersClubKits from 2022, it was made with the Glimmer Hot Foil System and the Opaque White roll on red cardstock from my stock but you can use this one and to put the sentiment as straight as possible I use the T Square/Ruler
  and some transparent embellishments.

Have a nice evening and have fun creating!

*SandraFée*

mardi 23 juillet 2024

Press plate Night and Day

Buongiorno a tutti! 

come state?Spero stiate bene nonostante questo caldo estivo arrivato all'improvviso!
Ho visto che negli ultimi anni va molto di voga il "Christmas in July" ho deciso di cominciare anch'io a creare qualche card natalizia.

Good morning everyone! 

How are you doing? I hope you are doing well despite this summer heat that has suddenly arrived! I saw that “Christmas in July” is very much in vogue in recent years, so I decided to start creating some Christmas cards too.


Per queste mie due card ho usato questa nuova DOPPIA press plate Night and day pines !!! Dentro alla confezione abbiamo 2 press plate che fanno la stampa positiva e negativa del soggetto in questione! Trovo che sia geniale!!! Voi cosa ne pensate?

For these two cards of mine I used this new DOUBLE press plate Night and day pines !!! Inside the package we have 2 press plates that do positive and negative printing of the subject in question! I find it to be brilliant !!! What do you guys think?


Per la prima stampa ho usato il negativo, che ho inchiostrato con l'Altenew enchanted gold pigment ink e come cartoncino ho usato uno verde scuro dai pad di StudioLight.


For the first print I used the negative, which I inked with Altenew enchanted gold pigment ink, and as a cardstock I used a dark green one from StudioLight pads.


Per questa seconda card invece ho usato la plate positiva ed inchiostrato con il Distress ink Walnut Stain perché volevo creare degli sfondi che rimanessero un po'neutri per poter dare più importanza agli elementi successivi.

Ho usato la fustella Sealed Christmas Sprigs per creare i rametti e la Stella di natale e per dare una sfumatura maggiore alle foglie, ho intensificato alcune parti con i Copic markers. Invece per ottenere l' effetto cordino, ho usato la fustella Sealed Twine, anch'esso di Spellbinders , insieme ad un cartoncino dorato dal set Gold Assortment Treasured Cardstock.

For this second card, however, I used Positive Plate and inked with Distress ink Walnut Stain because I wanted to create backgrounds that remained somewhat neutral in order to give more importance to the later elements.

I used the Sealed Christmas Sprigs die cut to create the sprigs and the poinsettia and to give more shading to the leaves, I intensified some parts with Copic markers. Instead to get the lanyard effect, I used the Sealed Twine dies, also from Spellbinders , along with a gold cardstock from the Gold Assortment Treasured Cardstock set.


Infine per completare la mia card ho usato la cerlacca dal kit di Spellbinders.

Finally, to complete my card, I used wax from the Spellbinders kit.


Spero vi siano piaciute queste card e grazie per esservi fermate a leggere il blog!

Vi auguro una splendida giornata


I hope you enjoyed these cards and thank you for stopping by and reading the blog!

Have a wonderful day

Quyen


vendredi 19 juillet 2024

Summer Vibes

Happy Friday everyone!


Today I share a card with some summer vibes. As background I used the My Favorite Things Sweet Summer Blends Cardstock. Perfect for that happy Summer vibe, Then I added a focal point with the Betterpress Spotlight Circle Duo Pressplate. You could also use Hotfoil with these plates. As Leaves I used the leaves from the Spellbinders Fresh Picked Daisies. I die cut them from a light green cardstock and added some ink on top for a little bit of depth. 

The flowers from this dies Set seem a little to big for my Circle, so I added purple Flowers from Altenew. added a Sentiment and finished is a summery card.


Thanks for stopping by. 

Have a wonderful day.


Adriana


Einen schönen Freitag euch allen!


Heute zeige ich eine Karte mit sommerlichen Vibes. Als Hintergrund habe ich den My Favorite Things Sweet Summer Blends Cardstock verwendet. Perfekt für diese fröhliche Sommerstimmung. Dann habe ich mit der Betterpress Spotlight Circle Duo Pressplate einen Fokuspunkt gesetzt. Diese kann man übrigens auch mit Hotfoil verwenden. Als Blätter habe ich die Blätter aus den Spellbinders Fresh Picked Daisies verwendet. Ich habe sie aus einem hellgrünen Papier gestanzt und etwas Tinte darüber gegeben, um ihnen ein wenig Tiefe zu verleihen. 

Die Blumen von diesem Stanzset sind ein bisschen zu groß für meinen Kreis, also habe ich lila Blumen von Altenew hinzugefügt, einen Spruch hinzugefügt und fertig ist eine sommerliche Karte.


Danke fürs Vorbeischauen.

Einen wunderschönen Tag noch.


Adriana


mardi 9 juillet 2024

Flaunt Your Feathers!


Buongiorno care creative! 
come state? spero tutto bene!
ormai mi conoscete e sapete che ho questo debole per gli embossing folder, in special modo quelli di Spellbinders!
Cominciamo dal principio... ho preso un cartoncino verde petrolio dal paper pad Lemonade di StudioLight.

Good morning dear creatives! 
how are you? hope all is well!
you know me by now and you know that I have a soft spot for embossing folders, especially the ones from Spellbinders!
Let's start at the beginning...I got a petrol green cardstock from StudioLight's Lemonade paper pad.


 Poi ho spruzzato dell'acqua con il mio nuovo fantastico Mighty mister spray di Spellbinders sul cartoncino in modo che una volta messo nell'embossing folder Feather Flourish e  passato attraverso la die cut machine, la carta non si spezzi.

 Then I sprayed some water with my new Mighty mister spray from Spellbinders on the cardstock so that once I put it in the Feather Flourish embossing folder and ran it through the die cut machine, the paper would not break.


Dopo che ho ottenuto la mia embossatura, ho sprayato del Distress Mica stain per dare l'effetto un po' perlato alla carta

After I got my embossing, I sprayed some Distress Mica stain to give the paper a slightly pearly effect


Per dare un effetto di rilievo ho usato l'inchiostro di Altenew Enchanted gold pigment ink ed ho fatto degli schizzi con Pale gold japanese watercolor.

To give a raised effect, I used Altenew Enchanted gold pigment ink and made sketches with Pale gold japanese watercolor.


Poi ho pensato di voler creare la  card con una forma diversa dalle classiche e quindi ho usato la fustella Essential Arches per ritagliare la card. Una volta ritagliato il cartoncino, l'effetto 3d era svanito, per cui l'ho ripassato ancora nell'embossing folder. Per dare alla card un ho ritagliato con la fustella arches della misura più grande un cartoncino dorato dal Gold assortment treasured cardstock.
Per dare un ulteriore tocco di glitter ho solorato l'interno delle piume con la Lunar paste Midnight snack e lo stickles d'oro.
Infine ho usato il sentiment dal set Betterpress elegant peacock press plate die set per completare la mia card.

Then I thought I wanted to create the card with a different shape than the classic ones, so I used the Essential Arches dies to cut out the card. Once the card was cut out, the 3d effect had faded, so I ran it through the embossing folder again. To give the card a I cut out with the largest size arches die cutter a gold cardstock from the Gold assortment treasured cardstock.
To give it an extra touch of glitter, I gilded the inside of the feathers with Lunar paste Midnight snack and gold Stickles.
Finally I used the sentiment from the Betterpress elegant peacock press plate die set to complete my card.


Spero vi piaccia e vi auguro una fantastica giornata !

I hope you enjoy it and have a great day !

Quyen


vendredi 5 juillet 2024

JAMAIS !

 Attention très long article !
( vu la taille de cet article, je vous laisse le soin de demander à votre traducteur préféré de faire son job , merci beaucoup !)


 Ah non,non! jamais, jamais, c'est commercial ce truc !.....
c'est ce que je disais de la Betterpress à sa sortie  il y a 1 an...sauf que...jamais est arrivé mardi 2 juillet😅

Je voyais les magnifiques créations faites avec elle et j'avoue que ces derniers 3-4 mois elle commençait sérieusement à me taquiner, cette coquine !

Elle ne fait pas QUE l'embossage (creux) mais ses plaques vont AUSSI pour la machine dite Hot Foil

Je me suis donc amusée comme une fofolle à tester mon nouveau joujou et j'avoue que je l'adooore !

 Voici la chose :


 Ma première impression/utilisation a été avec l'encre noire ( pas fait de photo sorry) et la 2ème tentative à été de faire une "impression" avec 2 encres de couleurs différentes :


 que j'ai colorée avec les feutres SpectrumNoir puis ajouté un effet "mouillé" en embossant à chaud avec la WOW embossing Powder Clear Gloss :


Puis j'ai testé avec les crayons Faber Castell et la plaque Paon :


La même plaque mais coloré avec les feutres :


La plaque fleurs qui est fournie avec la Betterpress, j'ai ressortis mes aquarelles Mijello Mission Gold :


Et la plaque qu'une amie m'a offerte, première photo avec fond distress oxide , encre noire BetterpressInk 

coloration crayons:


 et bien sûr, avec ma Glimmer Hot Foil  ( divers rouleaux ), première photo j'ai utilisé  Aura ( j'en ai faite une carte mais je l'ai envoyée et oublié de faire une photo, glups):

 
Et la 2ème avec la couleur Rainbow :


J'ai aussi testé plusieurs papiers l'officiel qui est top et 3 sortes de papiers aquarelle mais je m'arrête ici car sinon vous allez vous endormir profondément hihi

Bref, j'adooore la Betterpress et vous allez me voir l'utiliser souvent !

A bientôt,

*SandraFée*