mercredi 8 janvier 2025

You're dino-mite

Bonjour à tous!

J'espère que vous avez bien commencé l'année! 

Je suis ravie de vous présenter une carte interactive avec un die Ta Da-Diorama et des tampons de Lawn Fawn. Les tampons ne sont pas en stock mais vous pouvez les remplacer par des adorables moufettes que vous trouverez ici.

Vue de la carte fermée (les dimensions sont un peu plus petites qu'une carte A6 standard comme ça elle passe dans une enveloppe). Moi, je l'ai collé sur une carte. 


Vue de la carte ouverte


Sympa, vous ne trouvez pas?

Merci de votre visite et rendez-vous en boutique!

Belle journée!

Valérie


samedi 28 décembre 2024

Cozy Winter Card

 Hello everyone


Hope you had some nice Christmas Days. Today I’m sharing a card to send out some warm hugs in cold days. I wanted to create a cozy winter card. 


For the background I used the Collection Arizona Stamps from Florilèges. I really like this stamp set because you can use all stamps together as a background or create really nice accents. I did some tone on tone stamping on a mint Paper from the Vintage Spring Paper Pad. Then I created the snowflakes and the sentiment with white embossing powder. They are from the Simon Hurley Sketched Snowman Set. I also used my favorite white glitter Paper from the Fairytale Paper Pad. This is so soft but sparkly.


For a little bit more interest I cut the edges with the Spellbinders Notched Corner Punch. 


Thank you for stopping by and a Happy New Year.


Adriana


Hallo zusammen


ich hoffe ihr hattet ein paar schöne Weihnachtstage. Heute zeige ich euch eine Karte, mit der ihr in den kalten Tagen ein paar warme Umarmungen verschicken könnt. Ich wollte eine gemütliche Winterkarte kreieren. 

Für den Hintergrund habe ich die Collection Arizona Stamps von Florilèges verwendet. Dieses Stempelset gefällt mir sehr gut, denn man kann alle Stempel zusammen als Hintergrund verwenden oder wirklich schöne Akzente setzen. Ich habe Ton in Ton auf ein mintfarbenes Papier aus dem Papierblock Vintage Spring gestempelt. Dann habe ich die Schneeflocken und den Schriftzug mit weißem Embossingpulver gestaltet. Sie stammen aus dem Simon Hurley Sketched Snowman Set. Außerdem habe ich mein liebstes weißes Glitzerpapier aus dem Papierblock Fairytale verwendet. Es ist so zart, aber glitzernd.

Für ein bisschen mehr Interesse habe ich die Ränder mit der Spellbinders Notched Corner Punch gestanzt. 


Vielen Dank fürs Vorbeischauen und ein frohes neues Jahr.


Adriana


samedi 14 décembre 2024

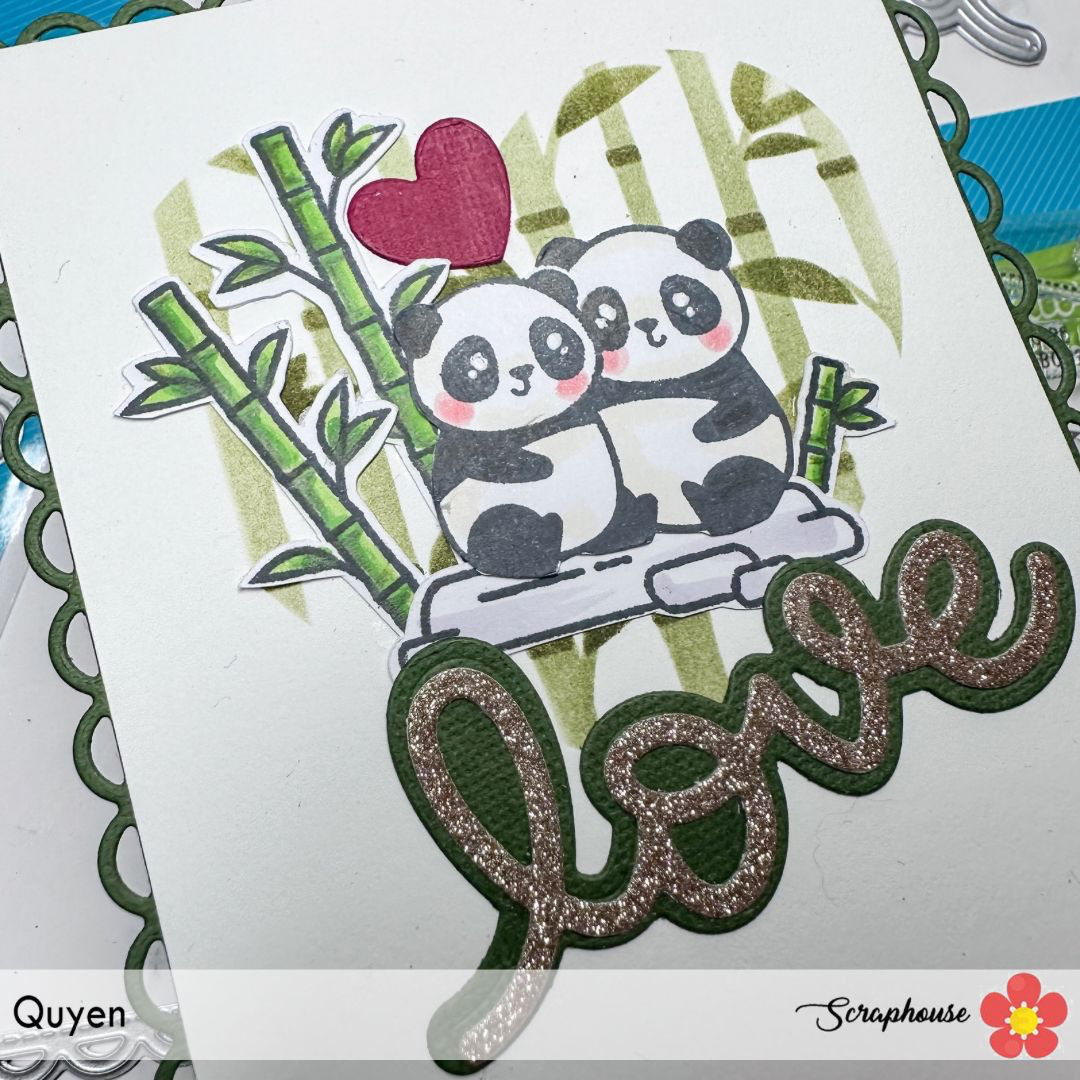
Panda's love is in the air


Buongiorno creative! come state? avete avuto modo di vedere la nuova mini release di San Valentino della Lawnfawn? questa volta trovo che questi panda siano bellissimi e versatili, da poter usare in tutte le occasioni e non unicamente per San Valentino.

Ho voluto creare qualcosa di divertente. Con la fustella Stitched happy heart ho ritagliato un cartoncino di scarto da creare uno stencil.

Good morning creatives! how are you? did you get a chance to see the new Valentine's Day mini release from Lawnfawn? this time I find these pandas to be beautiful and versatile, that can be used for all occasions and not solely for Valentine's Day.

I wanted to create something fun. Using the Stitched happy heart die I cut out a scrap cardstock to create a stencil.


Per poter posizionare correttamente lo stencil cuore che ho creato, ho appoggiato la fustella cuore sul mio cartoncino base dove avrei voluto appoggiare il mio stencil come se fosse una dima. Una volta rimosso la fustella e fissato lo stencil in carta , ho usato gli stencils Bamboo.

In order to properly position the heart stencil I created, I placed the heart die on my base card where I wanted to place my stencil as if it were a template. Once I removed the die and secured the paper stencil , I used Bamboo stencils.


Ho colorato i velocemente i miei soggetti della plancia I heart pandas ( siii i panda son bianchi e neri quindi é stato molto semplice) e decorato con il sentiment della fustella Scripty love e Scripty love outlined. Infine il mio cartoncino l'ho incollato ad una cornicetta ottenuta dalla nuova fustella Lacy Rectangle stackable. 
Spero vi sia piaciuta la card ,
buona giornata

I colored the quickly my subjects  from the I heart pandas stamp set( yes the pandas are black and white so it was very easy) and decorated with the sentiment from the Scripty love die and Scripty love outlined. Finally my card I glued it to a frame obtained from the new Lacy Rectangle stackable die cut. 
I hope you enjoyed the card ,
have a nice day

Quyen


mercredi 11 décembre 2024

Sweet Christmas Deer


Hello crafty friends!


Less than two weeks until Christmas. I don’t know about you but I just love to do Christmas cards.

I’m sharing two cardswho features some Betterpress and Die cutting. 

I used the Day and Night Pine Pressplate to create this stunning background. I did two variations. Then I die cut the deer’s and the leaves from the Delightful Deer Die Set in different shades of brown and green. This die set is fabulous and you can add all the little details. I also added some floral die cuts with glitter cardstock from the Studio Light glitter Paper Pad. I find some sparkle adds that Christmas feel even more.

I assembled everything on a Oval I created with the Essential Modern Ovals. So, it has a nice platform to stand out.


Thanks for stopping by.


Adriana


Hallo Bastelfreunde!


Weniger als zwei Wochen bis Weihnachten. Ich weiß nicht, wie es euch geht, aber ich liebe es, Weihnachtskarten zu basteln.

Ich zeige euch heute zwei Karten, die mit Betterpress und Stanzformen gestaltet wurden. 

Ich habe die Day and Night Pine Pressplate verwendet, um diesen atemberaubenden Hintergrund zu gestalten. Ich habe zwei Varianten gemacht. 


Dann habe ich die Rehe und die Blätter aus dem Stanzset Delightful Deer in verschiedenen Braun- und Grüntönen ausgestanzt. Dieses Stempelset ist fabelhaft und man kann all die kleinen Details hinzufügen. Ich habe auch einige Blumen aus goldigem Glitterpapier aus dem Studio Light Glitter Paper Pad hinzugefügt. Ich finde, dass etwas Glitzer das Weihnachtsgefühl noch verstärkt.

Ich habe alles auf einem Oval montiert, das ich mit den Essential Modern Ovals erstellt habe. So hat es eine schöne Plattform, um hervorzustechen.


Danke fürs vorbeischauen.


Adriana


vendredi 29 novembre 2024

Combining differerent techniques

 Buona sera creative!

come state? questo blog post é inerente al reel che trovate sul profilo ig delle shop @scraphouse.ch e @shiny_scrap. Ho voluto subito provare queste nuove betterpress plate: Bold color mix numbers plate e Sweeping celebration sentiments

Ho usato gli inchiostri Interference Lavender Fields Shimmer e Tropical Paradise Shimmer di Lisa Horton per i numeri , mentre per la scritta happy birthday ho usato il classico inchiostro nero per la betterpress. 

In seguito ho messo il mio cartoncino nel 3d embossing folder Amaryllis Garden perché volevo vedere che effetto avrei ottenuto. Poi visto che avevo macchiato la mia card con gli inchiostri Interference, ho deciso di nascondere l'errore con delle macchie di Lindy's del set Kissing Klimt.  Infine ho aggiunto qualche paillettes dorata e mattato con un cartoncino dal blocco di Studio Light Shades of Pink.

Grazie per esser passate da qui, ricordatevi che avete ancora un po' di tempo per sfruttare lo sconto per il Black Friday!

un abbraccio 


 Good evening creative!

how are you? this blog post is inherent to the reel you can find on the ig profile of the shops @scraphouse.ch and @shiny_scrap. I immediately wanted to try these new Betterpress plates: Bold color mix numbers plate and Sweeping celebration sentiments

I used Lisa Horton's Interference Lavender Fields Shimmer and Tropical Paradise Shimmer inks for the numbers , while I used the classic black Betterpress ink for the happy birthday lettering. 

Later I put my cardstock in the 3d embossing folder Amaryllis Garden because I wanted to see what effect I would get. Then since I had stained my card with Interference inks, I decided to hide the mistake with some Lindy's stains from the Kissing Klimt set.  Finally, I added some gold sequins and matted with a cardstock from the Studio Light Shades of Pink block.

Thanks for stopping by, remember you still have some time to take advantage of the Black Friday discount!

a hug 

Quyen


jeudi 28 novembre 2024

vendredi 22 novembre 2024

Classic but modern snowflakes


Hello everyone!


I’m sharing a card today with gorgeous snowflakes. I took classic Christmas colors as green and red – but used more a blue-green and a coral red – what I think gives it a modern look.

I stared by masking of half of my card base with a tape and did some ink blending over it. Then I turned everything and added green on the lower part. I didn’t like how the colors turned out, so I added some light pink cardstock over it. 


Then I used the Delicate Snowflakes Die Set to cut out my snowflakes and assembled them together. I used 3 different shades. Love to add all the details. Then I cut out the same Snowflake on my card base – and then I adhered the snowflake on the inside of my card. So, it shows up on the outside but also on the inside, what I think gives a little twist.

I added a sentiment with gold embossing powder and also some splatter.


Tips for your crafting:

As the snowflake is very delicate, I would take the shadow of the snowflake for my inlay – as it will open easier.

And although it worked with my cardstock added on the card – it’s easier if there is no additional cardstock on the card front.


Have nice day!

Adriana


Hallo zusammen!


Ich zeige euch heute eine Karte mit wunderschönen Schneeflocken. Ich habe klassische Weihnachtsfarben wie Grün und Rot genommen - aber eher ein Blaugrün und ein Korallenrot verwendet - was meiner Meinung nach einen modernen Look ergibt.

Zuerst habe ich die Hälfte meines Kartengrundes mit Klebeband abgeklebt und mit Tinte verblendet. Dann habe ich alles umgedreht und im unteren Bereich Grün hinzugefügt. Da mir die Farben nicht gefielen, habe ich etwas hellrosa Papier darübergelegt. 


Dann habe ich mit dem Stanzenset Delicate Snowflakes meine Schneeflocken ausgestanzt und sie zusammengesetzt. Ich habe 3 verschiedene Farbtöne verwendet. Ich liebe es, all die Details hinzuzufügen. Dann habe ich die gleiche Schneeflocke auf meiner Kartenbasis ausgestanzt - und dann habe ich die Schneeflocke auf die Innenseite meiner Karte geklebt. So ist sie nicht nur auf der Außenseite, sondern auch auf der Innenseite zu sehen, was meiner Meinung nach einen kleinen Twist gibt.

Ich habe einen Spruch mit

Goldprägepulver und ein paar Spritzer hinzugefügt.


Tipps für deine Bastelei:

Da die Schneeflocke sehr zart ist, würde ich den Schatten der Schneeflocke für meine Einlage nehmen - dann geht sie leichter auf.

Und auch wenn es mit meinem Papier auf der Karte funktioniert hat - es ist einfacher, wenn kein zusätzlicher Papoer auf der Kartenvorderseite ist.


Schönen Tag noch!

Adriana


jeudi 14 novembre 2024

Quick Cas Card


Buona sera creative! Come state? Oggi mi trovo qui per mostrarvi altre 2 semplici card da fare quando avete poco tempo. 

Per questa prima card ho usato il timbro di Ha-Pi little fox Joyeux lutin merry little christmas , ho timbrato due volte il negozio di giocattoli uno di fianco all'altro perché volevo che il coniglietto non coprisse la vetrina del negozio. Il coniglietto di MFT viene dal set Greatest present che ho colorato con i Copic markers.


Good evening crafters! How are you all doing? Today I am here to show you 2 more simple cards to make when you are short of time. 

For this first card I used the Ha-Pi little fox stamp Joyeux lutin merry little christmas , I stamped the toy store twice side by side because I wanted the bunny not to cover the store window. The MFT bunny is from the Greatest present set that I colored with Copic markers.


Per la seconda card ho usato un design simile, ma ho timbrato solo una volta al centro del mio cartoncino con il timbro di Home for Chrismas merry little christmas. I protagonisti di questa card son l'orsetto ed il pinguini di MFT North pole pals.


Spero vi siano piaciute queste card natalizie veloci , vi ringrazio per esser passate qui 

buon giovedi sera e buon weekend,


For the second card I used a similar design, but stamped only once in the center of my card with the Home for Chrismas merry little christmas stamp. The main characters on this card are the teddy bear and penguin from MFT North pole pals.

I hope you enjoyed these quick Christmas cards , thank you for stopping by here 

happy Thursday and have a good weekend

Quyen


lundi 11 novembre 2024

Simple Christmas Card

Hi Crafty Friends

I’m sharing another Christmas card. This time I used the Night and Day Pressplate to create a stunning background. As it it’s a Pressplate you can use it with ink with your Betterpress, or of course with your Hotfoil system. I chose to use the Night plate, on a light rose cardstock. And added darker rose ink. Really love how it turned out. So much texture and as I find a unique look with the rose pines.


I added the biggest frame from the Nested Tree Frame and also cut the inner part out, so I don’t cover up too much from the background. I added a sentiment and Snowman from the Sketched Snowman. I also wanted to decorate the frame a little bit, without distracting from the background. I added some berries and holy leaves from the Festive Ornament Dies.

It’s a very simple card but I think because of the background it really stands out.


Have a wonderful day.

Adriana


Hallo Bastelfreunde

ich zeige euch eine weitere Weihnachtskarte. Diesmal habe ich die Night and Day Pressplate verwendet, um einen wunderschönen Hintergrund zu gestalten. Da es sich um eine Pressplatte handelt, könnt ihr sie mit eurer

Betterpress oder natürlich auch mit eurem Hotfoil-System verwenden. Ich habe mich für die Night-Platte auf einem hellrosa Papier entschieden. Und dann habe ich dunkle rosa Tinte hinzugefügt. Das Ergebnis ist wirklich toll geworden. So viel Textur und, wie ich finde, ein einzigartiger Look mit den rosa Tannen.


Ich habe den größten Rahmen aus dem Nested Tree Frame hinzugefügt und auch den inneren Teil ausgeschnitten, damit ich nicht zu viel vom Hintergrund verdecke. Ich habe einen Spruch und einen Schneemann aus dem Sketched Snowman hinzugefügt. Ich wollte den Rahmen auch ein wenig verzieren, ohne vom Hintergrund abzulenken. Ich habe einige Beeren und heilige Blätter aus der Stanze Festive Ornament hinzugefügt.

Es ist eine sehr einfache Karte, aber ich denke, dass sie durch den Hintergrund besonders gut zur Geltung kommt.


Einen wunderschönen Tag noch.

Adriana

vendredi 1 novembre 2024

Lindy's with Pressplates? - Yes please!


Hello everyone!


I’m sharing a sweet card set, where I tried a new technique. And I love how it turned out! Lindy’s with Betterpress plates


I started by adding ink on a solid Pressplate – the Label Silhouettes from Spellbinders. Then I added a little bit of Lindy’s Powder and added some water with a wet brush.


You really don’t want to add to much water, because then I press everything out of the plate. Then I run I through with my Betterpress. I love how the ink, water and powder gives this gorgeous background. Because of the water I lost a little bit of the dimension the Betterpress creates. So, I put the plate back in place an run it through again.


I stamped the sweet little Sketched Snowman in black and colored them with Alcohol marker. I cut them out with the coordinating dies, and added an additional die so the snowman stands out more. I also added some stamping around the snowman from the same stamp set.


Hope you give this technique a try. It’s really fun.

Thanks for stopping by.

Adriana


Hallo zusammen!


Ich teile ein süßes Kartenset, bei dem ich etwas Neues ausprobiert habe. Und ich liebe es, wie es geworden ist! Lindy's mit Betterpress-Platten. 


Ich habe zunächst Farbe auf eine feste Pressplatte gegeben - die Label Silhouettes von Spellbinders. Dann habe ich ein wenig Lindy's Powder hinzugefügt und mit einem nassen Pinsel etwas Wasser aufgetragen. Man sollte wirklich nicht zu viel Wasser hinzufügen, denn dann drücke ich alles aus der Platte heraus. Dann lasse ich sie mit meiner Betterpress durchlaufen. Ich liebe es, wie die Farbe, das Wasser und das Pulver diesen wunderschönen Hintergrund ergeben. 


Durch das Wasser habe ich ein wenig von der Dimension verloren, die die Betterpress erzeugt. Also habe ich die Platte wieder an ihren Platz gesetzt und sie noch einmal durchlaufen lassen.


Ich habe die süßen kleinen skizzierten Schneemänner in Schwarz gestempelt und mit dem Alkohol Marker koloriert. Ich habe sie mit den passenden Stanzen ausgestanzt und eine zusätzliche Stanze hinzugefügt, damit der Schneemann besser zur Geltung kommt. Außerdem habe ich den Schneemann mit einem Stempel aus demselben Stempelset umrandet.


Ich hoffe, du probierst diese Technik auch mal aus. Es macht wirklich Spaß.

Danke fürs Vorbeischauen.


Adriana