


Hello everyone!
I’m sharing a card today with gorgeous snowflakes. I took classic Christmas colors as green and red – but used more a blue-green and a coral red – what I think gives it a modern look.
I stared by masking of half of my card base with a tape and did some ink blending over it. Then I turned everything and added green on the lower part. I didn’t like how the colors turned out, so I added some light pink cardstock over it.

Then I used the Delicate Snowflakes Die Set to cut out my snowflakes and assembled them together. I used 3 different shades. Love to add all the details. Then I cut out the same Snowflake on my card base – and then I adhered the snowflake on the inside of my card. So, it shows up on the outside but also on the inside, what I think gives a little twist.
I added a sentiment with gold embossing powder and also some splatter.

Tips for your crafting:
As the snowflake is very delicate, I would take the shadow of the snowflake for my inlay – as it will open easier.
And although it worked with my cardstock added on the card – it’s easier if there is no additional cardstock on the card front.
Have nice day!
Adriana
Hallo zusammen!
Ich zeige euch heute eine Karte mit wunderschönen Schneeflocken. Ich habe klassische Weihnachtsfarben wie Grün und Rot genommen - aber eher ein Blaugrün und ein Korallenrot verwendet - was meiner Meinung nach einen modernen Look ergibt.
Zuerst habe ich die Hälfte meines Kartengrundes mit Klebeband abgeklebt und mit Tinte verblendet. Dann habe ich alles umgedreht und im unteren Bereich Grün hinzugefügt. Da mir die Farben nicht gefielen, habe ich etwas hellrosa Papier darübergelegt.
Dann habe ich mit dem Stanzenset Delicate Snowflakes meine Schneeflocken ausgestanzt und sie zusammengesetzt. Ich habe 3 verschiedene Farbtöne verwendet. Ich liebe es, all die Details hinzuzufügen. Dann habe ich die gleiche Schneeflocke auf meiner Kartenbasis ausgestanzt - und dann habe ich die Schneeflocke auf die Innenseite meiner Karte geklebt. So ist sie nicht nur auf der Außenseite, sondern auch auf der Innenseite zu sehen, was meiner Meinung nach einen kleinen Twist gibt.
Ich habe einen Spruch mit
Goldprägepulver und ein paar Spritzer hinzugefügt.
Tipps für deine Bastelei:
Da die Schneeflocke sehr zart ist, würde ich den Schatten der Schneeflocke für meine Einlage nehmen - dann geht sie leichter auf.
Und auch wenn es mit meinem Papier auf der Karte funktioniert hat - es ist einfacher, wenn kein zusätzlicher Papoer auf der Kartenvorderseite ist.
Schönen Tag noch!
Adriana

Per questa prima card ho usato il timbro di Ha-Pi little fox Joyeux lutin merry little christmas , ho timbrato due volte il negozio di giocattoli uno di fianco all'altro perché volevo che il coniglietto non coprisse la vetrina del negozio. Il coniglietto di MFT viene dal set Greatest present che ho colorato con i Copic markers.
Good evening crafters! How are you all doing? Today I am here to show you 2 more simple cards to make when you are short of time.
For this first card I used the Ha-Pi little fox stamp Joyeux lutin merry little christmas , I stamped the toy store twice side by side because I wanted the bunny not to cover the store window. The MFT bunny is from the Greatest present set that I colored with Copic markers.

Per la seconda card ho usato un design simile, ma ho timbrato solo una volta al centro del mio cartoncino con il timbro di Home for Chrismas merry little christmas. I protagonisti di questa card son l'orsetto ed il pinguini di MFT North pole pals.

Spero vi siano piaciute queste card natalizie veloci , vi ringrazio per esser passate qui
buon giovedi sera e buon weekend,
For the second card I used a similar design, but stamped only once in the center of my card with the Home for Chrismas merry little christmas stamp. The main characters on this card are the teddy bear and penguin from MFT North pole pals.
I hope you enjoyed these quick Christmas cards , thank you for stopping by here
happy Thursday and have a good weekend
Quyen
Hi Crafty Friends
I’m sharing another Christmas card. This time I used the Night and Day Pressplate to create a stunning background. As it it’s a Pressplate you can use it with ink with your Betterpress, or of course with your Hotfoil system. I chose to use the Night plate, on a light rose cardstock. And added darker rose ink. Really love how it turned out. So much texture and as I find a unique look with the rose pines.

It’s a very simple card but I think because of the background it really stands out.
Have a wonderful day.
Adriana
Hallo Bastelfreunde
ich zeige euch eine weitere Weihnachtskarte. Diesmal habe ich die Night and Day Pressplate verwendet, um einen wunderschönen Hintergrund zu gestalten. Da es sich um eine Pressplatte handelt, könnt ihr sie mit eurer
Betterpress oder natürlich auch mit eurem Hotfoil-System verwenden. Ich habe mich für die Night-Platte auf einem hellrosa Papier entschieden. Und dann habe ich dunkle rosa Tinte hinzugefügt. Das Ergebnis ist wirklich toll geworden. So viel Textur und, wie ich finde, ein einzigartiger Look mit den rosa Tannen.

Es ist eine sehr einfache Karte, aber ich denke, dass sie durch den Hintergrund besonders gut zur Geltung kommt.
Einen wunderschönen Tag noch.
Adriana

I’m sharing a sweet card set, where I tried a new technique. And I love how it turned out! Lindy’s with Betterpress plates.
I started by adding ink on a solid Pressplate – the Label Silhouettes from Spellbinders. Then I added a little bit of Lindy’s Powder and added some water with a wet brush.

You really don’t want to add to much water, because then I press everything out of the plate. Then I run I through with my Betterpress. I love how the ink, water and powder gives this gorgeous background. Because of the water I lost a little bit of the dimension the Betterpress creates. So, I put the plate back in place an run it through again.

I stamped the sweet little Sketched Snowman in black and colored them with Alcohol marker. I cut them out with the coordinating dies, and added an additional die so the snowman stands out more. I also added some stamping around the snowman from the same stamp set.
Hope you give this technique a try. It’s really fun.
Thanks for stopping by.
Adriana

Hallo zusammen!
Ich teile ein süßes Kartenset, bei dem ich etwas Neues ausprobiert habe. Und ich liebe es, wie es geworden ist! Lindy's mit Betterpress-Platten.

Ich habe zunächst Farbe auf eine feste Pressplatte gegeben - die Label Silhouettes von Spellbinders. Dann habe ich ein wenig Lindy's Powder hinzugefügt und mit einem nassen Pinsel etwas Wasser aufgetragen. Man sollte wirklich nicht zu viel Wasser hinzufügen, denn dann drücke ich alles aus der Platte heraus. Dann lasse ich sie mit meiner Betterpress durchlaufen. Ich liebe es, wie die Farbe, das Wasser und das Pulver diesen wunderschönen Hintergrund ergeben.

Durch das Wasser habe ich ein wenig von der Dimension verloren, die die Betterpress erzeugt. Also habe ich die Platte wieder an ihren Platz gesetzt und sie noch einmal durchlaufen lassen.
Ich habe die süßen kleinen skizzierten Schneemänner in Schwarz gestempelt und mit dem Alkohol Marker koloriert. Ich habe sie mit den passenden Stanzen ausgestanzt und eine zusätzliche Stanze hinzugefügt, damit der Schneemann besser zur Geltung kommt. Außerdem habe ich den Schneemann mit einem Stempel aus demselben Stempelset umrandet.
Ich hoffe, du probierst diese Technik auch mal aus. Es macht wirklich Spaß.
Danke fürs Vorbeischauen.
Adriana

Buongiorno crafty friends!
Spero di trovarvi bene! Siete curiose di sapere tutti gli step che ho eseguito per creare questa card? :)
Ho cominciato a sfumare queste 6 Solar paste ( Beluga, Royal flush, Cross my heart, Overheated, Golden hour, Crocodile tears ) su un cartoncino nero con un ink blend tool cambiando le spugnette per ogni colore.
Good morning crafty friends!
I hope to find you well! Are you curious about all the steps I performed to create this card? :)
I started blending these 6 Solar pastes ( Beluga, Royal flush, Cross my heart, Overheated, Golden hour, Crocodile tears ) on a black card with an ink blend tool changing the sponges for each color.


Buongiorno a tutti!
spero stiate bene! Di recente ho scoperto questo paper pad di Studio light per creare card di Natale in brevissimo tempo. Ogni pagina del pad serve per creare la base del biglietto con un effetto foilizzato magnifico! Li potete trovare sullo shop in versione argento, oro e oro rosa.


Hello crafty Friends
I’m sharing a card today, which is actually quite simple. But with a little bit of texture and glitter the card really makes a difference.
I stated by putting together the sweet little Trees from the Spellbinders Nested Tree Dies. I used three different shades of green, so they all look different, but still the same. Then I used Studio Light Glitter Paper to add the snow and the star on top of the trees.
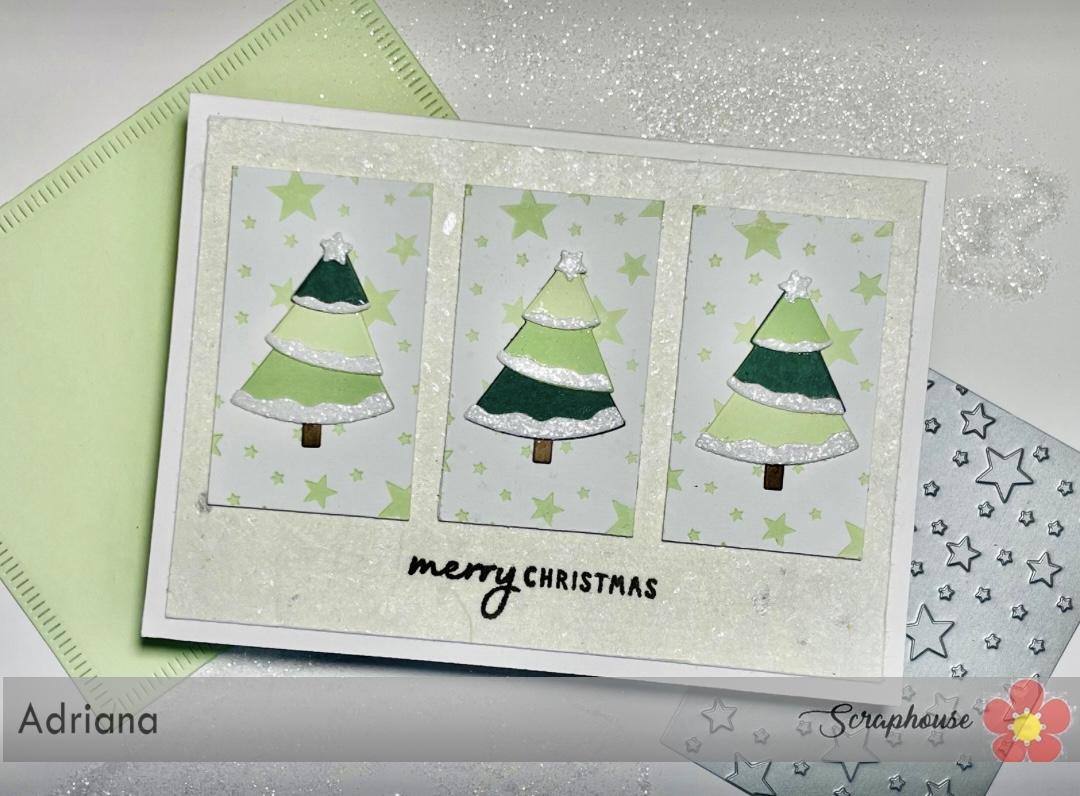
Then I cut three squares as background for the threes. And I added texture with the Holiday Background Panels Press Plate. I used the one with the stars, although it was hard to decide which one, I should take, there all great. I first did only an impression, but there was to less contrast. So, I added a light green color who matches my trees.
Hope you like the card.
Adriana

Hallo Bastelfreunde
Heute zeige ich euch eine Karte, die eigentlich ganz einfach ist. Aber mit ein bisschen Textur und Glitzer macht die Karte wirklich etwas her.
Zunächst habe ich die süßen kleinen Bäume aus den Spellbinders Nested Tree Dies zusammengesetzt. Ich habe drei verschiedene Grüntöne verwendet, damit sie alle unterschiedlich aussehen, aber trotzdem gleich sind. Dann habe ich mit Studio Light Glitter Paper den Schnee und den Stern auf den Bäumen hinzugefügt.
Dann habe ich drei Quadrate als Hintergrund für die Dreiergruppe ausgeschnitten. Und ich habe mit der
Pressplatte Holiday Background Panels Textur hinzugefügt. Ich habe die mit den Sternen verwendet, obwohl es schwer war, mich zu entscheiden, welche ich nehmen sollte, die sind alle toll. Zuerst habe ich nur einen Abdruck gemacht, aber der Kontrast war zu gering. Also habe ich eine hellgrüne Farbe hinzugefügt, die zu meinen Bäumen passt.
Ich hoffe, die Karte gefällt euch.
Adriana
Hello everyone!
Leaves are starting to turn red and yellow around here, so lot of inspiration for my next card.
I used the Autumn Sealed Sprigs to create different leaves. And the I colored them with ink an metallic watercolor. I really like how they turned out. For my background I used a beige cardstock and added lot of brown splatters, so it had some more texture.
I used some gorgeous Twine to tie the leaves together. It gives me that organic feel I love. And then for the sentiment I used the new Essential Tags from Lisa Horton. Such a great set. I really like the style of it.
Stay cozy and warm.
Adriana

Hallo zusammen!
Die Blätter fangen an, sich hier rot und gelb zu färben, also eine Menge Inspiration für meine nächste Karte.
Ich habe die Autumn Sealed Sprigs verwendet, um verschiedene Blätter zu gestalten. Und dann habe ich sie mit Tinte und Metallic-Aquarellfarben koloriert. Mir gefällt das Ergebnis sehr gut. Für den Hintergrund habe ich eine beigefarbenes Papier verwendet und viele braune Spritzer hinzugefügt, damit er etwas mehr Struktur bekommt.
Zum Zusammenbinden der Blätter habe ich wunderschönes Garn verwendet. Das gibt mir dieses natürliche Gefühl, das ich so liebe. Und für den Schriftzug habe ich die neuen Essential Tags von Lisa Horton verwendet. Das ist ein tolles Anhänger Set. Ich mag den Stil der Anhänger sehr.
Hält euch warm.
Adriana

Hi crafty Friends!

I did mine with gold hot foil. I found this looks already soo gorgeous... but I decided to add a color in the background. I colored between the trees with Alcohol markers. On the top I wanted to get darker and to achieve a more solid look, I used Ink and applied it with a blending brush. Finally, I added with splatter, so it looks like its snows. I did my sentiment in gold. And also added a white frame, like this I find I looks a little bit like a picture of a gorgeous winter scene.
Thanks for stopping by, Adriana

Love the shine 😍
Hallo Bastelfreunde!
Ich zeige euch heute eine Karte, die ich mit der Season`s Greeting Evergreens Press Plate erstellt habe. Eigentlich ist es eine Betterpress-Platte, aber wie ihr wisst, kann man sie perfekt zum Folieren verwenden.
Ich habe meine mit goldener Heissolie gemacht. Ich finde, das sieht schon soo toll aus... aber ich habe beschlossen, dem Hintergrund noch etwas Farbe zu geben. Ich habe zwischen den Bäumen mit Alcohol Markern gemalt. Oben wollte ich es dunkler und fester machen, also habe ich Tinte verwendet und sie mit einem Pinsel aufgetragen. Zum Schluss habe ich noch Spritzer hinzugefügt, damit es so aussieht, als würde es schneien. Ich habe mein Sentiment in Gold gemacht. Außerdem habe ich einen weißen Rahmen hinzugefügt, so sieht es ein bisschen aus wie ein Bild einer wunderschönen Winterlandschaft.
Danke fürs Vorbeischauen, Adriana


