samedi 23 mai 2020
Isha - MFT Birthday Wishes Card
Anyhoo, I wanted to create a birthday card for a sweet girl so used this adorable Gnome image and kept it CAS.
I stamped the images, colored using the copic markers and die-cut using the coordinating dies. I then stamped the grass using the Scene Builder stamp, sponged some Tumbled Glass distress ink to the background. Adhere the images to create the scene.
To finish, I added a bit of clear sparkle to the flowers and the apron:)
Hope you have a nice day and stay safe!
mardi 19 mai 2020
Isha - MFT No-line Coloring Smile Card
I love Stacy Yakula illustrations, so fell in love with this new stamp "Always Bring A Smile" too :) This stamp really is so good for coloring, so I did some no-line watercoloring. I used my Faber Castell markers but you can use distress ink, Zig clean color markers, Gansai Tambi watercolors or whatever you like :)
I started by creating the background, so I stamped the clouds from one of the older stamps by MFT "Scene Builder". I used distress ink Antique Linen for all the stamping. I then colored in the images. I then took the sun ray stencil and sponged some mustard seed distress ink using the Picket Fence sponge brush.
Hope you enjoyed this card and if you create something inspired by my card, please write. We would love to see your creations.
Have a nice day! Stay safe!
mercredi 13 mai 2020
Valérie // Tuto carte à tirette avec message caché (slider card with hidden message)
Bonjour,
Comment
allez-vous ?
Hallo,
wie geht es euch?
Aujourd’hui j’ai un tutoriel pour réaliser une carte
interactive à tirette avec un message caché. Ça prend un peu de temps mais ce
n’est pas compliqué, vous verrez.
Heute
habe ich ein Tutorial für euch, um eine interaktive Karte mit einem versteckten
Text zu erstellen. Es braucht ein wenig Zeit, aber es ist nicht kompliziert, ihr
werdet sehen.
Tout d’abord, essayer de visualiser votre carte et
rassemblez votre matériel.
Versucht
zunächst, eure Karte zu visualisieren und stellt das Material bereit.
Créez votre scène et placez les éléments sur votre carte.
J’ai décidé de réaliser une scène préhistorique avec des tampons Lawn Fawn et
je souhaite que mon stégosaure en bas à droite se déplace vers la gauche. Allez
voir sur Scraphouse, il y a des tampons qui sont idéaux pour ce genre de carte.
Erstellt
eure Szene und platziert die Elemente auf eurer Karte. Ich entschied mich für
eine prähistorische Szene mit Lawn Fawn Stempeln und ich möchte, dass mein
Stegosaurus unten von rechts nach links wandert. Geht zu Scraphouse, dort gibt
es Stempel, die sich ideal für diese Art von Karten eignen.
https://scraphouse.ch/fr/lawn-fawn-stamps-paper-pads-dies/2162-la.html (lama)
https://scraphouse.ch/fr/lawn-fawn-stamps-paper-pads-dies/1423-l.html (hiboux)
https://scraphouse.ch/fr/lawn-fawn-stamps-paper-pads-dies/1412-l.html
(ours en traîneau)
J’ai découpé la base de ma carte et la colline avec un die
Lawn Fawn, puis encré le ciel en bleu et l’herbe en vert avec les Distress
Inks.
Ich
schnitt die Basis meiner Karte und den Hügel mit einem Lawn Fawn Die aus, dann färbte
ich den Himmel in Blau und das Gras in Grün mit den Distress Inks ein.
Ensuite, il faut découper la partie qui servira à faire
bouger votre motif. Je n’ai pas de die exprès fait pour ça, j’ai donc tout
simplement utilisé un die étiquette.
Schneidet
als Nächstes den Teil aus, der zum Bewegen des Motivs verwendet werden soll.
Ich habe keinen Die dafür, also habe ich einfach einen Etiketten Die verwendet.
Gardez la partie découpée et tamponnez le sentiment.
Behaltet
den ausgeschnittenen Teil und stempelt den Text drauf.
Pour réaliser le mécanisme à tirette, coller de la mousse 3D
sur 3 côtés.
Um den
Zugmechanismus herzustellen, klebt Ihr an 3 Seiten 3D-Foam Pads auf.
Mesurez ensuite l’espace entre les 2 bandes de mousse 3D
(ici, env. 1,5cm). Soyez assez précis, cela permettra à votre languette de
papier de bouger. Découpez une languette de papier de cette largeur. Attention,
elle doit être plus longue que votre carte, de sorte que vous puissiez la tirer
et faire bouger votre motif pour révéler le sentiment.
Messt
dann den Abstand zwischen den 2 Streifen 3D-Foam Pads (hier ca. 1,5 cm). Seid
ganz genau, damit sich eure Lasche bewegen kann. Schneidet einen Papierstreifen
als Lasche in dieser Breite aus. Achtet darauf, dass dieser länger als die
Karte ist, so dass Ihr ihn herausziehen und euer Motiv bewegen könnt, um den Text
zu zeigen.
Votre mécanisme est quasiment prêt. Encrez la languette pour
la fondre dans le décor (ici en vert).
Das
Mechanismus ist fast fertig. Färbt nun die Lasche ein, um sie an die Umgebung
anzupassen (hier in grün).
Retirez la languette. Il vous reste à coller votre sentiment
sur la base de votre carte.
Entfernt
die Lasche. Jetzt müsst ihr den Text auf die Basis eurer Karte kleben.
Insérez la longue languette et collez votre motif dessus. Terminez
votre carte en plaçant tous les autres éléments.
Fügt die
Lasche ein und klebt euer Motiv darauf. Finalisiert eure Karte, indem ihr alle
anderen Elemente platziert.
Voilà ce que ça donne
Hier die fertige Karte

dimanche 10 mai 2020
Isha - You Make Me Smile
I love these artistic butterflies from MFT Brilliant Butterflies stamp set, so decided to use them for this card.
I started by creating my background, so I used one of the older stamps from MFT but you can use any flower or leaves stamp for this. I embossed them using white embossing powder and sponged some ink to it using the sponging brush. I then added a few black splatters and let them dry.
I stamped the butterfly base using antique linen distress ink and then colored them in a rainbow of colors using various distress inks and a brush. Once these were dry, I stamped the 3rd layer using versafine onyx black ink. I then applied some clear glitter pen.
I fussy cut them using my scissors but there are coordinating dies available.
I then stamped the sentiment from another new stamp set "Always Bring a Smile". Actually, I really love the sentiments and the images too. Embossed it using white embossing powder and die-cut using the fish Tail die. You can cut a simple black stripe too.
Assemble everything together. Hope this card brings you a smile as much as it did to me :)
Stay safe.
jeudi 7 mai 2020
Here's me again
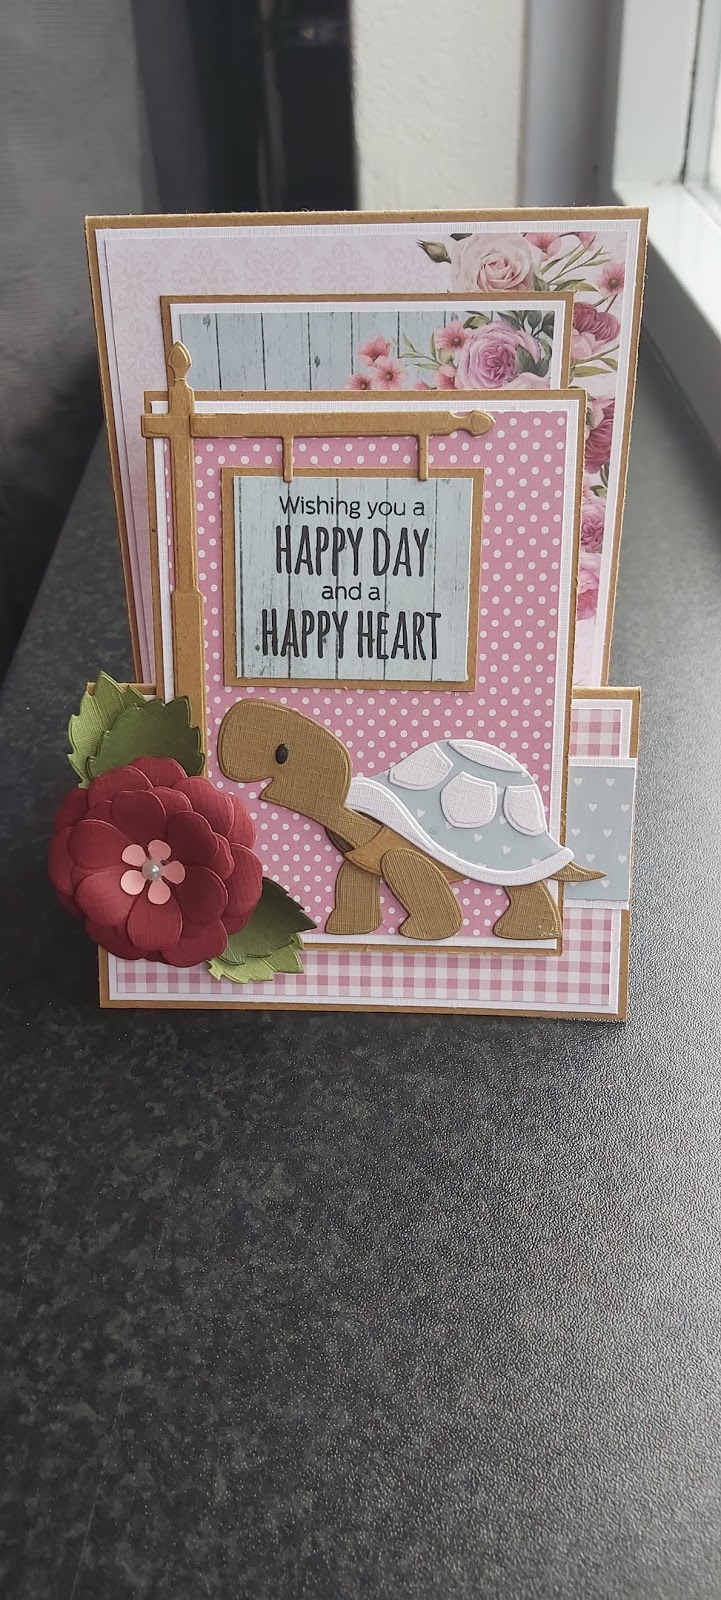
This time with a birthday card. I made this card for my mom. She loves turtles and flowers. So I've used the turtle dies of Marianne Design. And lovely paper of Joy!crafts Noor design - Vintage roses. The base of this card, I made with Kraft and flat with linen cardstock. I hope you'll like this card.
Salute,
https://scraphouse.ch/fr/marianne-design-dies/3583-marianne-design-collectables-alphabet.html?search_query=turtle&results=2
https://scraphouse.ch/fr/joycrafts-noor-design/34-joycrafts-mini-bordure-fleurs-8717706041740.html
https://scraphouse.ch/fr/linen-smooth-cardstock/806-linen-cardstock-white.html?search_query=linen+&results=48
lundi 4 mai 2020
Isha- Smile
I used some of my older dies too to create this fun playful card but there are lots of similar products in the shop so do check them out.
I also added the word smile using the Speech Bubbles dies. I love this sentiment from the new release, which is perfect for today's times.
Hope you enjoyed my creation. There are so many GORGEOUS products in the shop so I will really recommend you go and have a look HERE.
I will be sharing more cards soon :)
jeudi 30 avril 2020
dimanche 26 avril 2020
Isha - Happiness in Little Things Card
Now I stamped the cute mouse and colored it using copic markers. I then stamped the dandelion and added a touch of yellow to it.
To finish, I added a tiny red heart and stamped the sentiment.
I adhered this panel to a light blue cardbase.
vendredi 17 avril 2020
Isha -Lawn Fawn Interactive Birthday Card
This is really a fun and easy card to make. Here is a small video on how it works.
Here is the full card
I started by creating the sky using the cloud stencil and Tumbled Glass distress oxide ink. I then die-cut some of the grassy hills and sponged distress oxide inks in peeled paint, mowed Lawn and citrus Twist.You can use this JoyCrafts Grass Hills Border too.
FUN!!!! right? I really am enjoying these adorable critter images. I have another card for you coming tomorrow.
jeudi 16 avril 2020
Valérie // Tuto carte à tirette magique (color magic slider card)
Hallo zäme!
Pendant que mon chéri bosse en home office, je bricole. J'avais envie depuis longtemps de tester une slider card (carte à tirette, je crois). Je sais qu'il existe des tonnes de vidéos à ce sujet sur YouTube, mais moi j'aime bien les explications avec images à l'appui. Prêts?
Während mein Liebling im Home Office arbeitet, bastle ich. Ich wollte schon lange einmal eine Schieberkarte (color magic slider card) ausprobieren. Ich weiß, dass es auf YouTube tonnenweise Videos darüber gibt, aber ich mag Erklärungen mit Bildern. Bereit?
Tout d'abord, préparez la base de votre carte. La mienne mesure 10,8 x 14 cm.
Bereitet zunächst die Basis eurer Karte vor. Meine misst 10,8 x 14 cm.
Découpez un rectangle au centre du devant de votre carte pour créer la fenêtre.
Schneidet ein Rechteck in der Mitte der Vorderseite eurer Karte aus, um das Fenster zu erstellen.
Stempelt euer Motiv in der Mitte eurer Karte mit der MISTI mit Memento Tuxedo Black Ink. Achtet darauf, alles so zu befestigen, dass sich nichts bewegt.
Découpez un morceau d'acétate un peu plus grand que la fenêtre. Le placer sur la carte et tamponner le motif une nouvelle fois AU MÊME ENDROIT sur la feuille d'acétate, en utilisant de l'encre StazOn.
Schneidet ein Stück Acetat aus, ein wenig grösser als das Fenster. Legt es auf die Karte und stempelt das Motiv mit StazOn-Tinte erneut AN DER GLEICHEN STELLE auf das Acetatblatt.
Mettez la feuille d'acétate de côté.
Leget das Acetatblatt beiseite.
Coloriez votre motif (ici, avec mes Copics).
Koloriert euren Stempel (hier mit Copics).
Une fois cela fait, découpez des bandes de papier de 5mm et collez-les avec de l'adhésif (ici, Sookwang) autour de la base de la carte sur laquelle se trouve votre motif. Répétez l'opération en ajoutant une 2ème couche pour créer un peu de volume.
Schneidet dann 5mm breite Papierstreifen aus und klebt diese mit Klebstoff (hier Sookwang) um die Unterseite der Karte herum, auf der sich euer Motiv befindet. Wiederholt den Vorgang, indem ihr eine 2. Schicht hinzufügt, um etwas Volumen zu erzeugen.
Découpez ensuite un rectangle de papier blanc d'environ 9x14cm et y ajouter une bande de papier de 5mm de largeur en bas.
Schneidet dann ein Rechteck von ca. 9x14 cm aus weissem Papier aus und fügt unten einen 5 mm breiten Papierstreifen hinzu.
Prüft, ob das Rechteck durch die Öffnung passt und ob es sich leicht ziehen und wieder einschieben lässt. Schneidet eine Zuglasche aus, so dass ihr das Rechteck nach oben ziehen könnt.
Posez de l'adhésif sur le tour de l'ouverture de la carte. Posez ensuite l'acétate pour le coller en l'alignant au motif coloré.
Klebt um die Kartenöffnung herum. Legt dann das Acetat so an, dass es mit dem farbigen Muster übereinstimmt.
Terminez la décoration de votre carte, c'est-à-dire le motif colorié sur la base de votre carte.
Posez de l'adhésif sur les 3 côtés (pas en haut), collez et bien presser.
Beendet die Verzierung eurer Karte, d.h. den farbigen Stempel auf der Basis eurer Karte.
Klebt alle 3 Seiten (nicht auf der Oberseite), gut andrücken.
Merci de votre passage et de m'avoir suivi jusqu'au bout (je l'espère) 😉
Danke für euren Besuch und dafür, dass Ihr bis zum Schluss durchgehalten habt (hoffentlich) 😉
A bientôt,
Bis bald,