Buona sera amiche creative!
Vi é piaciuta la nuova release della Lawn fawn? Oggi vi mostro cosa ho fatto con le novità:D
Good evening creative friends!
Did you enjoy the new Lawn fawn release? Today I show you what I did with the new features:D
Buona sera amiche creative!
Vi é piaciuta la nuova release della Lawn fawn? Oggi vi mostro cosa ho fatto con le novità:D
Good evening creative friends!
Did you enjoy the new Lawn fawn release? Today I show you what I did with the new features:D
Buona sera care creative,
stasera vi presento una nuova card! come sapete adoro usare la glimmer hot foil e quindi stavolta ho voluto combinare diverse tecniche!
Good evening dear creatives,
tonight I want to show you a new card! As you know I love to use glimmer hot foil so this time I wanted to combine different techniques!
Ho voluto creare uno sfondo dai bei riflessi del foil Rainbow di Spellbinders insieme al hot foil plate di Lawnfawn Stitched trails . Ho fissato sia il foil al cartoncino bianco e le sagome della hot foil plate al foil con del washitape e passato per la Hot foil machine e poi attraverso alla mia big shot. Dopo di che ho colorato i 4 lati del cartoncino con il distress ink Picked Raspberry.
I wanted to create a background from the beautiful shades of the Rainbow foil from Spellbinders along with the hot foil plate from Lawnfawn Stitched trails . I attached both the foil to white cardstock and the hot foil plate to the foil with washitape and passed through the hot foil machine and then through to my big shot. After that I colored the 4 sides of the cardstock with Picked Raspberry distress ink.
Poi ho usato la fustella Giant Hello Sunshine e l'ho embossata con le polveri della Wow embossing in 3 tappe, il primo terzo della scritta con la polvere Mai tai, il centro con Mojito e per ultimo Strawberry daiquiri.
Then I used the Giant Hello Sunshine die cut and embossed it with Wow embossing powders in 3 stages, the first third of the lettering with Mai tai, the center with Mojito and lastly Strawberry daiquiri.
Buona sera creative!
Spero di trovarvi bene! Stasera voglio parlarvi delle card di compleanno! chi di voi si é ritrovata all'ultimo a dover preparare un biglietto di compleanno, alzi la mano! :D io sono una tra queste! Ho marcato sul calendario le date dei compleanni, ma poi capita sempre non contando le tempistiche di spedizione, di arrivare all'ultimo a preparare la card. Quindi oggi vi voglio proporre una soluzione veloce per fare al volo una card.
Good evening creative!
I hope to find you well! Tonight I want to talk to you about birthday cards! those of you who have found yourselves at the last minute having to prepare a birthday card, raise your hands! :D I am one of them! I have marked on the calendar the dates of birthdays, but then it always happens not counting the timing of shipping, to arrive at the last to prepare the card. So today I want to propose a quick solution to make a card on the fly.
Buongiorno creative!
spero di trovarvi in forma! Mi dispiace che sia passato quasi un mese dal mio ultimo post... mio marito ed io abbiamo passato delle splendide vacanze in Olanda! Se non ci siete ancora mai state, ve lo consiglio vivamente!:D Intanto torniamo alla card che vi voglio mostrare oggi! Sono stata un po' di parte visto che questa estate compirò 40 anni :D
Buongiorno carissime creative!
Come state? Spero tutto bene! Sono in partenza per le vacanze ma prima di andare via, volevo mostrarvi questa card! Onestamente le fustelle a forma di quadrifoglio avevano catturato la mia attenzione quando erano state presentate lo scorso anno da Lawnfawn ma non avevo fatto in tempo ad acquistarle. Quindi appena ho visto questa fustella di Marianne design Lucly clovers, l'ho presa subito! Mi piace molto poter avere le due misure di quadrifoglio, voi cosa ne pensate?
Ho fustellato diverse volte i quadrifogli usando un cartoncino verde dal Studio light essentials pad Lemonade ed ho un po' scurito le estremità delle foglie con in Distress ink Lucky clover e poi schizzato dell'acquarello dorato da un set di Kuretake. In seguito con l'alfabeto Henry's ABC della Lawnfawn ho ritagliato la scritta Lucky prima con un cartoncino glitterato e poi con un cartoncino di Tonic Studios Iridiscent inca gold, mentre la scritta "You are my" e "Charm" l'ho ottenuta stampandola dalla macchinetta MakeId. Una volta pronti tutti i miei elementi, ho ritagliato un rettangolo di vellum dorato di Tonic Studios (pearled gold) che ho attaccato a sua volta su un cartoncino bianco, per poter dare un po' di rigidità alla card. Infine ho incollato una cornicetta verde ricavata dalla fustella Stitched rectangle frame sempre della Lawnfawn ed aggiunto tutti gli elementi decorativi preparati in precedenza.
Spero vi piaccia la mia card e vi auguro uno splendido weekend!
un abbraccio
I die-cut the shamrocks several times using a green cardstock from the Studio light essentials pad Lemonade and somewhat darkened the ends of the leaves with in Distress ink Lucky clover and then splattered some gold watercolor from a set of Kuretake. Next with Henry's ABC alphabet from Lawnfawn I cut out the Lucky lettering first with glitter cardstock and then with cardstock from Tonic Studios Iridiscent inca gold, while the words "You are my" and "Charm" I got by printing them from the MakeId machine. Once all my elements were ready, I cut out a rectangle of Tonic Studios gold vellum (pearled gold), which I attached to a white cardstock , in order to give the card some rigidity. Finally, I glued a green frame made from the Stitched rectangle frame die also from Lawnfawn and added all the decorative elements prepared earlier.
I hope you enjoy my card and have a wonderful weekend!
a hug
Quyen
Buona sera care creative,
avete visto che bella la nuova collezione di Florileges design? I due nuovi paper pads sono a tema nascita e le ho adattate al nostro gattino Mac che abbiamo adottato dalla Sicilia più di un anno fa e ci da tanto amore.
Dato che il nostro micio é un maschietto ho optato per il pad maschile A petits pas boy ed un foglio Uni duo vert sage.
Ho tagliato due rettangoli di carta vegetale da 1 mm della misura di 10 cm x 14 cm e le ho rivestite con una carta del pad. Ho usato un anello triplo per rilegare l'album e per fare i buchi ho usato la Crop-a-dile.
Ho decorato la copertina con la fustella orsetto Outils de découpe cadre ours e ritagliato diversi elementi decorativi dalle carte del pad. Anche le pagine dell'album sono state decorate con ritagli a mano, mezze perle dorate e filo dorato. Alcune pagine, prima di incollare le foto, ho usato 2 plance di timbri per gli sfondi della Sokai So' celebrate Fond 1 e Fond 2.
Spero vi sia d'ispirazione, buona creativà a tutte
Good evening dear creatives,
have you seen what a beautiful new collection from Florileges design? The two new paper pads are birth themed and I adapted them to our kitten Mac who we adopted from Sicily over a year ago and gives us so much love.
Since our kitty is a boy I opted for the male pad A petits pas boy and a Uni duo vert sage sheet.
I cut two 1 mm vegetable paper rectangles measuring 10 cm x 14 cm and lined them with a paper from the pad. I used a triple ring to bind the album and used Crop-a-dile to make the holes.
I decorated the cover with the Outils de découpe cadre ours bear die and cut out several decorative elements from the pad papers. The album pages were also decorated with hand cut-outs, gold half-pearls and gold thread. Some pages, before pasting the photos, I used 2 backgrounds stamp sets from the Sokai So' celebrated Fond 1 and Fond 2.
I hope you are inspired, good creativity to all
Quyen
Next I stamped Elegant Diamonds clear stamps and embossed with a black powder and the sentiment "from me to you" in the center of the card. To give the card stand out more I shaded the corners with Distress Oxide Victorian Velvet.
Before gluing the elements to the card, I positioned them until I was satisfied with the result. The leaves I glued on with glue, while the flowers to give some dimension, I used thick double-sided tape and added Pinfreshstudio drops to embellish.

.jpeg)
Hello Everybody 😊
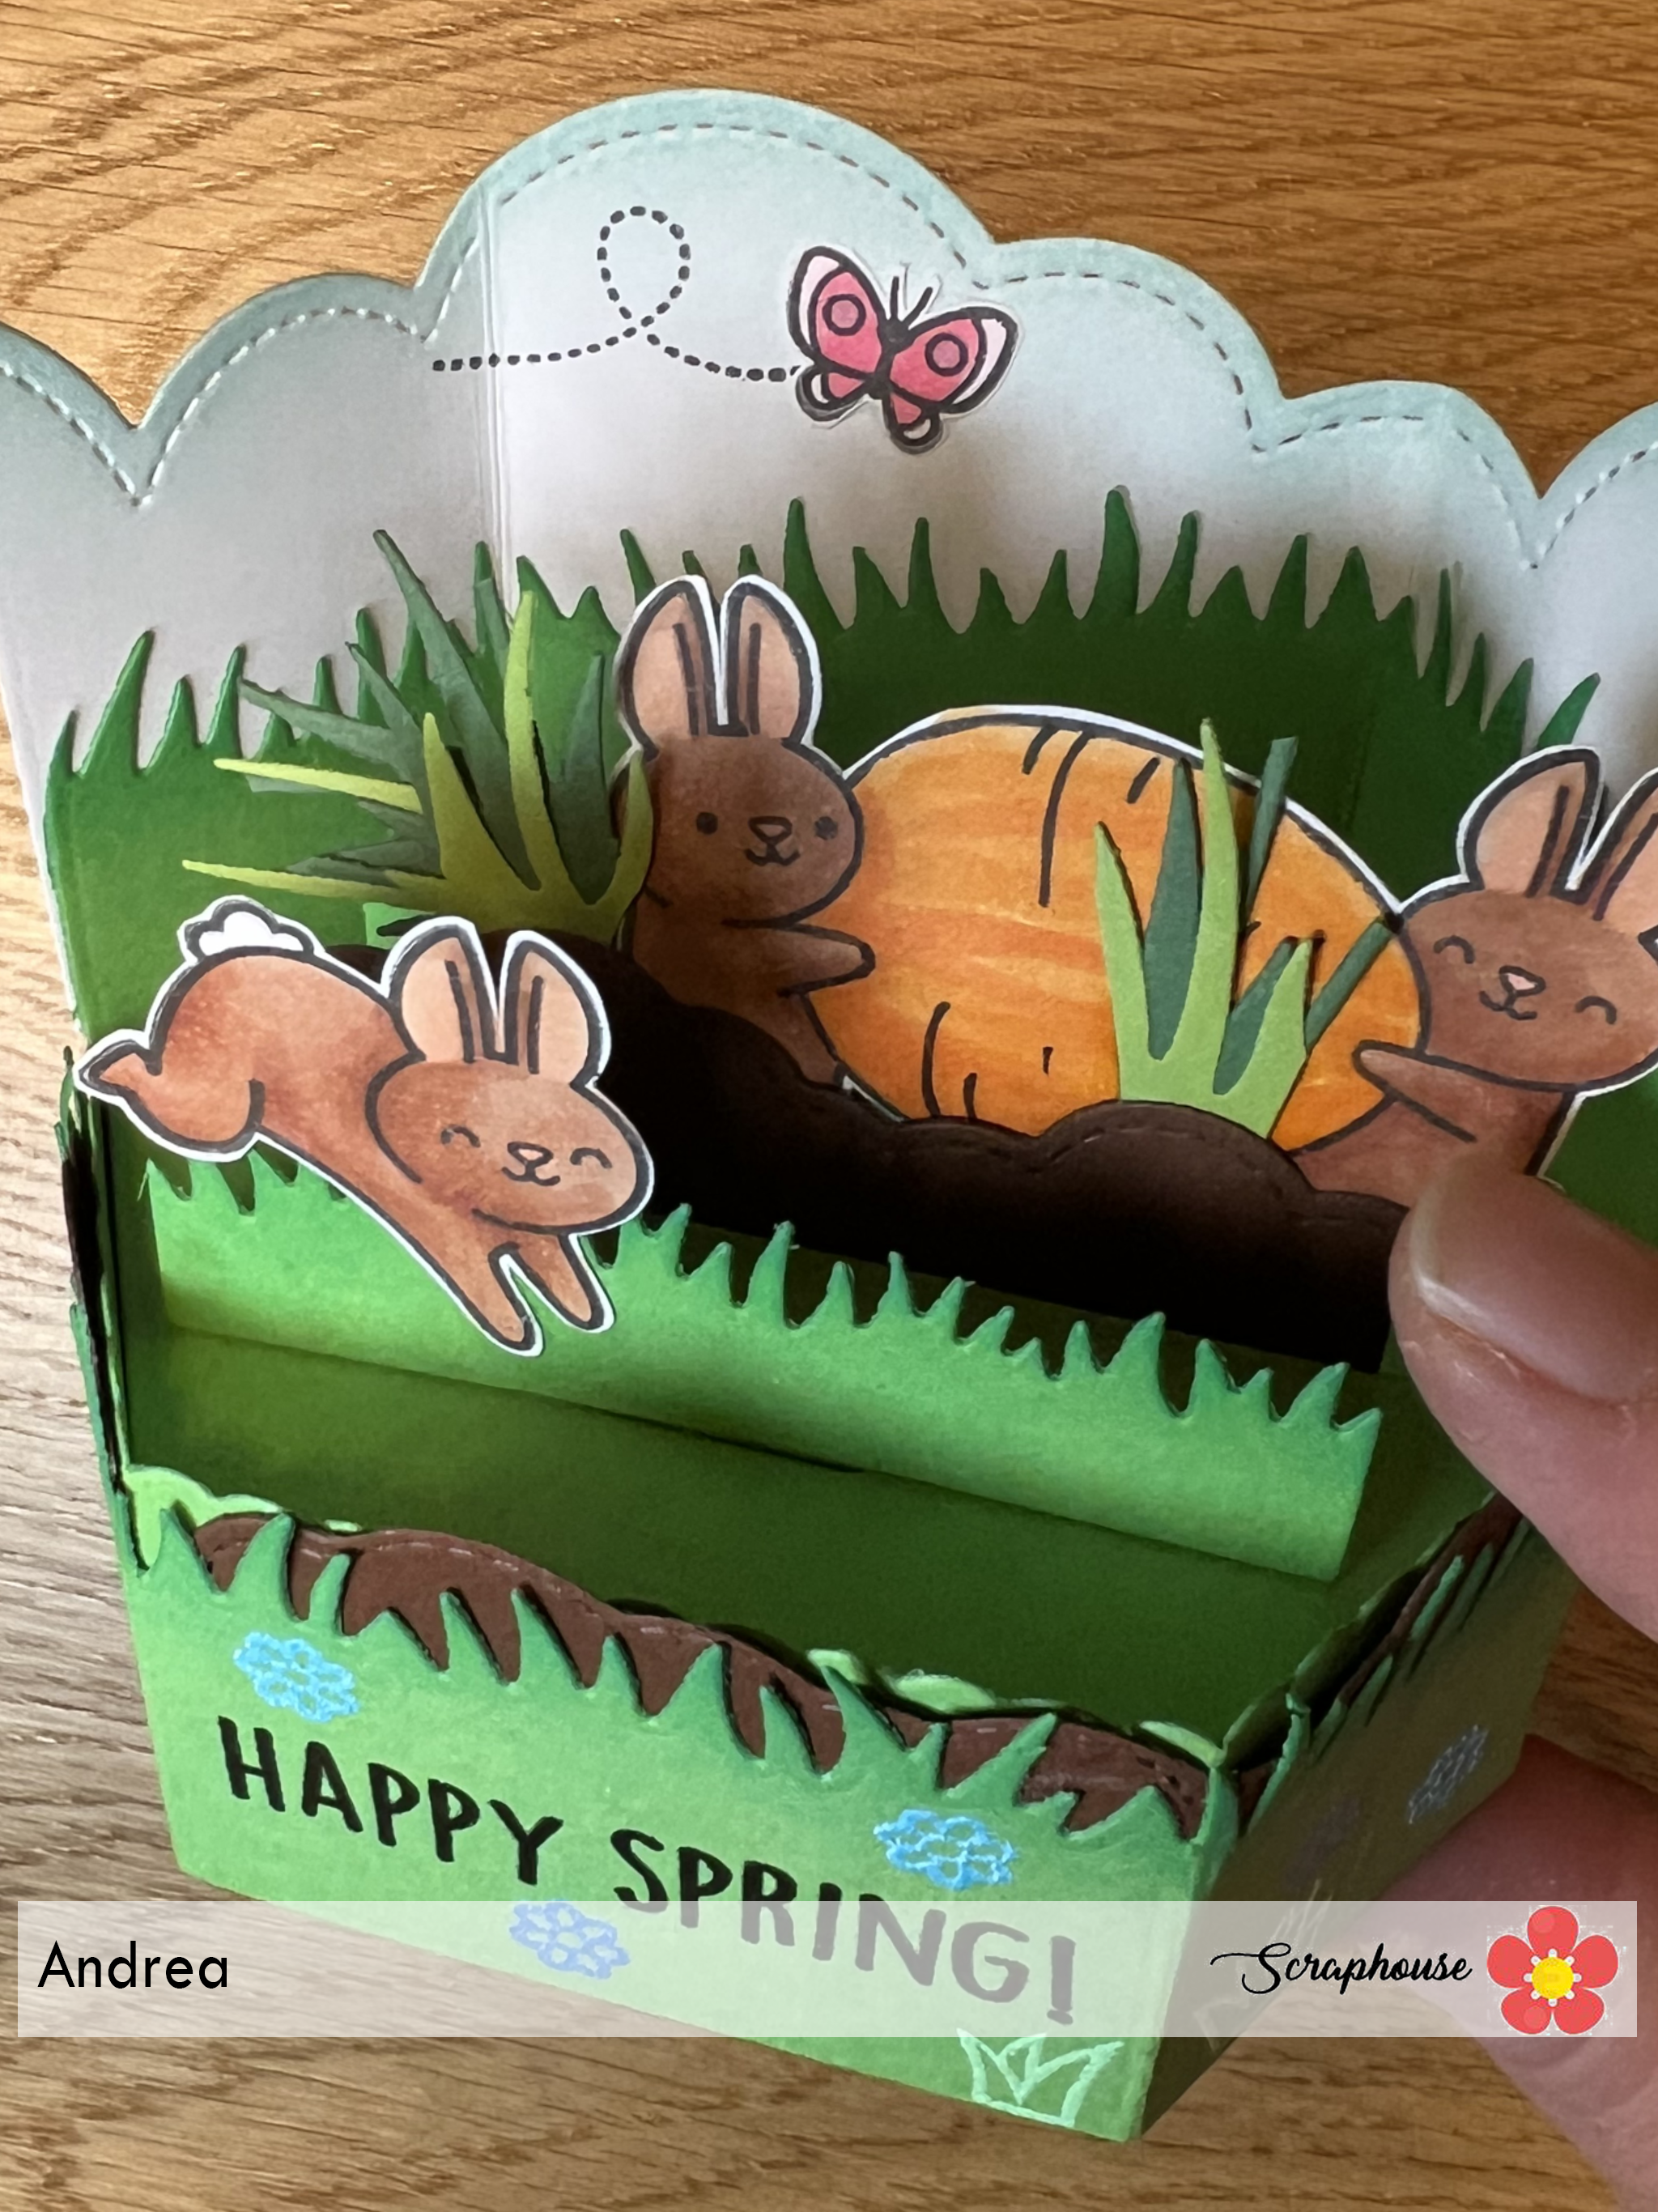
Here is a card where I turned the "Eggstra Ordinary Easter" Bunnies carrying an egg into spring bunnies with a huge carrot.😃
Huhu mitenand 😊
Do e Charte woni d'Osterhäsli vom Set "Eggstra Ordinary Easter" wo es Osterei träged i Häsli miteme grosse Rüebli verwandlet han. 😃
I used the platform pop-up die, the cloud wrap around where I cut the edges with a grassy border, the cloud inserts for the soil, the grassy border inserts and the background pop up add on I also cut down with the cloudy border.
Do defür hani d Platform Pop-up Stanze bruucht, wie au d'cloud wrap around Stanze woni aber no mitere Gras Stanze bearbeitet han, dänn hani die Cloud inserts bruucht für d Erde und die normale grassy inserts. Als Hintergrund hani es pop up add on no mit ere cloudy border Stanze in Form brocht.
Then I used some different embossing powders for the „Happy Spring!“ and the flowers on the wrap around.
Dänn hani verschiedeni Embossing Puder usprobiert für s "Happy Spring!" und d Blüemli ufem Wrap Around.
I am wishing you a good start into the new week!
Andrea
Ich wünsch eu ganz en guete Wuchestart!
Andrea
Buongiorno carissime!
come state? son passate un paio di settimane dal mio ultimo post con i prodotti di Spellbinders... ammetto che sono rimasta un po' bloccata perchè ammirando tutte le cards del loro Dt e trovandole perfette, avevo paura di replicare i loro progetti. Oggi sono finalmente pronta a mostrarvi ciò che ho creato. Della collezione mi aveva subito colpito il 4 petal flower 3D embossing folder.
Good morning dears!
how are you? it's been a couple of weeks since my last post with Spellbinders products... I admit I was a bit stuck because admiring all their Dt cards and finding them perfect, I was afraid to replicate their projects. Today I am finally ready to show you what I have created. Of the collection I was immediately impressed with the 4 petal flower 3D embossing folder.