lundi 30 octobre 2023

My Favourite Person Card with Isha Gupta

Hello everyone! Isha here sharing a fun watercolor clean and simple card on the new Betterpress by Spellbinders. Now this system comes with everything you need to create the card. 

I started by using  the black ink that comes with the box. This system is easy to use and gives a beautiful letterpress look, which is difficult to share in the photos.

I did everything as per the instructions to get the impression. You can use any of your favorite die or simply look for something in the SHOP.

I used  watercolors to color in the image and a soft wash in the background.

To finish, I adhered this panel to a dark red cardbase. I also made a REEL for this card,  I will add it to the Scraphouse.ch instagram.

Have a nice day and thanks for dropping by!


mercredi 25 octobre 2023

Special Birthday!

 Buongiorno carissime!
Oggi è un giorno speciale perché festeggiamo il compleanno della nostra Marjolein! Tantissimi auguri!!!! Per questo evento speciale ho tirato fuori la mia amata glimmer machine. Penso che sia perfetta per creare card per eventi speciali.


Good morning dear ones!
Today is a special day because we celebrate our Marjolein's birthday! Best wishes!!!! For this special event I brought out my beloved glimmer machine. I think it is perfect for making cards for special events.


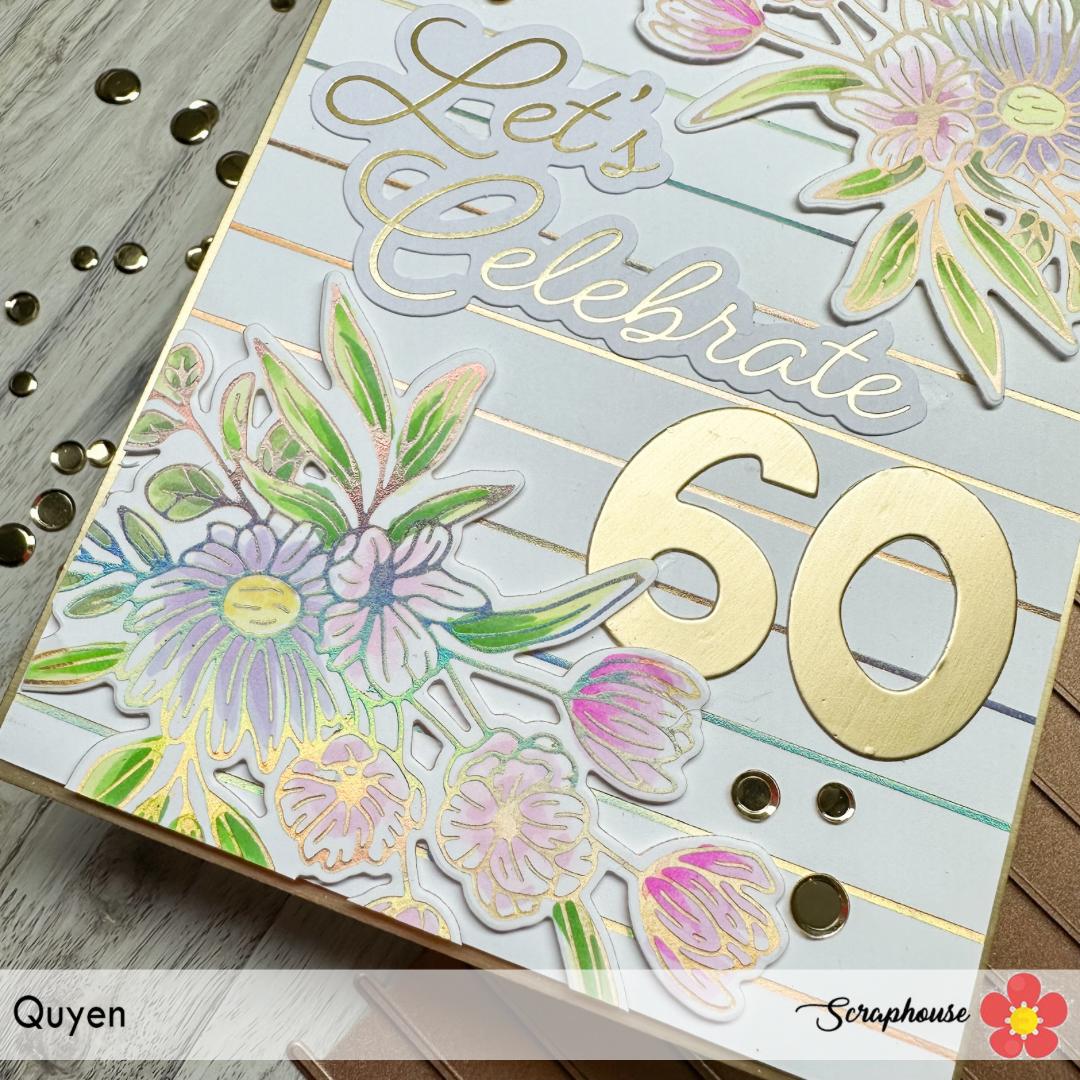
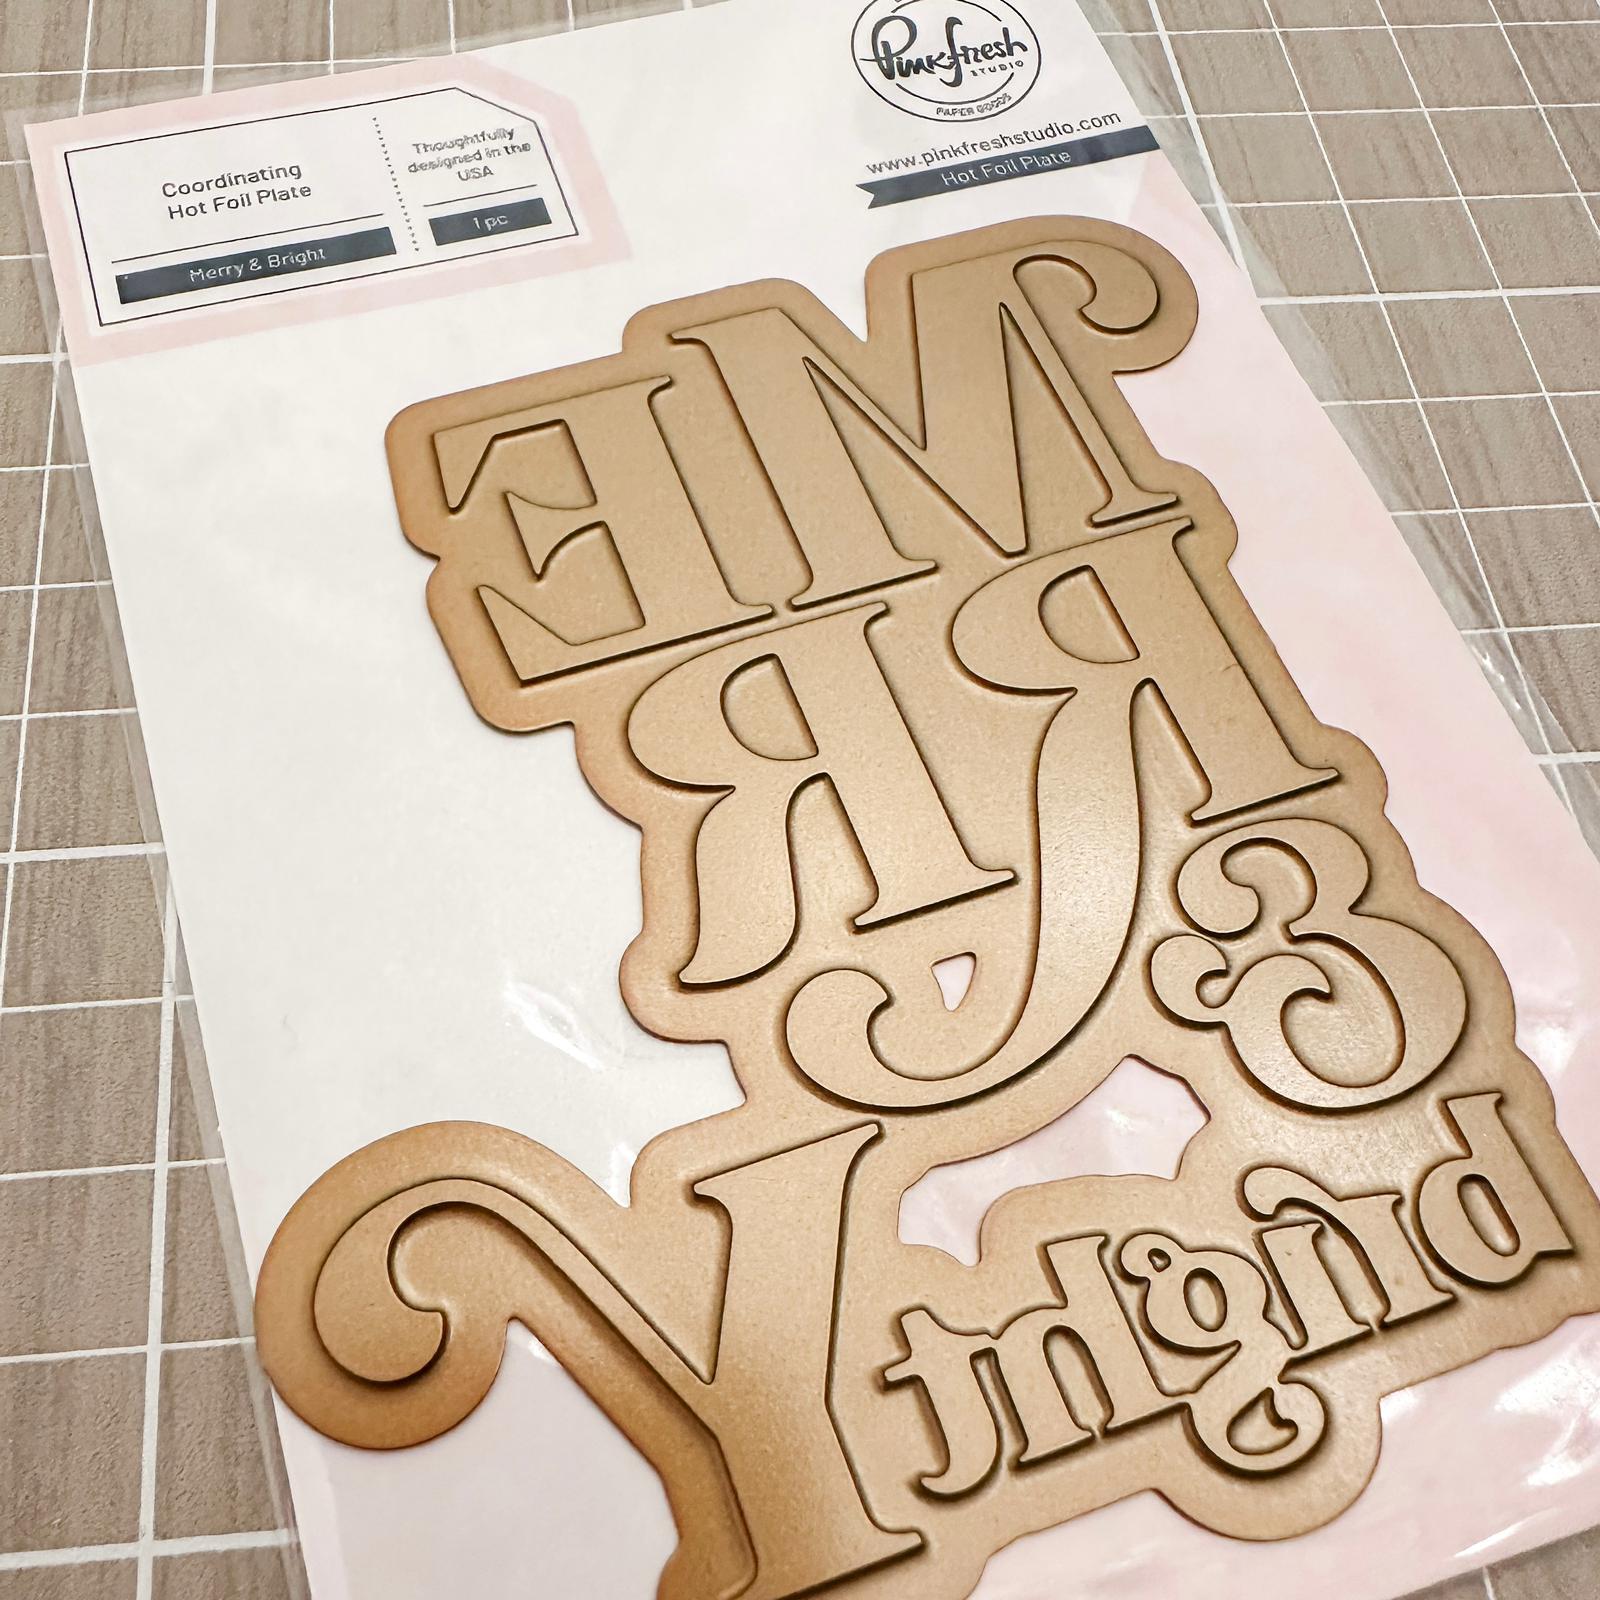
Ho cominciato a creare lo sfondo usando la plate Skinny stripe di Spellbinders e la plate Glimmer Bouquet con un foil oro satinato su un cartoncino bianco. I fiori dopo averli fustellati, li ho colorati con i copic. Una volta assemblato tutti i miei elementi al cartoncino, ho aggiunto un die cut sentiment di Pinkfresh studio ed i Gold Smooth sequin e fustellato il numero con una fustella di Aluacid.
Cosa ne pensate del risultato? spero vi piaccia!
Felice giornata! 

I began creating the background using Spellbinders' Skinny stripe plate and Glimmer Bouquet plate with a satin gold foil on white cardstock. After die-cutting the flowers, I colored them with Copic markers. Once I assembled all my elements to the cardstock, I added a die cut sentiment from Pinkfresh studio and the Gold Smooth sequins and die cut the number with a die cut from Aluacid.
What do you think of the result? hope you like it!
Happy day 

Quyen


jeudi 12 octobre 2023

Merry Christmas


Buongiorno creative! 
eccomi dopo le vacanze al mare a condividere questa nuova card dal tema natalizio. 
Trovo che questo piccolo set Pawsitive Christmas della Lawfawn sia davvero carino e facile da usare per creare card veloci. Ho colorato questo bassotto e gattino nelle calze di natale con degli alcool markers e ritagliato a mano.
In seguito ho embossato su un cartoncino la polvere verde della Wow embossing Verdant e poi fustellato il sentiment Merry Christmas border della Lawnfawn  ed i rametti del set Build-aWreath etched dies di Spellbinders. 
Infine per lo sfondo ho usato la glimmer machine con la hot foil Monoline stars.
Spero vi piaccia,
buona giornata

Good morning crafters! 
Here I am after the beach vacation to share this new card with a Christmas theme. 
I find this little Pawsitive Christmas set from Lawfawn really cute and easy to use for creating quick cards. I colored this dachshund and kitten into Christmas stockings with alcohol markers and cut out by hand.
Next I embossed on cardstock the green powder from Wow embossing Verdant and then die cut the Merry Christmas border sentiment from Lawnfawn and the sprigs from the Build-aWreath set etched dies from Spellbinders. 
Finally for the background I used the glimmer machine with hot foil Monoline stars.
I hope you will like it,
have a nice day

Quyen


lundi 2 octobre 2023

Congratulations card by Isha Gupta

Hello everyone! Isha here sharing a pastel with subtle glimmer clean and simple card featuring the new Betterpress by Spellbinders. Now this system comes with everything you need to create the card. I decided to use a gold ink instead of the black ink that comes with the box. This system is easy to use and gives a beautiful letterpress look, which is difficult to share in the photos.


I did everything as per the instructions to get the impression. I then die-cut it with a scalloped edge die. You can use any of your favorite die or simply look for something in the SHOP.

I used kitsch flamingo distress oxide ink to add some color to the two corners, stamp the sentiment and flicked some gold splatters to the panel.


To finish, I adhered this panel to a white cardbase. I also made a REEL for this card, however, I only could capture some part of the process. I will add it to the Scraphouse.ch instagram.

Have a nice day and thanks for dropping by!


lundi 18 septembre 2023

Today is all a-bat you

Hello!

Valérie par ici! J'espère que vous allez bien!

Je ne suis pas fan de Halloween et je ne le fête pas, mais quand j'ai vu ces petites chauve-souris de Lawn Fawn, je n'ai pas su résister! Il me les fallait! Allez voir en boutique toutes les nouveautés qui sont arrivées!


Dépêchez-vous, il ne reste que quelques pièces!

Je me suis amusée avec les encres Distress pour réaliser le fond de ma carte et j'ai ajouté quelques taches de peinture. Ensuite j'ai tamponné, colorié avec mes Copics et découpé mes images. J'espère que vous serez inspiré par ma carte!

Valérie

mardi 12 septembre 2023

Ta-Da! Diorama!


Buon giorno care creative! 
Eccomi qui con un nuovo post! Son felice di aver potuto giocare con questa nuova fustella della Lawn fawn Ta-Da!Diorama! Ho voluto creare un caminetto dove Babbo Natale scende a lasciare i regali.
Ho usato un foglio dal pad Autumn spice di StudioLight e con lo Brick Stencil della Lawn Fawn e il distress inkpad Walnut stein ho creato l'effetto delle mattonelle di un camino. Per l'apertura del camino ho ritagliato 2 rettangoli dalla carta Let it shine Snowflakes Polar.
I soggetti che ho colorato vengono dai 2 set Ho-Ho-Holidays e Simply Celebrate Winter che ho colorato con i Copic. Mentre sopra il camino ho usato la fustella Christmas Garland.
Spero vi piaccia!
Felice giornata 


Good morning dear creative ones! 
Here I am with a new post! I am happy that I was able to play with this new die cut from Lawn fawn Ta-Da!Diorama! I wanted to create a fireplace where Santa Claus comes down to leave presents.
I used a sheet from StudioLight's Autumn spice pad and with Lawn Fawn's Brick Stencil and the Walnut stein distress inkpad, I created the effect of tiles in a fireplace. For the chimney opening I cut out 2 rectangles from the Let it shine Snowflakes Polar paper.
The subjects I colored came from the 2 sets Ho-Ho-Holidays and Simply Celebrate Winter that I colored with Copics. While above the fireplace I used the Christmas Garland die cut.
I hope you all like it!
Happy day 

Quyen


Ecco qui il video della Lawn fawn su come costruire il Ta-Da! Diorama!

Here is the Lawn fawn video on how to build the Ta-Da! Diorama!


jeudi 24 août 2023

Lawfawn's winter 2023 release

 Buona sera creative!

siete felici che oggi sia uscita la nuova release della Lawnfawn? Per l'occasione ho creato questa card usando la fustella Spooky forest Backdrop ed un cartoncino di carta d'acquarello ed ho colorato gli alberi con il distress ink vintage photo, cercando di lasciare un po' di bianco sui rami per creare l'effetto neve. Inoltre con la fustella Slimline stitched hillside borders ho creato delle collinette di neve dietro allo scenario. Per lo sfondo ho sfumato i distress ink mermaid lagoon, chipped sapphire e black soot e usato lo Snow Flurries Background Stencil con la pasta stencil paste white. Per incorniciare la card ho usato un cartoncino nero e la fustella Stitched Rectangle Frames.

Good evening creative!

Are you happy that the new Lawnfawn release is out today? For the occasion, I created this card using the Spooky forest Backdrop die and a watercolor paper cardstock and colored the trees with Distress Ink vintage photo, trying to leave some white on the branches to create the snow effect. Also with the Slimline die cut stitched hillside borders I created snow hillocks behind the scenery. For the background I blended the distress inks mermaid lagoon, chipped sapphire and black soot and used the Snow Flurries Background Stencil with stencil paste white. To frame the card I used black cardstock and the Stitched Rectangle Frames die cut.


Passiamo alla colorazione con i Copic, per questa scena ho voluto che i protagonisti fossero i due topini che si baciano sotto al vischio(Christmas before and afters) mentre l'altro trio di topolini son nascosti a  spiarli (Hay there hayrides mice add on).

Per completare la card ho aggiunto il sentiment let it snow dalla foil plate  Winter Big Scripty Words ed il sentiment "meet me under the mistletoe" incluso nella plancia Christmas before 'n afters.

Spero che vi piaccia e vi auguro di creare tante nelle card con queste novità!

Buona serata !


Let's move on to coloring with Copics, for this scene I wanted the main characters to be the two mice kissing under the mistletoe(Christmas before and afters) while the other trio of mice are hiding spying on them(Hay there hayrides mice add on).

To complete the card I added the let it snow sentiment from the Winter Big Scripty Words foil plate and the "meet me under the mistletoe" sentiment included in the Christmas before 'n afters stamp set.

I hope you enjoy it and wish you many in the cards with these new release!


Good evening !

Quyen


mercredi 23 août 2023

Christmas foiling

 Buongiorno creative!

Con queste giornate caldissime, il Natale sembra un pensiero lontano! Oggi mi son divertita a giocare con la nuova hot foil plate di Spellbinders Holly Background. Mi piace molto come un bello sfondo si possa creare differenti card in maniera veloce. Parto mostrandovi il risultato finale per poi spiegarvi come le ho realizzate.

Good morning creative!

With these hot days, Christmas seems like a distant thought! Today I had fun playing with the new hot foil plate from Spellbinders Holly Background. I really like how a beautiful background can be created different cards quickly. I'll start by showing you the end result and then explain how I made them.


Ho cominciato ad usare la Holly background hot foil plate con diversi colori di foil su cartoncini di colori differenti. Dove ho foilizzato su carta bianca, ho colorato l'agrifoglio con i Copic, mentre su cartoncino colorato, in questo caso nero, l'ho lasciato "nature".

I started using the Holly background hot foil plate with different colors of foil on different colored cardstock. Where I foiled on white paper, I colored the holly with Copics, while on colored cardstock, in this case black, I left it "nature."


In seguito ho voluto usare anche la solid plate per poter usare i foil avanzati dalle precedenti sfondi , ottenendo un risultato differente.

In seguito ho voluto usare anche la solid plate per poter usare i foil avanzati dalle precedenti sfondi , ottenendo un risultato differente.


Infine ho abbellito questi sfondi con delle mattature rosse e/o verdi e aggiungendo dei sentimenti delle plate di Lawn fawn e di Pinkfresh studio.

Finally, I embellished these backgrounds with red and/or green matting and adding sentiments from Lawn fawn plates and Pinkfresh studio.


Cosa ne pensate? Spero vi siano piaciute queste cards!
Ci sentiamo al prossimo post!
Gioiosa giornata a tutte

What do you think? I hope you enjoyed these cards!
Talk to you in the next post!
Joyful day to all

Quyen


mercredi 16 août 2023

First time playing with Lunar and Solar pastes.

 Buona sera carissime,

spero di trovarvi in buona salute.
Oggi con molta eccitazione vi mostra questa card usando le paste Lunar e Solar di Simon Hurley. Dal momento che erano uscite in commercio, mi avevano molto attirato, perché la loro stesura sembrava fantastica! Finalmente le ho potute testare anch'io e confermo che la loro texture é meravigliosa! Le si possono applicare con una spatolina, ma anche con le dita oppure con un blending tool, a dipendenza dell'effetto che volete ottenere!

Good evening dear ones,

I hope to find you in good health.
Today with much excitement I show you this card using Simon Hurley's Lunar and Solar pastes. Since they had come out commercially, I had been very attracted to them because their layering looked great! I finally got to test them out myself and confirm that their texture is wonderful! You can apply them with a spatula, but also with your fingers or with a blending tool, depending on the effect you want to achieve!


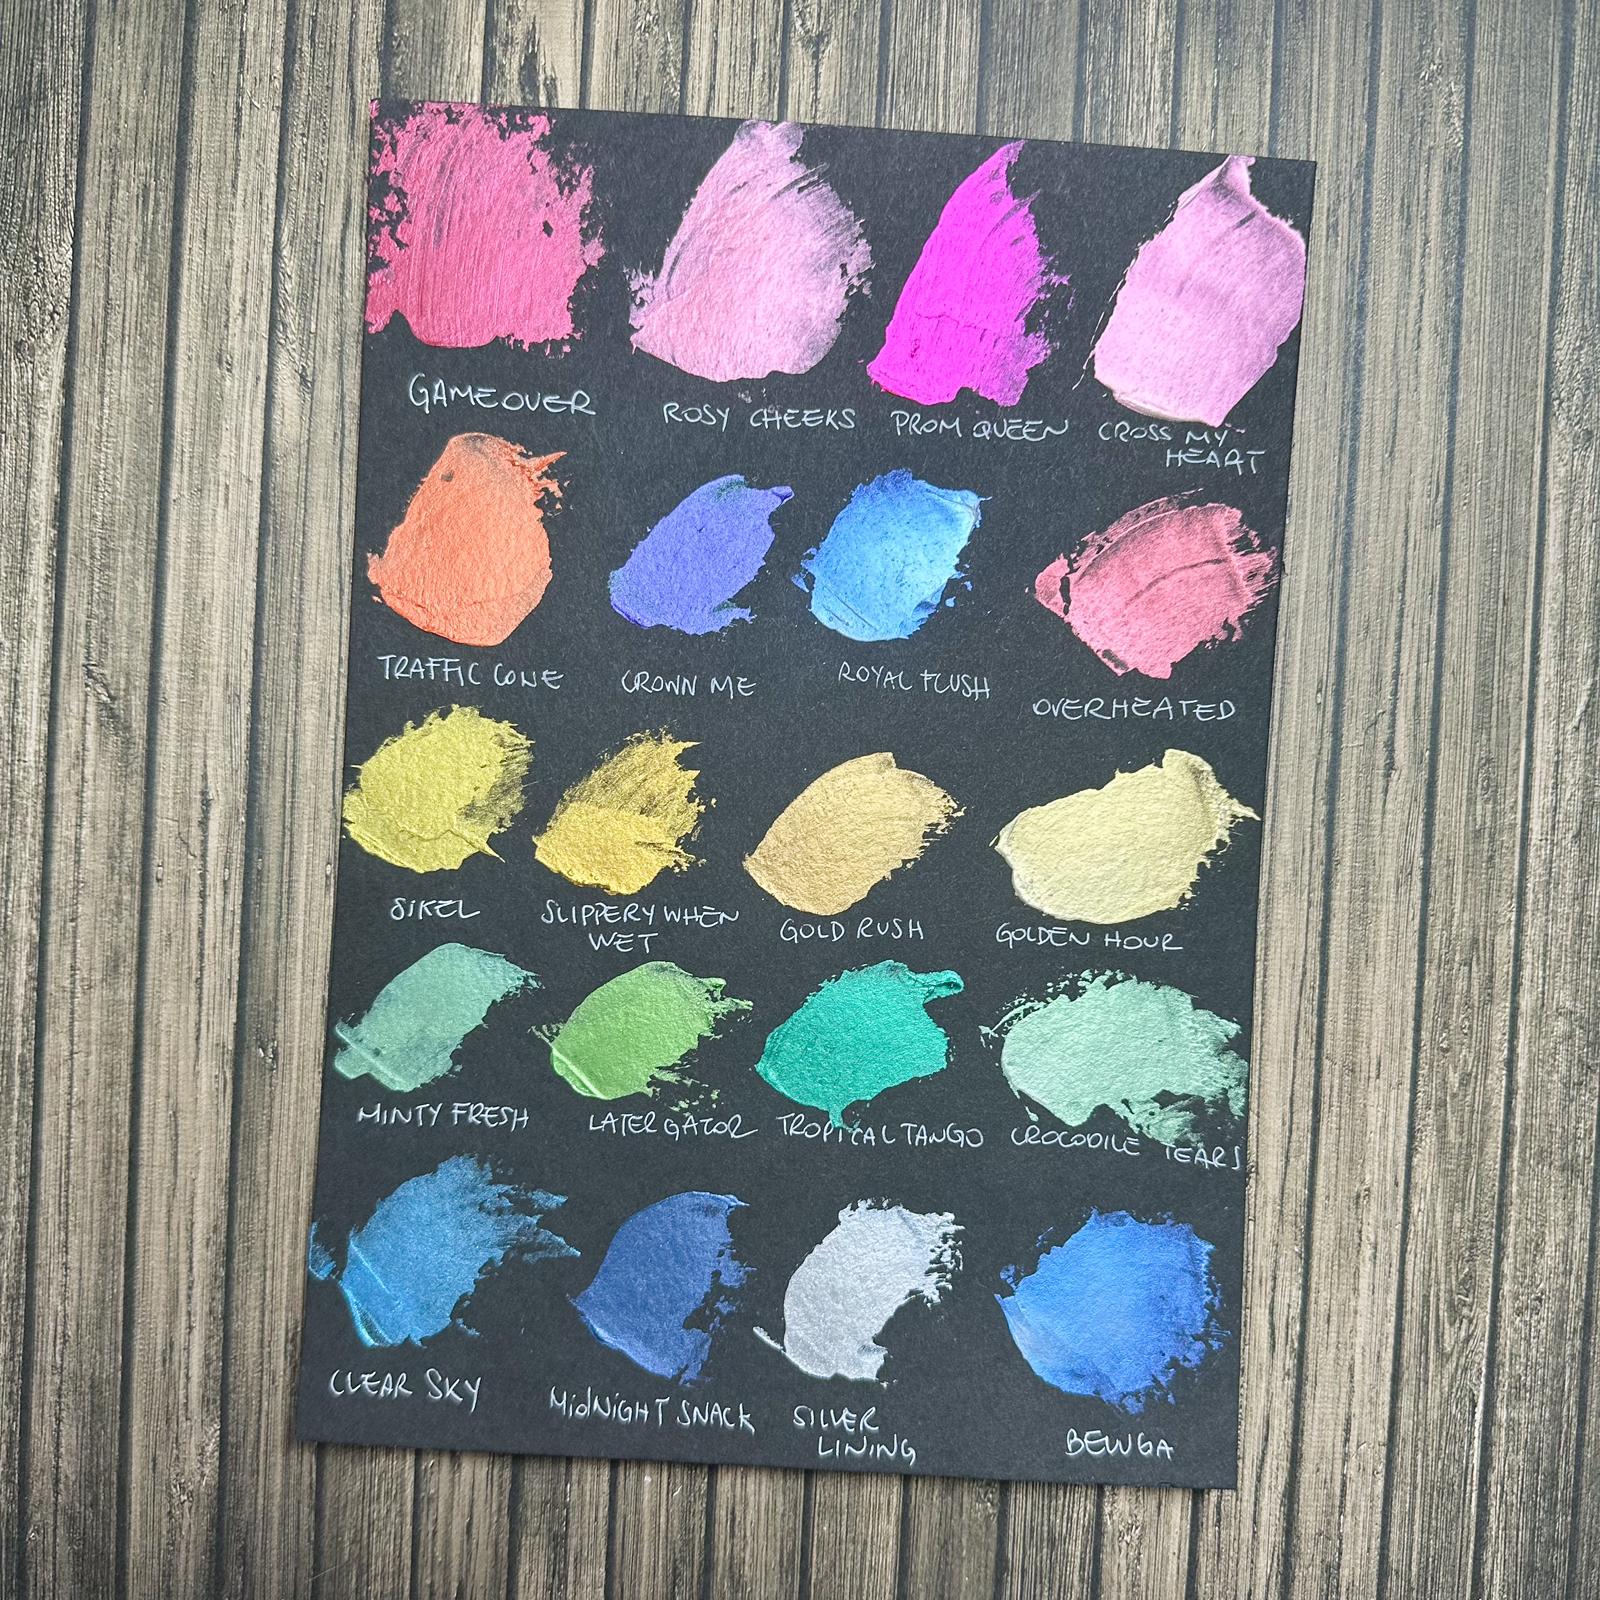
Qui le ho applicate sopra ad un cartoncino nero embossato con l'embossing 3D di Spellbinders Holly and Foliage. Le paste le ho applicate con le dita,  per le foglie ho usato: Minty fresh, Later gator, Tropical tango, per le bacche ho usato Game over e per gli spazi non in rilievo ho usato l'oro, Slippery when wet. Colorazione semplice e veloce. Una volta che le paste si son asciugate, ho ritagliato un rettangolo della misura che volevo per lo sfondo della card.
Per il sentiment ho usato la glimmer machine, foilizzando d'oro un sentiment del set Winter Big Scripty Words hot foil plates della Lawnfawn .
Spero vi piaccia il risultato!
Buonanotte 


Here I applied them over a black embossed cardstock with Spellbinders Holly and Foliage 3D embossing. I applied the pastes with my fingers, for the leaves I used Minty fresh, Later gator, Tropical tango, for the berries I used Game over and for the unembossed spaces I used gold, Slippery when wet. Quick and easy coloring. Once the pastes dried, I cut out a rectangle the size I wanted for the background of the card.
For the sentiment I used the glimmer machine, gold foiling a sentiment from the Winter Big Scripty Words hot foil plates set from Lawnfawn .

I hope you like the result!

Good night
Quyen 


mercredi 2 août 2023

3D Embossing folder

 Salve carissime,

oggi vi mostro una card semplice semplice ma di grande effetto!
materiale necessario:
- embossing folder 3d ( io ho usato Beautiful butterflies 3d embossing folder di Spellbinders)
-carta acquarello ( ho usato quella della Florence)
- distress ink reinkers ( ho usato scattered straw, picked raspberry, mermaid lagoon)
- embossing powders + ink for embossing powders ( ho usato wow Metallic gold sparkle)
- gold ink pad ( ho usato versa color gold)
- pennarello nero

Hello darlings,

today I show you a simple simple but impressive card!
materials needed:
- 3d embossing folder ( I used Beautiful butterflies 3d embossing folder from Spellbinders)
-watercolor paper ( i used the one from Florence)
- distress ink reinkers ( I used scattered straw, picked raspberry, mermaid lagoon)
- embossing powders + ink for embossing powders ( I used wow Metallic gold sparkle)
- gold ink pads ( I used versa color gold)
- black pen


Ho cominciato colorando la carta con i miei 3 inchiostri, mettendo il colore a casaccio e sfumandoli tra di loro. Una volta che lo sfondo era asciutto, l'ho embossato con la placca della Spellbinders. 
Ho passato sulla parte in rilievo il tampone dorato, aspettato che l'inchiostro fosse asciutto e poi ho passato il tampone versamark per le polveri da embossing e poi buttato la polvere della WOW. Ho rimosso con un pennellino d'acquarello pulito ogni eccesso di povere nei punti dove non volevo che ci fosse. 
Per creare lo sfondo nero invece ho colorato con un semplice pennarellino nero tutte le parti che non erano in rilievo.
Spero che vi piaccia, buona serata

I started by coloring the paper with my 3 inks, putting color randomly and blending them together. Once the background was dry, I embossed it with the Spellbinders plate. 
I swabbed the embossed part with the gold pad, waited until the ink was dry, and then swabbed the versamark pad for the embossing powders and then tossed in the WOW powder. I removed with a clean watercolor brush any excess powder in places where I didn't want it to be. 
To create the black background instead, I colored with a simple black marker all the parts that were not embossed.
I hope you like it, have a good evening

Quyen