lundi 27 mars 2023

Happy Spring Card with Lawn Fawn Easter Bunnies

 Hello Everybody 😊

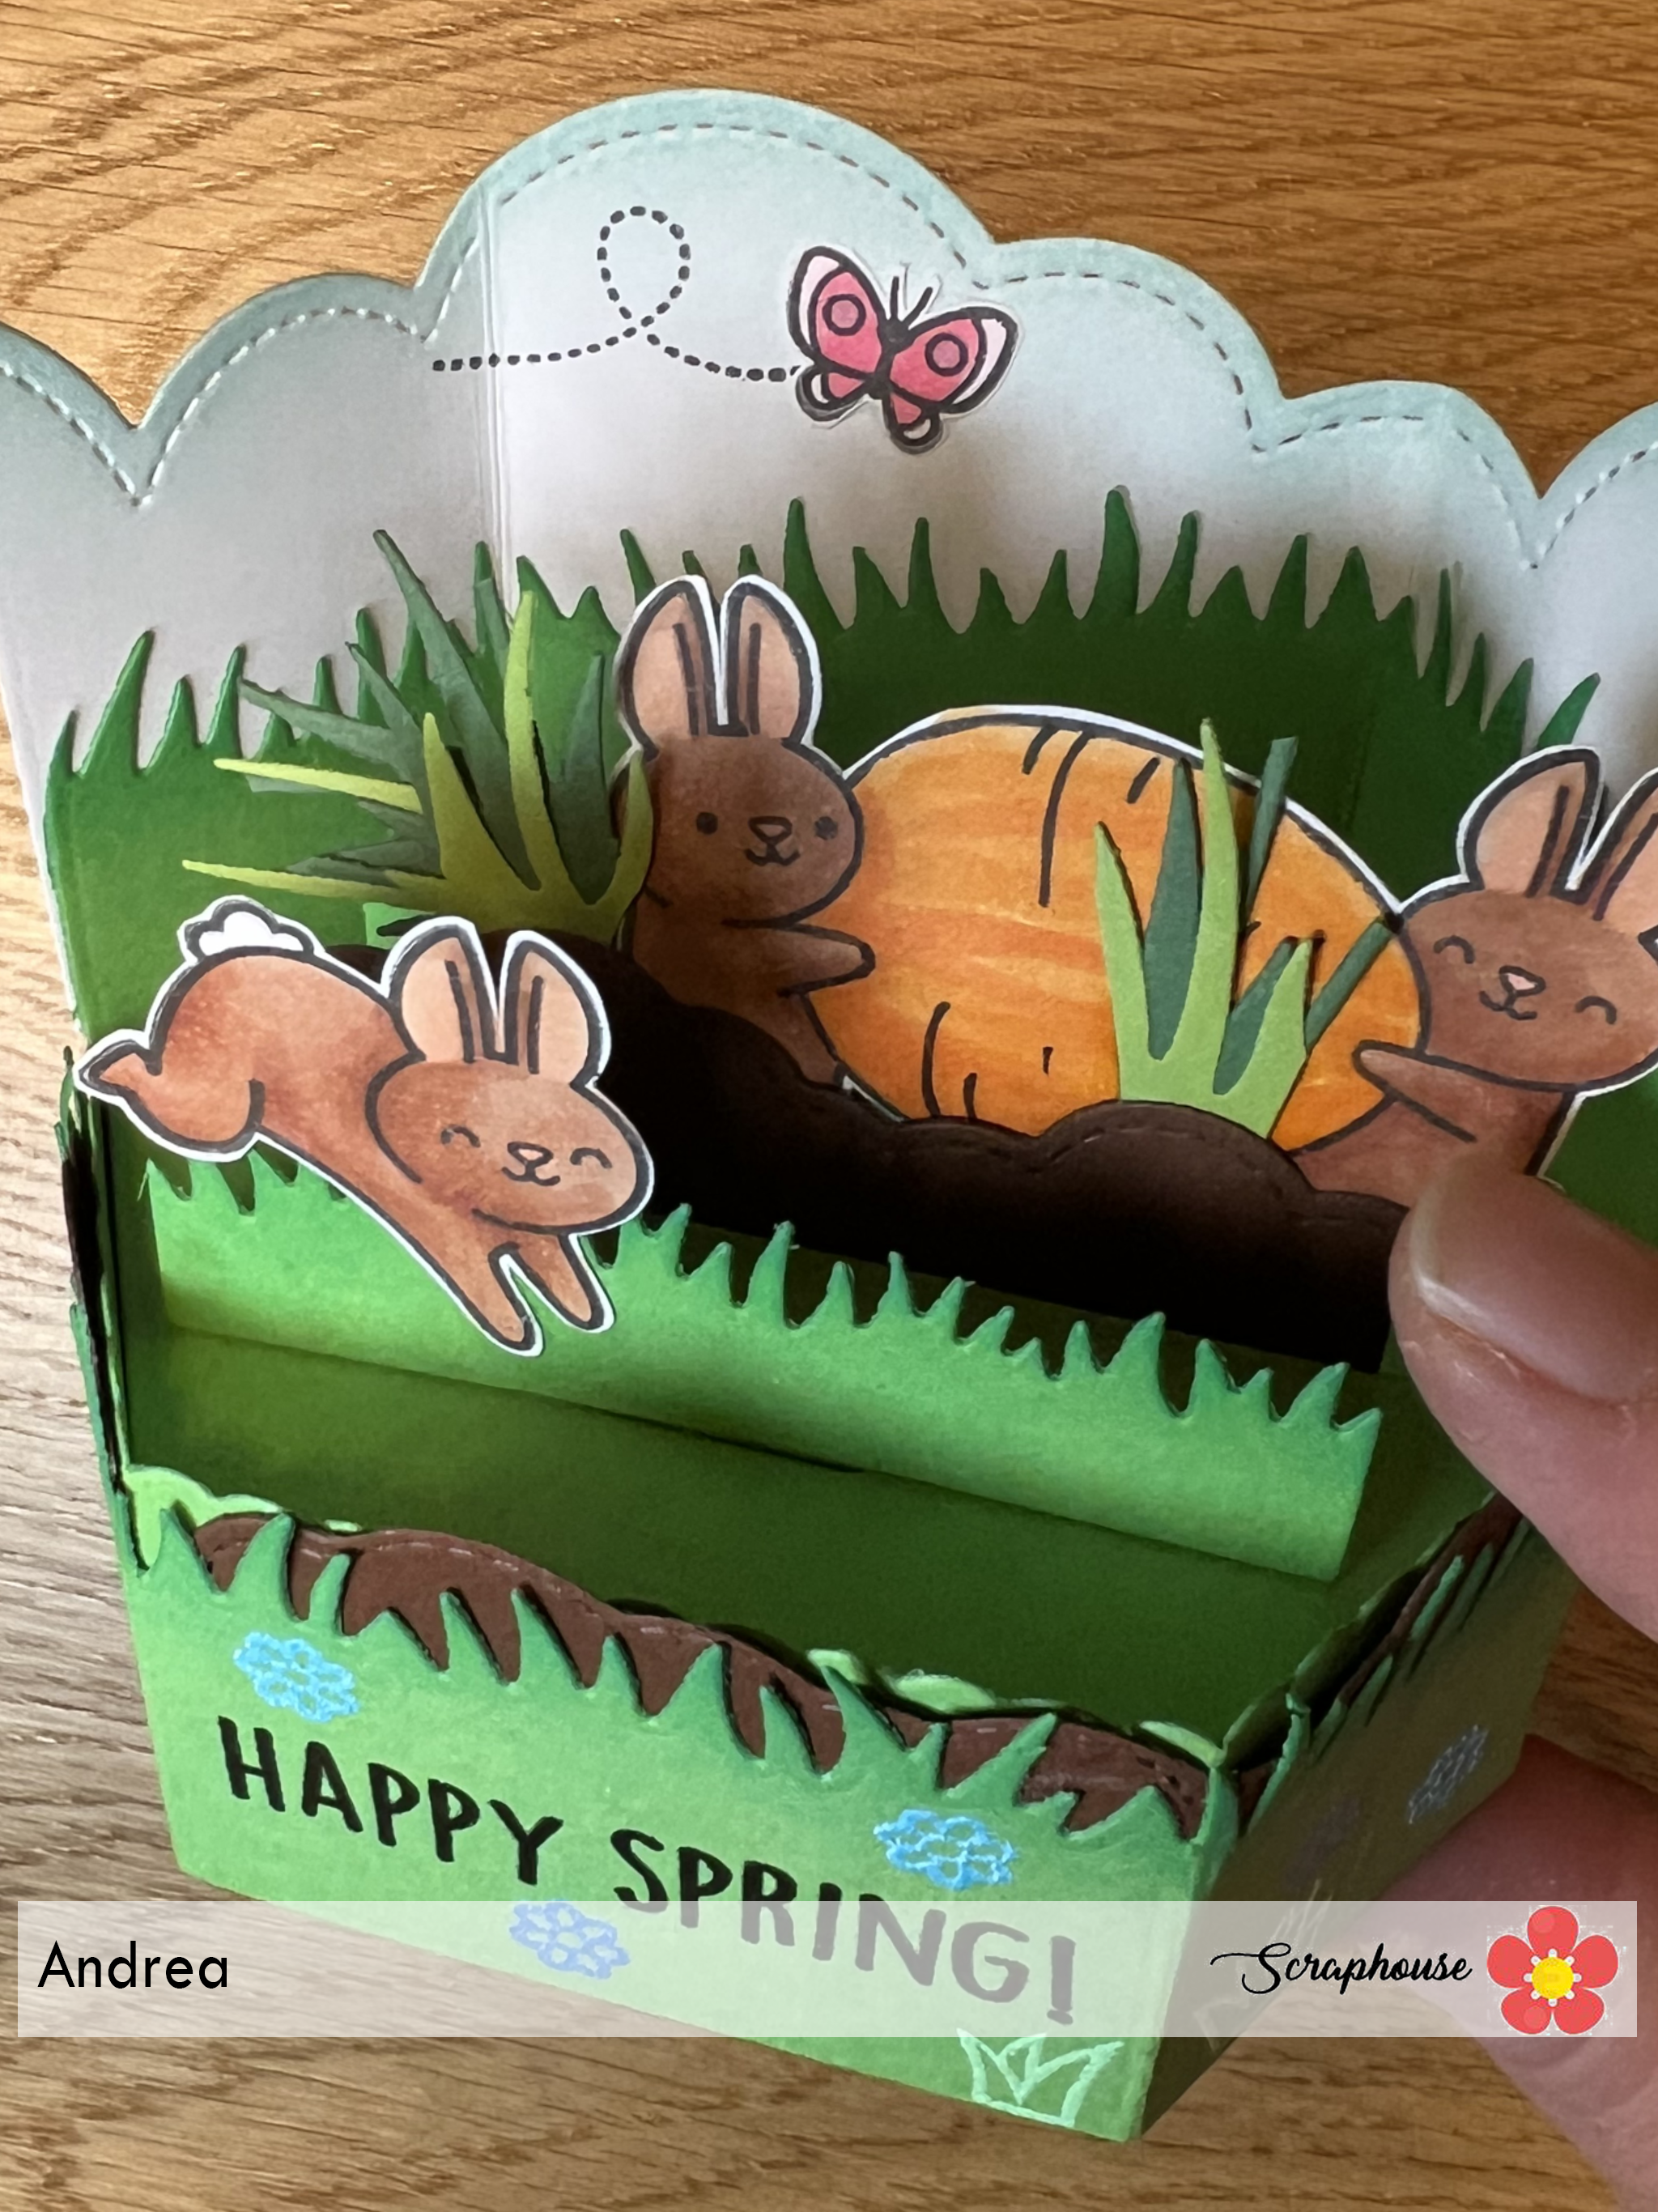
Here is a card where I turned the "Eggstra Ordinary Easter" Bunnies carrying an egg into spring bunnies with a huge carrot.😃

Huhu mitenand 😊

Do e Charte woni d'OsterhĂ€sli vom Set "Eggstra Ordinary Easter" wo es Osterei trĂ€ged i HĂ€sli miteme grosse RĂŒebli verwandlet han. 😃

I used the platform pop-up die, the cloud wrap around where I cut the edges with a grassy border, the cloud inserts for the soil, the grassy border inserts and the background pop up add on I also cut down with the cloudy border.

Do defĂŒr hani d Platform Pop-up Stanze bruucht, wie au d'cloud wrap around Stanze woni aber no mitere Gras Stanze bearbeitet han, dĂ€nn hani die Cloud inserts bruucht fĂŒr d Erde und die normale grassy inserts. Als Hintergrund hani es pop up add on no mit ere cloudy border Stanze in Form brocht.

Then I used some different embossing powders for the „Happy Spring!“ and the flowers on the wrap around.

DĂ€nn hani verschiedeni Embossing Puder usprobiert fĂŒr s "Happy Spring!" und d BlĂŒemli ufem Wrap Around.

I am wishing you a good start into the new week!

Andrea

Ich wĂŒnsch eu ganz en guete Wuchestart!

Andrea

mercredi 22 mars 2023

Sending Health and Happiness

 Buongiorno carissime!

come state? son passate un paio di settimane dal mio ultimo post con i prodotti di Spellbinders... ammetto che sono rimasta un po' bloccata perchĂš ammirando tutte le cards del loro Dt e trovandole perfette, avevo paura di replicare i loro progetti. Oggi sono finalmente pronta a mostrarvi ciĂČ che ho creato. Della collezione mi aveva subito colpito il 4 petal flower 3D embossing folder.

Good morning dears!

how are you? it's been a couple of weeks since my last post with Spellbinders products... I admit I was a bit stuck because admiring all their Dt cards and finding them perfect, I was afraid to replicate their projects. Today I am finally ready to show you what I have created. Of the collection I was immediately impressed with the 4 petal flower 3D embossing folder.


Sono partita embossando un cartoncino color verde salvia e con un tampone color bianco ho colorato le parti in rilievo. In seguito ho usato 2 fustelle del set 4 petal labels etched   per tagliare un cartoncino specchiato dorato della Tonic Studio mirror card iridiscent gold ed un vellum per creare il punto centrale della mia card. 
Ho usato la glimmer hot foil machine per foilizzare le farfalle da Edge butterflies hot foil plate ed il sentiment da Making Me Smile hot foil plate per abbellire la card. Infine ho aggiunto Gold Smooth discs sequins. Voila spero che vi piaccia il risultato finale!
Vi auguro una buona giornata creativa !

I started by embossing a sage green cardstock and using a white-colored pad, I colored the raised parts. Next I used 2 die cuts from the 4 petal labels etched set to cut a Tonic Studio mirror card iridiscent gold card and a vellum to create the center point of my card. 
I used the glimmer hot foil machine to foil the butterflies from Edge butterflies hot foil plate and the sentiment from Making Me Smile hot foil plate to embellish the card. Finally I added Gold Smooth discs sequins. Voila I hope you like the final result !
Have a good creative day !

Quyen


mercredi 8 mars 2023

Tulips hot foil

 Ciaooo a tutti, 

come state? eccomi qui con un nuovo post usando la glimmer hot foil machine! A mio parere il foil da quella bella luce alle card e gli conferisce un tocco magico ed elegante. Se siete interessate, potete dare un'occhiata nello shop sotto la sezione Hot foil per vedere tutti i prodotti disponibili, cliccando qui.

Oggi ho voluto giocare un po'con i nuovi prodotti di Spellbinders Wonderful tulips hot foil plate and die e lo stencil coordinato Layered stencil , dato che era la prima volta che usavo insieme al foil anche lo stencil, perciĂČ ho deciso di foilizzare 4 volte il tulipano con foil di diversi colori dei set Spellbound e Satin Pastel in modo da fare diversi test!

Ho usato 3 tamponi di color rosa da un set di altenew, per colorare i tulipani, ma alla fine il risultato ottenuto non mi convinceva tantissimo, mi sembravano troppo approssimativi.


Hello everyone, 

how are you? here I am with a new post using the glimmer hot foil machine! In my opinion the foil gives that beautiful glimmer to the cards and gives them a magical and elegant touch. If you are interested, you can take a look in the shop under the hot foil section to see all the products available by clicking here.

Today I wanted to play a little bit with the new Spellbinders Wonderful tulips hot foil plate and die products and the coordinating Layered stencil , since it was the first time I was using along with the foil also the stencil, so I decided to foil 4 times the tulip with foils of different colors from the Spellbound and Satin Pastel sets so I could do different tests!

I used 3 pink-colored pads from an Altenew set, to color the tulips, but in the end I wasn't so sure about the result, they looked too sloppy.


Per cui mi sono lanciata a colorarli con i Copic ed il risultato ottenuto mi Ă© piaciuto molto di piĂč...

So I tried into coloring them with Copics and I liked the result more ....


Il sentiment "have a wonderful day" era giĂ  compreso nel set dei tulipano, quindi il ho incollati su un cartoncino effetto tela e incollato qualche abbellimento dorato Gold smooth sequins discs .
Qual'Ă© la vostra card preferita?

Buona giornata 

The sentiment "have a wonderful day" was already included in the tulip set, so the I glued it on a canvas effect card and glued some gold embellishment Gold smooth sequins discs.
Which is your favorite card?

Have a great day


Quyen 


mardi 7 mars 2023

Hello Baby Card with Isha

Hello everyone! Isha here again with a fun interactive card using some new and old Lawn Fawn products. Check out all the Lawn Fawn products in the SHOP


I started by creating my white background layer. I die-cut some cloud borders and sponged distress oxide salty ocean to the edges. Next I made the interactive element from watching the intro video of Pop 'N Pull Tab dies on the Lawn Fawn  youtube channel.

Die-cut a circle, sponge some ink to the center. Die-cut the Moon and Stars Mobile die. Color part of it using copic markers. Assemble it onto the circle and adhere the circle to the interactive tab. Stamp the sentiment and now adhere this panel to a blue card.

Here is how it looks in motion

Thank you for stopping by and have a nice day!


lundi 6 mars 2023

Lawn Fawn Elephant Parade, Hotfoil stamp and Cloud Stencil

 Hello Everybody :)
Another few cards with the new Lawn Fawn release. This time also featuring the Hotfoil stamp and the cloud stencil. The cards are pretty simple but I think they turned out quite cute.

Hallo zusammen :)
Hier noch ein paar Karten mit dem neuen Lawn Fawn Release. Dieses Mal habe ich noch den Hotfoil Stempel und die Schablone mit den Wolken benutzt. Die Karten sind ziemlich einfach aber ich finde sie sind ziemlich herzig geworden.

First I colored the two small elephants and mice from the "Elephant Parade" stampset as well as the elefant and some of those little windmills from the "Elephant Parade add-on" set.
Then I took the hotfoil stamp, heated up my glimmer system and used a pretty blue foil to hotfoil it on my cardstock. Then I used the biggest stitched rectangle from the stackables and cut out my panel. I also cut out some green paper with the rectangle and right away again with the grassy borders. I added some ink blending in "Lucky Clover" Distress Ink on the hills and adhered them on the card. then I mounted the elephant with the flag on some foam pads and adhered that too.

Zuerst habe ich die zwei kleineren Elefanten und MÀuse vom Stempelset "Elephant Parade" sowie der Elefant und ein paar der kleinen WindrÀder vom Set "Elephant Parade add-on" koloriert.
Danach habe ich den Hotfoil Stempel vorbereitet, mit dem Glimmer System aufgeheizt und dann mit einer schönen blauen Folie auf das Papier gehotfoilt. Danach habe ich die grösste Stanze aus dem Set "Stitched Rectangle Stackables" genommen  und damit meinen Hintergrund zugeschnitten. Desweiteren habe ich grĂŒnes Papier mit derselben Stanze zugeschnitten und gleich noch mit den "Grassy Borders" weiter bearbeitet. Die grassigen HĂŒgel habe ich mit "Lucky Clover" Distress Ink etwas eingefĂ€rbt. Danach habe ich sie auf den Hintergrund geklebt und den Elefant mit der kleinen Flagge auf 3D Pads ebenfalls auf der Karte festgemacht.
After cutting the cardbase I folded the leftover pieces and thought that I could use those as cardbase for two smaller cards. So, I took the cloud stencil and Yeti white ink from Lawn Fawn and with the help of a toothbrush added those clouds onto my cardbase. Then I cut some more grass borders, ink blended them a bit and adhered them to the card. Then I added the windmills, mice and elephants. I only mounted the elefants on 3d foam pads, the rest I glued directly on with some wet glue.
And finished! :)

I am wishing you a lovely day and thank you so much for stepping by and as you are already here, you could also visit the store. ;)
Hugsy
Andrea

Nachdem ich die Kartenbasis zugeschnitten hatte, habe ich die ĂŒbrigen Teile des Papiers in der HĂ€lfte gefaltet und gedacht, dass ich daraus noch zwei kleinere Karten machen könnte. Also habe ich die Wolken Schablone sowie das Yeti weisse Stempelkissen hervor geholt und mit einer ZahnbĂŒrste die Wolken aufgetragen. Dann habe ich noch weitere "Grassy Borders" zugeschnitten mit etwas Tinte bearbeitet und danach auf der Karte befestigt. Dann habe ich die kleinen WindrĂ€der, MĂ€use und Elefanten aufgeklebt. Die 3D Abstandspads habe ich hierbei nur fĂŒr die Elefanten verwendet und das andere mit normalem FlĂŒssigleim aufgeklebt.
Et VoilĂ  schon fertig! :)

Ich wĂŒnsche euch einen schönen Tag und bedanke mich fĂŒrs Vorbeischauen und wenn ihr schon hier seit, besucht doch den Shop gleich auch  noch. ;)
Liebi GrĂŒessli
Andrea

mercredi 1 mars 2023

Easel Card

Buongiorno creative,
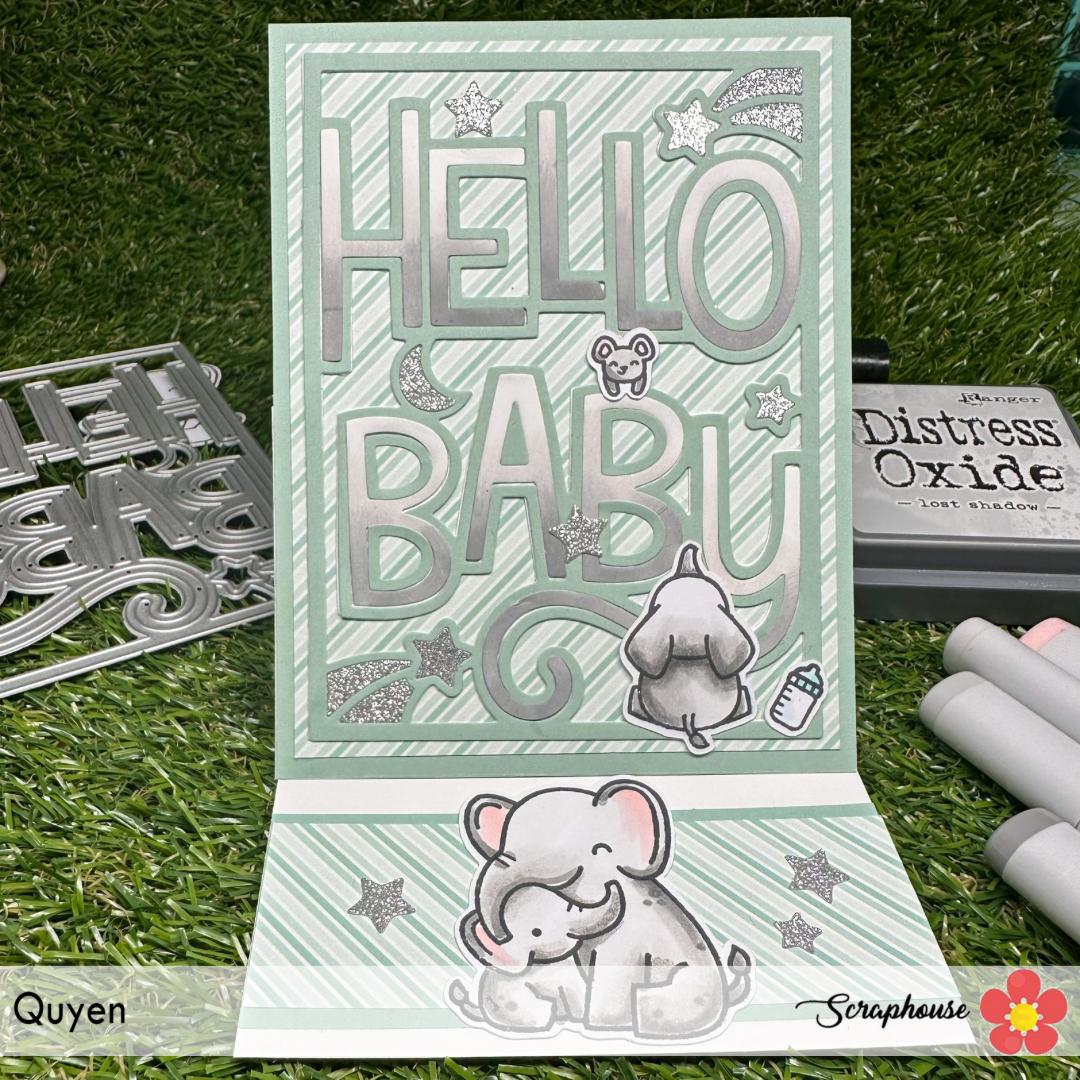
eccomi qui di nuovo con una card nascita! Quando ho visto la Giant dies outlined Hello Baby della Lawnfawn l'ho voluta avere assolutamente per creare card nascita semplici e veloci per quando mi sarebbe mancato il tempo per colorare. 


Good morning creative,
here I am again with a birth card! When I saw the Giant dies outlined Hello Baby from Lawnfawn I absolutely wanted to have it to create quick and easy birth cards for when I would run out of time to color.


Cominciamo dalla facciata della card, ho fustellato il Giant dies due volte, una con la carta verde tiffany e un'altra con la carta bianca. Ho tenuto le lettere che compongono la scritta hello baby con la carta bianca e le ho colorate usando la spugnetta da dito con Distress ink hickory smoke e l'oxide lost shadow.

Starting with the front of the card, I die-cut the Giant dies twice, once with tiffany green paper and once with white paper. I kept the letters that make up the word hello baby with white paper and colored them using the finger sponge with Distress ink hickory smoke and lost shadow oxide.


Ho incollato tutti i pezzi su un foglio a righe dal nuovo pad Stripes 'n sprinkles petite paper pack. COn i copic poi ho colorato l'elefantino e il topino dal set Flight high 

Una volta finito la copertina della mia card son passata a creare la struttura della Easel card con le misure standard. Ho tagliato un foglio bianco a 4 1/4 inches  ed a 11 inches. Poi ho cordonato a 5 1/2 ed a 2 3/4 inches. Ho incollato la mia card al pezzoo che misura 2 3/4.


I glued all the pieces onto a striped sheet from the new Stripes 'n sprinkles petite paper pack pad. With Copics I then colored the little elephant and mouse from the Flight high set

Once I finished my card cover I moved on to creating the easel card structure with the standard measurements. I cut a blank sheet to 4 1/4 inches and 11 inches. Then I scored at 5 1/2 and at 2 3/4 inches. I glued my card to the piece that measuring 2 3/4.


Come saprete l'easel card ha bisogno di uno stopper e quindi no colorato la coppia di elefanti dal set Elephant parade  e l'ho incollato all'interno della card.
As you know the easel card needs a stopper and so no colored the pair of elephants from the Elephant parade set and I glued it inside the card.


Spero via sia piaciuta, alla prossima,

I hope you liked it, see you soon,

Quyen

mardi 28 février 2023

Baby Card with Isha

 Hello everyone! Long time, sorry I had some personal things going on. Anyhoo, I made this cute baby girl card using some of the new Lawn Fawn products. Did you check them in the shop yet? There are still some in the shop so check it out :)

I love this new die "Moon and Stars Mobile" and the rainbow stencil "Corner Rainbow stencil". I also used the Stitched Rectangle die, Clouds Border die and the Quinn's ABCs dies.


I started by sponging some Ranger distress oxide inks through the stencil onto white cardstock. Die-cut using the stitched rectangle die. Die-cut the mobile using a glitter card. Die-cut the small elements from white card and color using copic markers. Add some shine using clear glitter pen.


Die-cut the cloud border, adhere to the bottom of the mat layer. Die-cut the alphabets for "baby" in white and black. Adhere the black behind the white slightly off set. Adhere everything to a pink cardbase.

If you don't have the exact products, you sure will find substitute from other companies in the shop.

Thank you for dropping by and have a nice day!

lundi 27 février 2023

Pull 'n Pop interactive dies and Elephant Parade stampsets

 New Lawn Fawn Release Spring 23

Hello Everybody

I had the pleasure to playing with the new Lawn Fawn release fresh out of the box! :)

I used the adorable elefants and the sentiment from the stampset "elephant parade" and the ballons from the "elephant parade add on" stampset. 

Also I used the interactive die cut set "Pull 'n Pop Pull Tab Dies" and the "Platform pop-up cloud inserts" in a different manner (not on a platform pop-up card ;)).

I do love some 3D elements so I added some string to the ballons which hang down when you open the card up. 

Et voilĂ  that is my first card with those just recently unpacked Scraphouse.ch goodies!

Thank you for stepping by and I hope you are having a lovely day! 😘

Huhu Mitenand

Ich han hĂŒt freudig chöne mit dĂ€ frisch uspackte Sache vom neue Lawn Fawn Release umespiele! :)

Ich han die zwei herzige Elefante und au dÀ Spruch vom Stempelset "elephant parade" gnoh und mit dÀ Ballöön vom "elephant parade add on" Stempelset ergÀnzt.

DÀnn hani das interaktive Set "Pull 'n Pop Pull Tab Dies" und die "Platform pop-up cloud inserts" chlin andersch benutzt als dÀnkt wÀred (ebe nid ufere Plattform pop-up Charte ;)).

Ich han 3D Element sehr gern und han drum no chli Fade ad Ballöön anegmacht wo dÀnn so abehanged wÀme d Charte ufmacht.

Und scho isch diĂ€ erschti Charte mit dĂ€ tolle Sache usem Scraphouse.ch PĂ€ckli vo hĂŒt fertig.

Merci vielmol fĂŒrs verbii luegĂ€ und ich hoff Du hĂ€sch en guetĂ€ Tag! 😘


samedi 25 février 2023

Hello Baby

 Ciao a tutti, 

spero che stiate bene! Sono felice che stasera finalmente ho trovato tempo di giocare con i nuovi prodotti della release di Lawnfawn! Questa volta mi son dovuta trattenere a non comprare tutto, ma nonostante ciĂČ adoro tutti i prodotti!


Hi everyone, 

I hope you are all doing well! I'm glad that tonight I finally found time to play with the new products from the Lawnfawn release! This time I had to restrain myself from buying everything, but nevertheless I love all the products!


Ho usato la fustella Dotted Moon and stars backdrop , ricavando questo sfondo bellissimo con le stelline e le piccole lune. Dato che volevo ricreare il cielo, grazie alla fustella Cloud Borders ho ricavato una nuvola per ricoprire la parte in basso della mia card. Mi piaceva anche l'idea di incorniciare la scena della card e quindi ho usato la fustella della misura piĂč grande del set Stiched rectangle frames con la carta glitter argento ed il rettangolo avanzato dal taglio, ho ricoperto il retro dello sfondo.
Ho colorato i timbri del set Fligh High, ed anche la scritta Baby con i Copic.
Ho timbrato la scritta "Hello" con la nuova plancia Henry jr.'s ABCs


I used the Dotted Moon and stars backdrop die cut , making this beautiful background with the little stars and moons. Since I wanted to recreate the sky, thanks to the Cloud Borders die cut I obtained a cloud to cover the bottom part of my card. I also liked the idea of framing the card scene, so I used the largest size die cut from the Stiched rectangle frames set with silver glitter paper and the leftover rectangle from cutting, I covered the back of my card.
I colored the stamps from the Fligh High set, and also the "Baby" lettering with Copics.
I stamped the "Hello" inscription with the new Henry Jr.'s ABCs stamp set.


Infine ho aggiunto della pailletes argento per decorare la card. Spero vi piaccia il risultato!
Vi auguro buon weekend, 
un abbraccio 

Finally, I added silver sequins to decorate the card. I hope you like the result!
Have a great weekend, 
a hug Quyen


mardi 7 février 2023

Peek-a-Boo Welcome Baby Card

 Peek-a-Boo Welcome Baby Card

Peek-a-Boo Willkommen Baby Karte


Scroll to the end of the post to see the card in action. 😊

Scrolle ans Ende des Posts um die Karte in Bewegung zu sehen. 😊

You need 3 Panels
You can make them with different measurements, place the window somewhere else and make it open sideways. Just try out where the window can be placed once you understand the mechanism of the card. (It is easier to show in a video than describe it 😉)

Du brauchst 3 Lagen (ich weiss das deutsche Wort nicht fĂŒr Panel.đŸ€“)
Du kannst unterschiedliche Masse benutzen, das Fenster irgendwo anders platzieren oder die Karte seitwĂ€rts drehen. Experimentiere mit dieser Kartenform sobald Du die Mechanik davon verstanden hast. (Es wĂ€re einfacher die Kniffe in einem Video zu zeigen als hier zu beschreiben 😉)

        Front View:                                                            Backview:
        Von Vorne:                                                             Von Hinten:
When you place the bottom lines of the front and the middle panel flush the windows should be identical. Also when you fold the middle part the windows need to be at the same spot. So when you put them all together you would have a neat Peek-a-Boo window.

Wenn Du die Titelseite und den Mittelteil unten bĂŒndig hinlegst mĂŒssen die Fenster auf derselben Höhe sein. Die mittlere Lage gefaltet hat die Fenster auch auf derselben Höhe somit entsteht ein sauberes Peek-a-Boo Fenster wenn alle Lagen ĂŒbereinander gefaltet werden. 

From left to right:
Front Panel: 10.5cm x 20cm score at 5.5 cm
On the back of the flap add the sentiment or image you want to appear when you open the card. Make sure to face it in the right direction. Use the other panel to line it up as shown further down.

Von Links nach Rechts:
Titelseite: 10.5cm x 20cm falzen bei 5.5cm
Der Spruch oder das Bildchen auf der RĂŒckseite der Klappe erscheint wenn man die Karte öffnet. Pass auf, dass sie in die richtige Richtung zeigen. Benutze die mittlere Lage um den Stempel oder das Bildchen zu platzieren, ich zeige dies ein bisschen weiter unten.


Middle Panel: 10.5cm x 21cm score at 10.5
I added some nice frames on this panel, it is the same one I adhered on the front of the frontpanel. In order to still see them once it is all adhered you need to fold those frames to the inside.

Mittlere Lage: 10.5cm x 21cm score at 10.5
Ich habe ein paar hĂŒbsche Rahmen auf der mittleren Lage sowie auf der Titelseite befestigt. Diese Rahmen sollten am Schluss noch zu sehen sein. Das heisst diese Lage wird mit den Rahmen nach innen gefaltet.


Backpanel: 10.5cm x 14.5cm
This contains the sentiment or image you see when the card is closed.
Add some score tape at the bottom edge.

RĂŒckseite: 10.5cm x 14.5cm
Dies beinhaltet Bild oder er Spruch, den Du siehst, wenn die Karte noch verschlossen ist.
FĂŒge etwas Score Tape an die untere Kante.


I did all the stamping and adhering of patterned paper before the assembling. Just pay attention when you stamp on the backside of the frontpanel to line them up correctly:
As we are holding the panels upside down, you need to line them up on top. Take the middle panel and put it over the top panel, line up one of the windows and use the other window as a guide for the stamp alignment.

Ich habe alles stempeln und verzieren vor dem Zusammenbau der Karte erledigt. Aufpassen muss man nur, dass man an die richtige Stelle stempelt. Dazu musst Du die Titelseite und die mittlere Lage korrekt ausrichten. Wir halten die Kartenteile hier auf dem Kopf also mĂŒssen die oberen Kanten hier bĂŒndig sein. Oder Du bĂŒndelst die Öffnungen und kannst dann das untere Fenster als Stempelhilfe benutzen. 


Then glue on the middle panel to the front panel so that the openings are overlaping and the frames are still visible.

Danach leimt man das mittlere Teil mit der Titelseite zusammen. Rahmen nach innen geklappt und die Unterseiten bĂŒndig.


Take the lining of the score tape and adhere the backpanel flush to the middle panel.

Klebe nun noch die RĂŒckseite bĂŒndig mit der mittleren Lage zusammen.


Fold the card correctly and you are done! 😃

Falte die Karte korrekt und schon bist Du fertig! 😃


I hope you can follow my explanations!
Thank you so much for stepping by.
Have a lovely Day!
Andrea

Ich hoffe Du kannst meinen AusfĂŒhrungen folgen!
Herzlichen Dank fĂŒrs Vorbeischauen.
Ich wĂŒnsche Dir einen gemĂŒtlichen Tag!
Andrea


And here it is in motion:
Und hier die Karte in Bewegung: